Blendmorph: Animations
Please watch the video presentation
How it works?
BlendMorph is created inside the program Blender and offers the possibility to create morph animations between 2 images.
The program generates transitions of type morph with the help of the points added to an image which corresponds to another image. Those points are associated to both images, but with the possibility of individual moving the location in window "Image 2".
When the animation is rendered, the points associated with both images intersects and automatically generates the morph animation.
Cycles/Eevee Nodes/Import images:
It is recommended the use of images with similar zones.
After the import of both images, you have the possibility of repositioning and scaling the image individually inside the nodes with the help of slides beside the Image1 and Image2.
Background Color node group offers the possibility to change the background color.
Camera resolution and image proportions:
Setting and manipulating the camera and also the resolution and proportion of the even images will be done only in the window Final Image.
After setting the camera resolution from Blender, which should correspond with the resolution and original proportion of the images, the image will be resized manually after the proportion of the camera, where you will have the liberty to move and resize the image.
It is recommended to use images with similar proportions before importing.
If you want to zoom with the camera, select the camera from the window Final Image into Camera settings adjusting Orthographic Scale.
Edit the points for morphing:
The points can be edited only on frame 0 and by using the hotkey G you can move them on screen.
Set the proportion and the size of the images before beginning of placing the points for morphing.
The points for morphing are bones from Blender who moves individually from window Image 2 and then you can reposition them in the window Image1.
Normally, the points are placed on specific places like nose, nostrils, eyes, eyebrows, lips, chin, but also on the line of the face.
Sometimes, when the images are not suitable in some places or the perspective is too different, it is recommended not using the points in those areas, practically leaving a softer transition area.
Also, it is recommended that the subject for morphing is not positioned next to the margin of the image or right on the margin.
The size of the points can be changed for morphing by modifying the size of the green point named Size from the window Image2.
The program supports until 380 points available on both images.
You can manipulate simultaneously more points with Border Select, key B, scale, rotate and move.
In the case when there are too many points involved, they can be moved back to Inactive zone from where you take it.
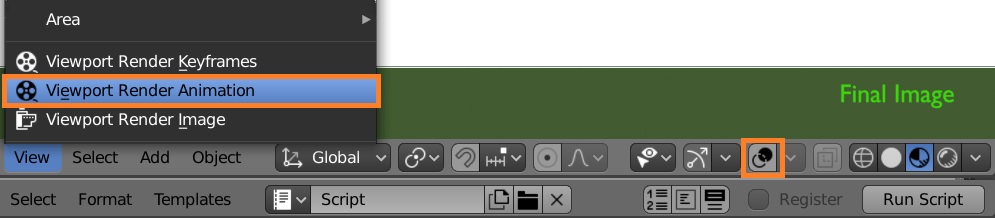
Run the script and Render:
After placing the morph points, press the button Run Script  and render/preview the animation in Cycles or Eevee, beginning from the frame 20 in the Final Image window.
For modifying the time of the animation, the DopeSheet keyframe marked with End it will be moved and then from the timeline, you can set the End of the animation.
At the current moment the rendering is only supported from “Viewport Render Animation” in the Final Image window as example below.
Discover more products like this
BlendMorph picture dev-fund image spring23 winter24 summer23 bfcm23 pictures tool photo morphing morphing blender blend 2d photo animation Morph Animation Blender Market photo picture animation Morph summer24 Blend Morph 2.8 bcon22 eevee bfcm24 transition transitions Cycles photo morph animation photo transitions summer22 bfcm22 CGcookie Markets masterblender spring24 visual effects image animation