Wireless Addon - Cables Made Easy
1) Installation
Once downloaded the .zip file, open Blender and go to File > User preferences . Into the Add-ons TAB, click on Install from file... and select the .zip file.
For Blender 2.8 use the *280.zip file
Once installed, enable it within the add-ons list. It is located in >3D View:Wireless
2) Creating Cables
Now you have a new tab in the 3d View Tools Shelf called Wireless, and if you have a curve selected you can turn it into a cable.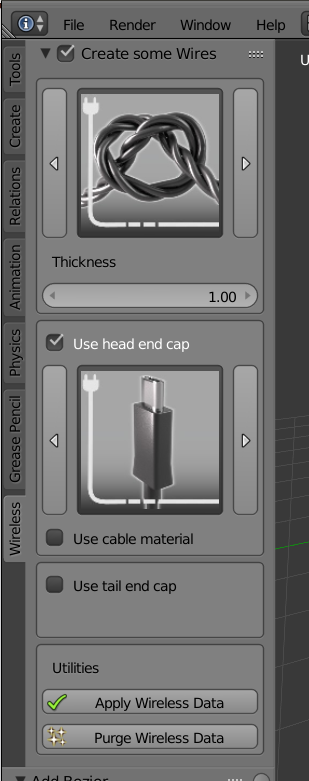
Turn the curve into a cable by clicking on the Create some wires button.
After this, you can choose the type of wire you want and if you want to have end caps, enable them by clicking the relative button.
Even if cables are made at 1:1 scale, you might need thicker (or thinner) cables. The thickness slider allows you to set up that.
The head end caps allow you to put an end cap on one extremity, and the Tail end cap on the other.
Use the left and right buttons to swap the end caps or click on the image and choose from the collection.
3) Editing the curve
If you want to alter the size or the shape of the cable, you can do this through the curve. Switch to edit mode and manipulate the control points at your will. Subdivide, extrude, rotate and move to get to the desired shape.
The Root Control Point
The root control point is the first point of the curve. When you move this around, the cable will start to go crazy. Don’t panic! Position the point where you want it and then just switch back and forward choosing a different cable type so the geometry is recalculated. The cable will snap back in place.
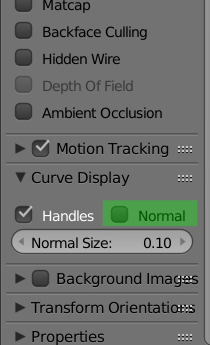
Tips for a better UX
Disable the normals display of the curve. Most of the time they are a big pain.
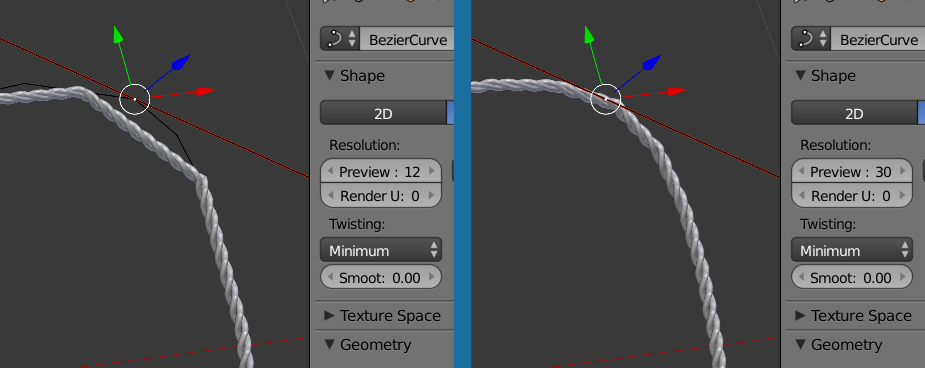
Increase the resolution of the curve. With the default resolution of 12, the cable seems broken. Increase the resolution until you have the desired result. Try to find a compromise between control points and resolution of the cable. For example having a Resolution of 60 between two points, you can use Resolution 30 and subdivide the two points.
4) Materials Handling
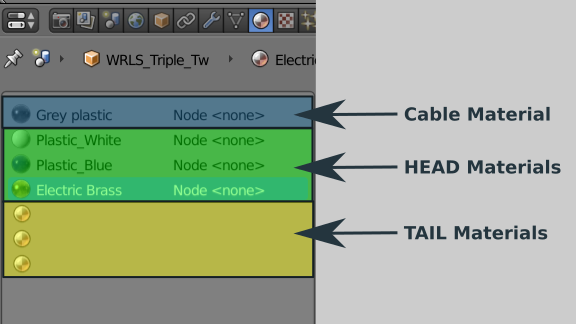
The new created cables have 7 material slots which are distributed like this:
Note:
Each time you change the end types or cable the materials used by them are deleted unless you have assigned them to a fake user. If you want to edit a material or replace it with one existent you have to assign it to a fake user or just assign it to another object. Doing this, the material is saved and you can use it later on.
For the extremities, you have the option to assign them the material used by the cable. This will replace the first material of the end cap with the cable one in such a way that it creates a more homogeneous cable. Play a bit with it and see the results.
5) Utilities
Apply Wireless data - will transform the cable into a unique mesh not responsive anymore to the Wireless controls.
Purge Wireless Data - I’ve left this button in case that something went wrong with the curve ( Yes, it is the first public release) It will delete the wireless data from the curve and the cable components.
6) Add custom parts
You can create your cables and head parts adding them to the library.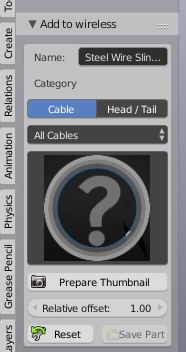
If you select a mesh which hasn’t been yet added, the Add to wireless panel will show you the available options:
Give a distinctive name to the part
Select between cable and head/tail
Add a category. If you leave All Cables it will save it only in this category. If you choose a different one, the part will be available prosing both the All Cables and the chosen one.
Prepare thumbnail will create a thumbnail for the part. Attention!! The thumbnail preparation works only with cycles materials.
If you are happy with the thumbnail hit Save Part, otherwise, Reset.
At this point, you should have the part available to use.
Even if I tried to make the process as simple as possible there are a few rules that you need to take in consideration when creating new parts:
As every good modeler, apply the scale when you are happy with the size.
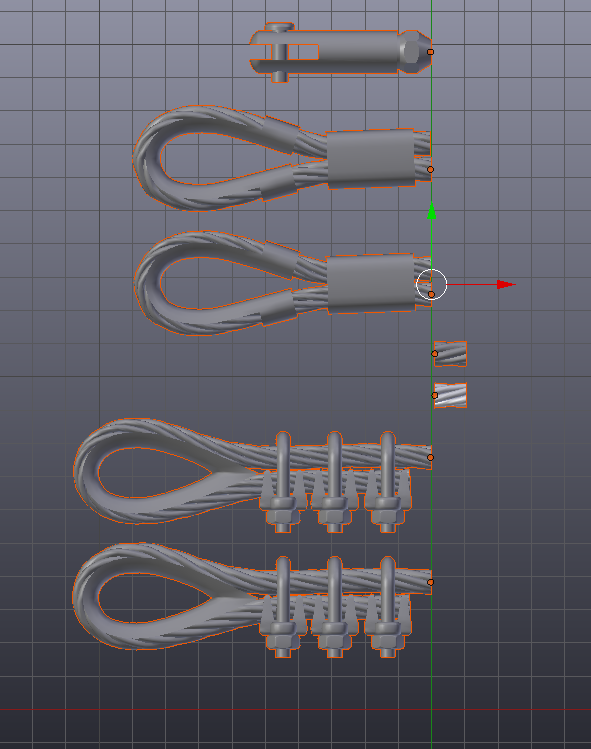
The orientation of the head and tail parts needs to be all geometry to the left (-x) looking from the top view.
The geometry for the cables needs to be all to the right (+x) for the cable parts.
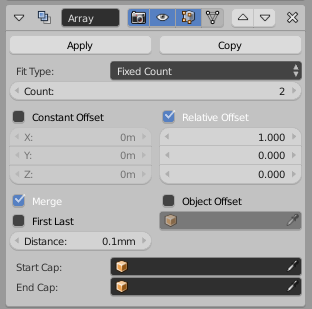
You can test the welding between the cable segments adding an array modifier with Merge enabled and a distance of 0.1mm
Control if the segments are looking good all around and if there are not unwanted deleted vertices.
For cables, you might want to have a relative offset, different than 1. Think about chain parts or some necklaces… test and find the best value for the offset and adjust the Relative Offset in the Add To Wireless panel to match it.
Before preparing the thumbnail and saving the part, remember to remove this array modifier.
There is a limit for the number of materials allocated for each part, more exactly: 1 material for the cable and max 3 materials for the head parts.
7) Edit custom parts
Edit custom part allows you to browse the custom-made parts and erase them.
8) Export / import
The export and import of custom parts were initially made with the ability to update the addon without losing them but you can use this feature as a tool for exchange and increase the number of available parts.
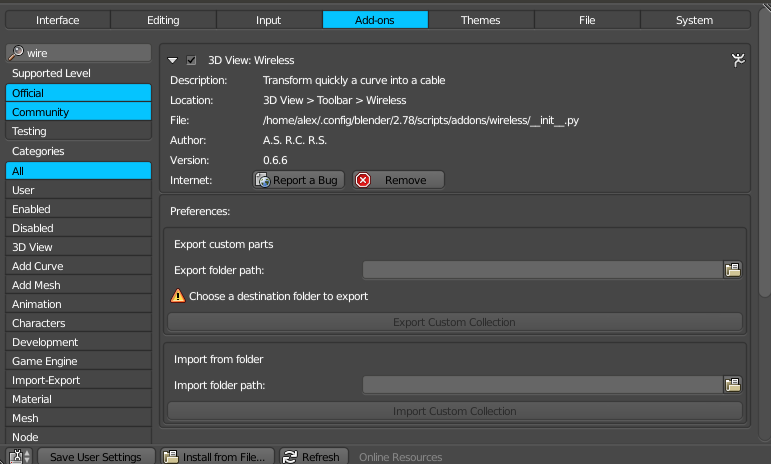
Export:
Choose a folder where you want to export the parts.
Hit Export Custom Collection
Import:
Select the folder containing a custom collection
Hit Import Custom Collection
9) Bug reports
I would be very happy to get feedback from you about any bugs you find. This will help me to give you better product updates, so you can get the most of it.
Send me a direct message, if possible include the blend file and replicate the steps you have done to make it happen.
Enchantments - any suggestions are more than welcome. I’ll do my best to make them happen.