Ultimaze [Pro]
UltiMaze [Pro] Documentation
(Don't worry, you won't need to know all of this before you get started building, and this user manual covers all of the features/settings. However, if you want to get off on the right foot, this document is highly-recommended reading. Hopefully, it isn't too boring.)
Installation
This add-on is very straightforward to install, as there isn't really anything special that you have to worry about. Nevertheless, let's quickly go over the steps (skip this section if you already know how to install add-ons).
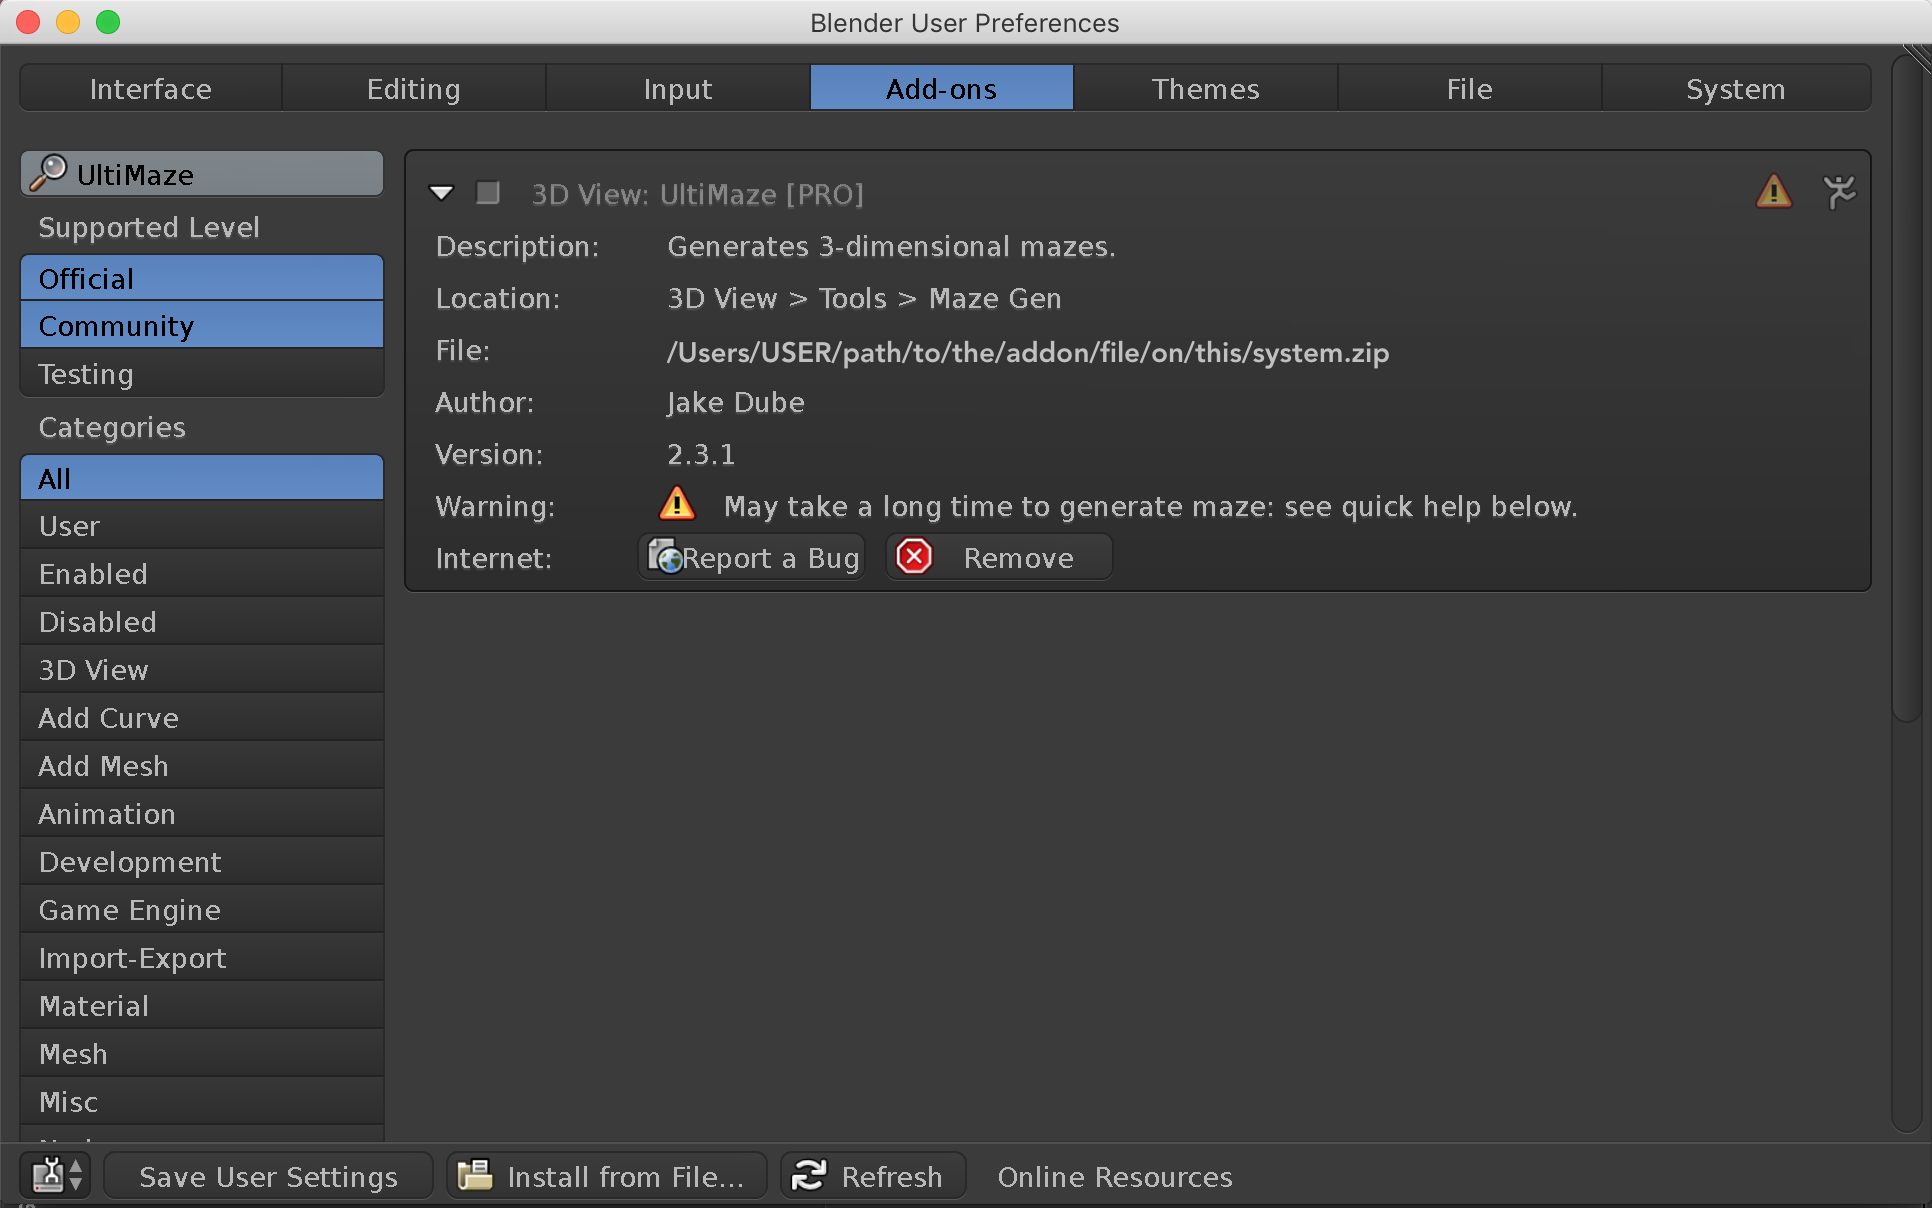
- Open Blender's user preferences by going to File > User Preferences, then click the Add-ons tab at the top.
- Click Install from File at the bottom of the user preferences window and navigate to the zip file (not the contents of the zip, but the zip itself).
- Select the zip, then click the Install from File... button in the top-right.
- If everything went smoothly you should see something like the below picture. Just check the small gray box to the left of the add-on's name ("UltiMaze [Pro]"), and click Save User Settings in the bottom left.
Maze Generator Panel

Generate Maze - Generates a maze based on the settings in UltiMaze panels. This will generate a 3D maze if Generate 3D Maze is enabled.
Width - The width of the maze when viewed from the top (all mazes are rectangular).
Height - The height of the maze when viewed from the top (all mazes are rectangular).
Generate 3D Maze - Whether or not to generate a 3D maze. Most of the time you will want this enabled when building 3D mazes, but there are times when you might not. See the section on the Image Converter panel for more information.
Allow Loops - Whether or not to allow loops in the maze (note that this is an aftereffect and still has influence when you are building a 3D maze from a text block. See the section on the Image Converter panel for more information on generating mazes from text blocks.

Chance - The chance that UltiMaze will add a loop to the maze where it detects that it can. Note that this is a 1/x chance, so
higher values = less of a chance that it will add a loop (which generally translates to less loops being added.
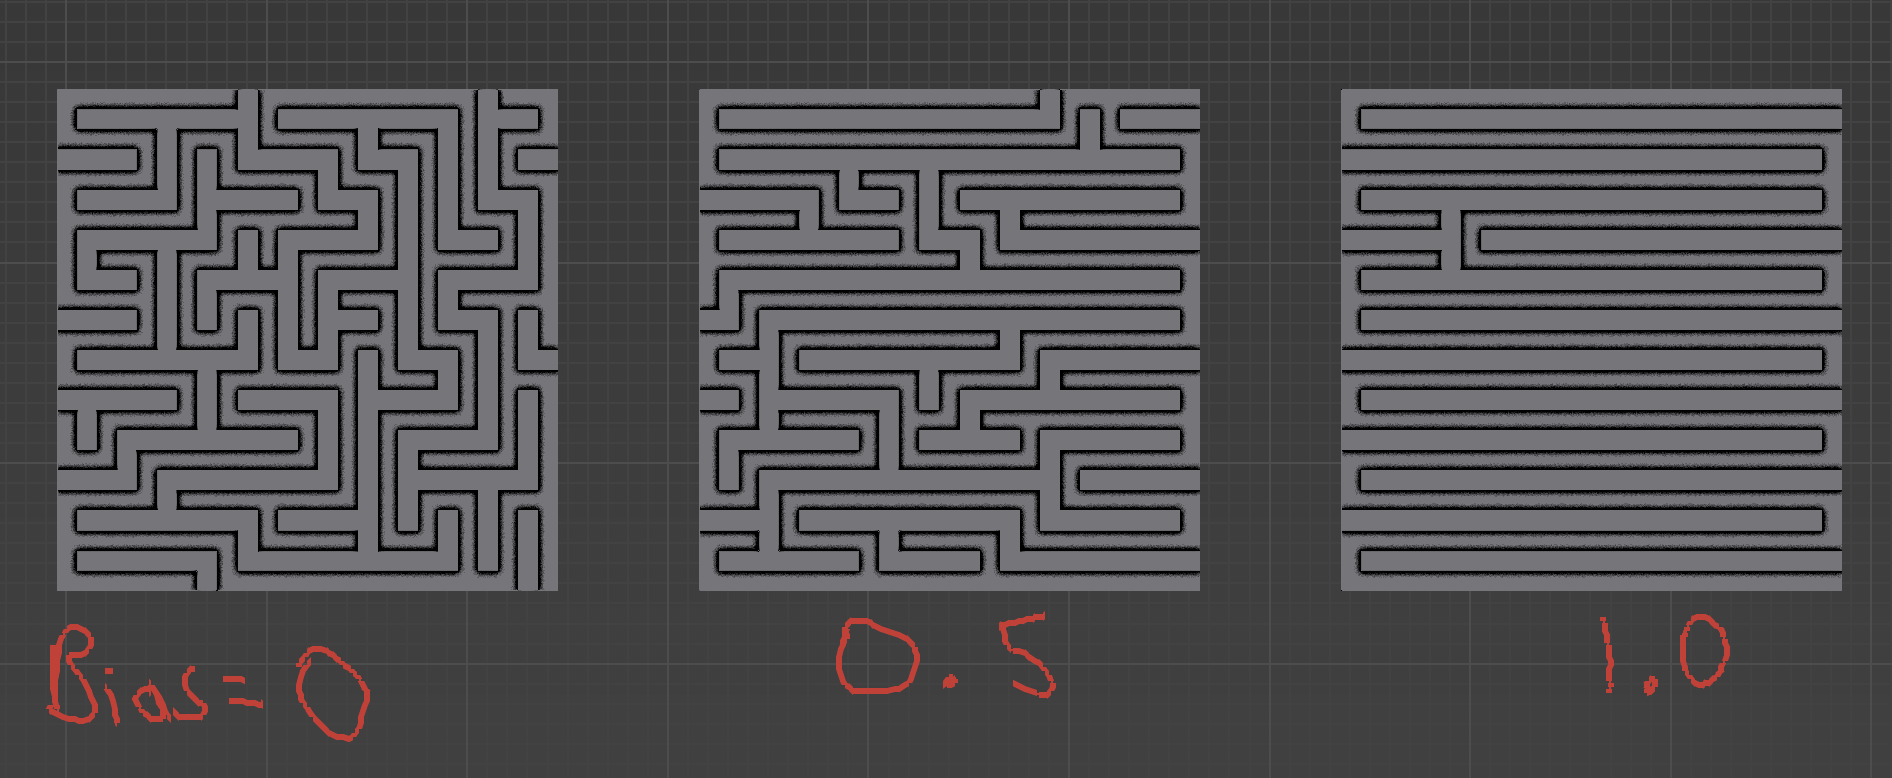
Algorithm - The algorithm for UltiMaze to use when generating the maze layout. Each will produce mazes with different properties such as bias, ease-of-solving, etc., but they also take different amounts of time to generate. Eller’s is about twice as fast as Binary Tree which is about twice as fast as the rest (Kruskal’s, Depth-First, Breadth-First, and Prim’s). Here is an example image showing the basic shape that the different algorithms will create.

Bias Direction - The direction of the bias (up/down=y and left/right=x). If set to Random, the x or y is randomly chosen each time UltiMaze generates a new maze.
Bias - The amount of directional bias to the layout generation.
Binary Tree Direction - The bias direction for the Binary Tree algorithm. This is based on diagonals from each of the four corners and the choices are named accordingly. Notice that after generation of a Binary Tree maze, there is always one corner that you could walk from to the opposite corner without ever running into a wall (there is no backtracking required). This is due to the nature of the Binary Tree algorithm.
Tileable - Whether or not the maze (generated using the Binary Tree algorithm) is tileable. This is a super cool feature when you put an array modifier on the maze after generation and get one massively huge maze very quickly.
Generate Maze From List - Chooses whether or not to generate a maze using one of the maze text blocks in the text editor (a text file with 1’s and 0’s marking the paths and walls). If disabled, the layout settings described above will take effect. Note that when this is enabled the layout settings are grayed out to show this.
List Maze - The text block to use as the list maze when using Generate Maze From List. This should be a text file with 1’s and 0’s indicating paths and walls, and the number of characters should be equal to the Width x Height of the maze settings. For example, if the width and height are set to 25x25, there should be 625 characters (1’s and 0’s) in this file.
Write List Maze - Whether or not to write the generated maze to a text block. This will auto-generate the 1’s and 0’s maze text file otherwise known as the List Maze.
Image Converter Panel
This is a very useful panel for if you want to build 2D (image) mazes or if you want to build a 3D maze using a pre-built image maze. Gimp, for example, can generate 2D mazes that you can edit by painting black and white pixels. This can then be fed into UltiMaze for 3D mesh building. The image maze in the picture at the bottom of this section shows a correctly built image maze. The maze Width is set to 25 as is the height, and the image maze has 25x25 pure black and white pixels.
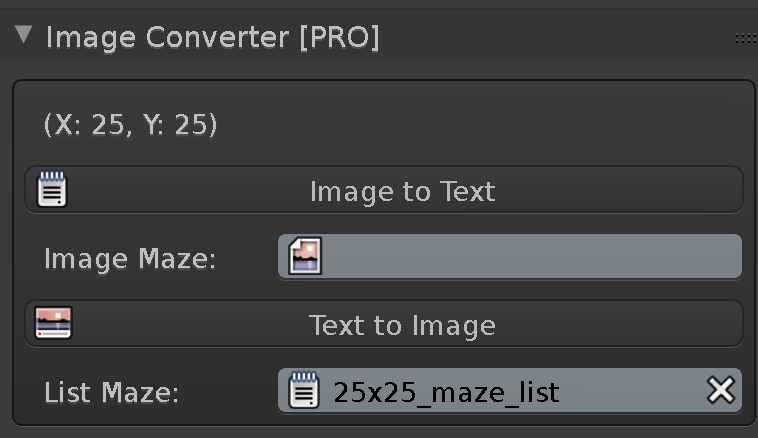
Image to Text - Converts the selected Image Maze (from the UV/Image Editor) to a text block maze consisting of 1’s and 0’s which specify walls and paths.
Image Maze - The image maze to convert when using Image to Text.
Text to Image - Converts the selected text block maze (List Maze) to an image maze.
List Maze - The text block maze to convert to an image when using Text to Image.

Maze Tiles Panel
This panel contains perhaps the most important feature of UltiMaze [Pro] as far as flexibility and ultimate artist control. Rather than creating simple cuboid mazes, you can make mazes however complex you want using pre-modeled tilesets. In the background, UltiMaze is duplicating and positioning and rotating and joining and removing doubles, then duplicating again and . . . you know, all the stuff you would have to do if you didn’t have such an awesome tool.

Use Modeled Tiles - Whether or not to use modeled tiles when building the maze. If this is disabled UltiMaze will use an incredibly fast method to generate simple cuboid mazes that is intended more for quickly previewing your layout/algorithm settings. If enabled, UltiMaze will duplicate around your pre-modeled tiles from the tileset.
Tile Mode - Choose between 12- and 6- piece mode for the tiles. Most “conventional” mazes will use 6-piece mode, but you can do some amazing things with the 12-piece mode such as piping systems and fencing where the focus is on the “wall” and not the path itself. (Note: 6 tile mode is still in beta testing. It will not cause serious problems if you use it, but it produces strange output when using some custom maze layouts. See the full bug report here.)
Tileset - The tileset to import to use in the generation process. This menu will give you a listing of all of the tiles in the tiles folder (see section on tiles in user preferences) that can be imported. Once the tileset is selected, click the Import Tileset button to finish the process.
Import Tileset - Imports the selected tileset.
Apply Modifiers - Applies the modifiers on the tiles as they are being instantiated to build the maze. If this is not enabled, most modifiers will be lost and this is most likely not desired.
Merge Objects - Merge all of the duplicated tiles at the end of the maze generation process. Disabling this could make a mess of you blend file with larger objects, so beware!
Remove Doubles - Automatically removes the double vertices in the maze when finished generating by using Blender’s built-in doubles tool. Note that this is only available when merging objects after generation.
Tiles - A series of object selectors that changes based the tile mode (6 or 12). Load the objects from the tileset here. For examples, load the included tilesets into here. Each of these is named accordingly.
Batch Gen Panel
This panel provides a suite of tools to allow generation of large sizes or quantities of mazes overnight or while you are taking a break. Store as many maze setups as you want, then hit Batch Generate and UltiMaze will crunch all of them into real mazes (depending on the stored settings).
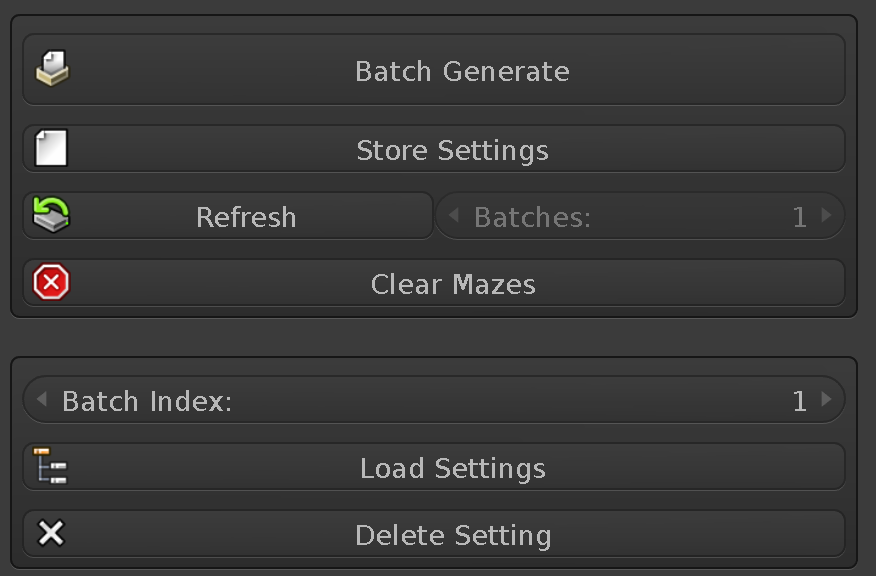
Batch Generate - Generates all stored mazes.
Store Settings - Stores the current UltiMaze settings (layout settings, tiles, etc.) for future generation as a batch. All of the stored settings together are called batches.
Refresh - Refreshes the number of batches. Batches are stored in an external text file and can sometimes get out of sync. Clicking this button won’t cause any harm, so hit it if you ever wonder whether the batch count is correct.
Batches - The number of batches detected in the external text file. This cannot be changed manually from the UI, but is there just to show the count for your information.
Clear Mazes - Clears out the stored batches. Be warned, there is no undo for this!
Batch Index - A selector for loading (a way to preview) and delete individual batches.
Load Settings - Loads the settings from the selected batch (selected with the Batch Index) as the current UltiMaze settings.
Delete Setting - Removes the selected batch (selected with the Batch Index) from the external batches text file.
Info Panel
This is useful info for you and a bug reporter for us (which is in turn for you).
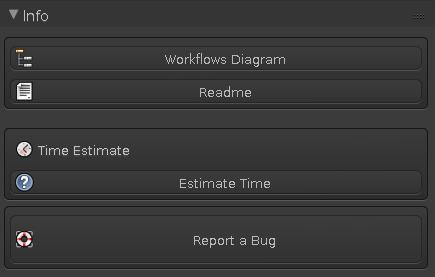
Workflows Diagram - Opens an image that sums up the different workflows and how UltiMaze will use them.
Readme - Shows the UltiMaze documentation.
Estimate Time - Estimates the amount of time it will take to generate a maze with the current settings.
Report a Bug - If you find a bug in UltiMaze [Pro], please use this button or the identical one in the add-on preferences to submit a bug report. This button will open up the bug reporter that we host on our website and will also copy to your clipboard all of the text from all of the log files that UltiMaze automatically makes. These logs will be very useful to us in finding the root cause of the bug so we can better fix it. Please paste that into the indicated region on the webpage that opens and fill out the description box on the left thoroughly. If you don’t mind us potentially contacting you for more information regarding the bug, please enter your email address into the appropriate field. Although we regularly check for bug reports on our site, there is currently no way to be notified immediately. If you feel that your report is urgent, please also send an email stating that you have submitted a bug report to assetsupport@integrity-sg.com. This will ensure a quicker response and fix. We greatly appreciate any bug reports we receive as it helps us to improve our add-ons.
Add-on Preferences
The add-on preferences for UltiMaze [Pro] are actually quite large because there is so much awesome material packed right in. Please read this section carefully.
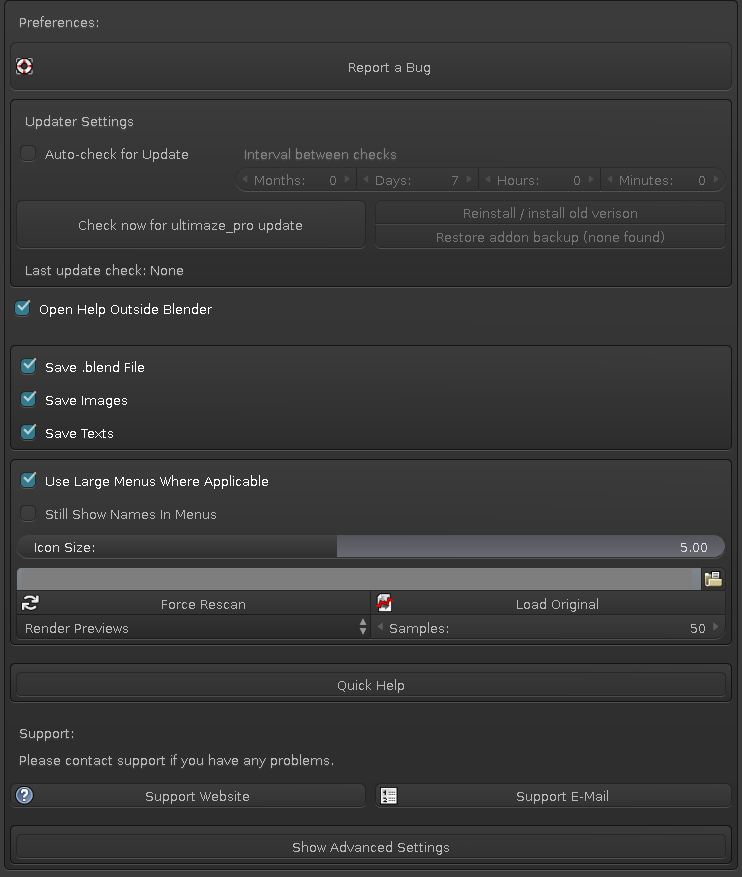
Report a Bug - If you find a bug in UltiMaze [Pro], please use this button or the identical one in the add-on preferences to submit a bug report. This button will open up the bug reporter that we host on our website and will also copy to your clipboard all of the text from all of the log files that UltiMaze automatically makes. These logs will be very useful to us in finding the root cause of the bug so we can better fix it. Please paste that into the indicated region on the webpage that opens and fill out the description box on the left thoroughly. If you don’t mind us potentially contacting you for more information regarding the bug, please enter your email address into the appropriate field. Although we regularly check for bug reports on our site, there is currently no way to be notified immediately. If you feel that your report is urgent, please also send an email stating that you have submitted a bug report to assetsupport@integrity-sg.com. This will ensure a quicker response and fix. We greatly appreciate any bug reports we receive as it helps us to improve our add-ons.
Add-on Updater Box - This is a third-party add-on updater. The settings are very straightforward; just use the big Check now for ultimaze_pro update button and follow its instructions. You should never have to manually get updates for UltiMaze because of this: simply check for updates and restart Blender after installing them.
Open Help Outside Blender - Opens the readme and the workflows diagram outside of Blender using the default application for .txt and .png files on your system. If you have problems with this on your operating system, disable this checkbox and send us a bug report (see the section Report a Bug) including your operating system in the description.
Save .blend File - This should definitely be on to insure that you do not lose data. UltiMaze will automatically save your blend file before executing time-consuming operations.
Save Images - This should definitely be on to insure that you do not lose data. UltiMaze will automatically save your images before executing time-consuming operations. Note that this will disregard the render result and viewer node images.
Save Texts - This should definitely be on to insure that you do not lose data. UltiMaze will automatically save your text blocks before executing time-consuming operations. Note that this will disregard “internal” texts as they will be saved if the blend file is saved. So to save “internal” texts, enable Save .blend File.
Use Large Menus Where Applicable - Uses menus with large icon previews wherever it can. Currently this is only for the tileset selector.
Still Show Names In Menus - For use when Use Large Menus Where Applicable is enabled, if this is enabled, it will still show the name of the element.
Icon Size - Size of the preview icons for large menus.
Tile Path - Path where the tilesets are stored.
Force Rescan - Rescans the tilesets in the Tile Path.
Load Original - Sets the Tile Path to the default one in the add-on directory.
Render Previews - This will search the Tile Path for blend files that do not have a corresponding png file and give the option to render out a preview image and save it correctly. Your current blend file will be reloaded after rendering is finished. You should render out ones that are prefixed with a “*” so that you can select those tilesets in the tiles panel. Items in this menu not marked with an asterisk have previews already rendered. Select one of those if you want to re-render a preview. There are some limitations with Blender’s preview system that requires you to restart Blender for the re-rendered preview to take full effect, so after it is finished, close and re-open Blender.
Samples - Number of samples to use when rendering out the preview.
Show Advanced Settings - Don’t go into here! Tampering with these settings could cause some serious problems!
Discover more products like this
batch floor plan custom Modeling tools Tiles level automate bcon17 image Generator tile model bfcm22 auto-save maze autosave ultimaze modeling anniversary loveblender conversion