Ultimate Screen Shader For Cycles And Eevee
How to use:
All you need is a plane with a UV map. You can either append the whole material and apply it to your model, or you can import the individual node groups and build and configure your own setup.
There are many different ways to use it, and while the default setup might cover most of the use cases, you might find out that you need to create your own setup.
To help you with that, I will explain each node and what it's expected to deliver for you.
Pixelize 2D:

This node takes care of pixelizing your image and changing its resolution at any time, instead of doing so manually in a photo editing software such as PhotoShop and GIMP. Simply set the X and Y resolution, then plug the "Pixelated UV" output to your image (or other node) UV input.
The X and Y resolution outputs are simply for convenience and are made to be plugged into the appropriate slots in the "RGB Matrix" node so you'll have to set resolution only once.
Distortions:

This takes care of all kinds of distortions to the image. It acts on the UV map, therefore ideally you need to plug this between the "Pixelize 2D" and your image node.
The "Distortion Scale" sets the size of the distortion, similar to the scale of a noise texture.
"Distortion Amplitude" is the strength of the distortion.
"Distortion Phase" is made so you can animate the distortion seamlessly. All you need is to set 2 keyframes for the beginning and end and it's done.
"Skew", "X Shift" and "Y shift" are self-explanatory and can be visualized easily.
Combine RGB:

This is made for convenience, it takes care of separating the RGB channels of each input image, then using the red, green and blue channel of the first, second and third image respectively.
Color Manips

It takes care of adjusting the hue, saturation, brightness, contrast and warmth of the image.
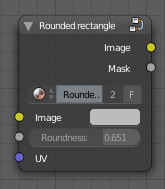
Rounded rectangle:

It creates a rounded rectangle mask to simulate the effect found on old CRT Screens. It is recommended to use it with the "Pixelize 2D" node to have a pixel-perfect result.
Screen shader :

This takes the resulting image and adds a glossy shader to it and it simulates a curved screen even on a flat plane.
There's also a "Displacement" node that can be used to displace the surface of your screen if you want a real geometrical displacement and not a faked one.
Chromatic Aberration UV separation:

This will separate a single UV vector and offset it into 3 separate ones. To be used with 3 image textures and the "Combine RGB" node.
Scanlines:

Creates a scanline effect, seeon mostly on old monitors. Adjust the amount and scale to your liking, then use the "Offset" parameter to animate it.
Static Noise:

The name says it all. You can use this to add static noise to your image. I recommend using it with the "pixelize 2D" node.
Generally you won't need to adjust the Aspect Ratio, especially if the scale is too big/small, but if you do you can calculate it by the following formula : width/height.
Use the "Phase" parameter to animate it.
Horizontal Black bar

This adds one or many Horizontal black bars on the screen as seen on many old screens (or even newer ones). Adjust the number and the width, then use the "Offset" to animate it.
RGB Matrix:

This one is probably the most important node. It takes care of creating the RGB pattern seen on each pixel. You can adjust the width and height of each of the subpixels (R,G and B). A smaller subpixel means more dark space between each pixel and the other. Generally their size should be smaller on older screens and vice versa.
It is important to have the X resolution and Y resolution the same as the "Pixelize 2D" node, otherwise it will not be aligned. That's why I recommend connecting the "X resolution" and "Y resolution" of the "Pixelize 2D" node with the inputs of the "RGB Matrix" node.
Do NOT connect the UV input to the "Pixelated UV" from the "Pixelize 2D" node, otherwise you will get incorrect results.