Pixelmodeller Ai
PixelModeller AI Documentation
Installation
Install the addon from the Blender preference’s Add-ons panel (this is not an extension).
Preferences
Once installed, open the PixelModeller AI preferences and set:
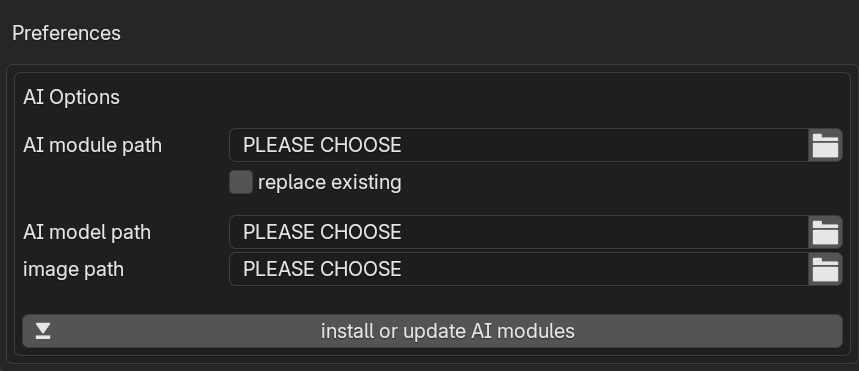
AI module path – This is the path where the addon will place the AI modules. Make sure the folder has read/write permissions
AI model path – This is where you will place any of the freely available AI models you have downloaded.
Image path – AI generated images will be saved to this folder.
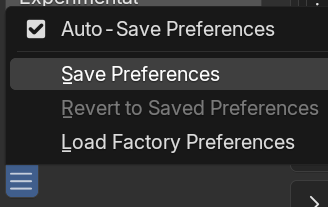
After setting the preferences, make sure you click the 3 bars at the bottom left of the preferences window, and choose ‘save preferences’.
AI Module Installation
This addon uses Torch, cv2, Pillow and their dependencies. If you already have those modules on your computer, then you can try specifying the folder where they reside. If you get a message saying the ones you have are incompatible, then you can either:
A) update the current ones using the below 'install or update AI modules' button
B) choose a different folder just for this addon (just in case another addon requires the older versions).
If you go with option B, before clicking the ‘install AI modules’ button, disable any other AI addons, save the preferences again, and restart Blender to ensure there are no conflicting modules that will prevent successful installation or correct operation of the addon. Consider using application templates when using conflicting addons: Application Templates - Blender 4.3 Manual

To download or update the modules, click the ‘install or update AI modules’ button. The modules are approximately 1.4GB total, so may take a while if you have a slow internet connect. You can view the progress in the Blender console. If there are any issues with installation, you will get a pop up box with detailed instructions on how to resolve.
Download an AI model
Download any of the below free AI models, and place them in the ‘AI models’ folder (not the ‘AI modules’ folder). If you’re only going to download one of them, I’d recommend the Depth Anything v2 Large, which usually produces superior results:
Depth Anything v2 Large 1.34GB (best model)
Depth Anything V2 Small 99.2MB
Midas 3.1 dpt_beit_Large_ 512 (1.47GB)
Midas 3.1 dpt_swin2_Large_384 (827MB)
Additional Step for Linux Users
Linux requires either xclip or wl-clipboard, dependent on your display protocol. This is so python can get the images from your clipboard.
Find your display protocol using command:
echo $XDG_SESSION_TYPE
If it returns wayland, use package name ‘wl-clipboard’, for X11, use ‘xclip’.
Example installation command: sudo apt install xclip
The install command will vary
dependent on your Distro:
Ubuntu, Debian, and Linux Mint:
sudo apt update
sudo
apt install (package name)
Fedora, CentOS, AlmaLinux, and Red Hat:
sudo dnf install (package name)
Arch Linux and Manjaro
sudo pacman -S (package name)
User Interface
Generate/Update UI
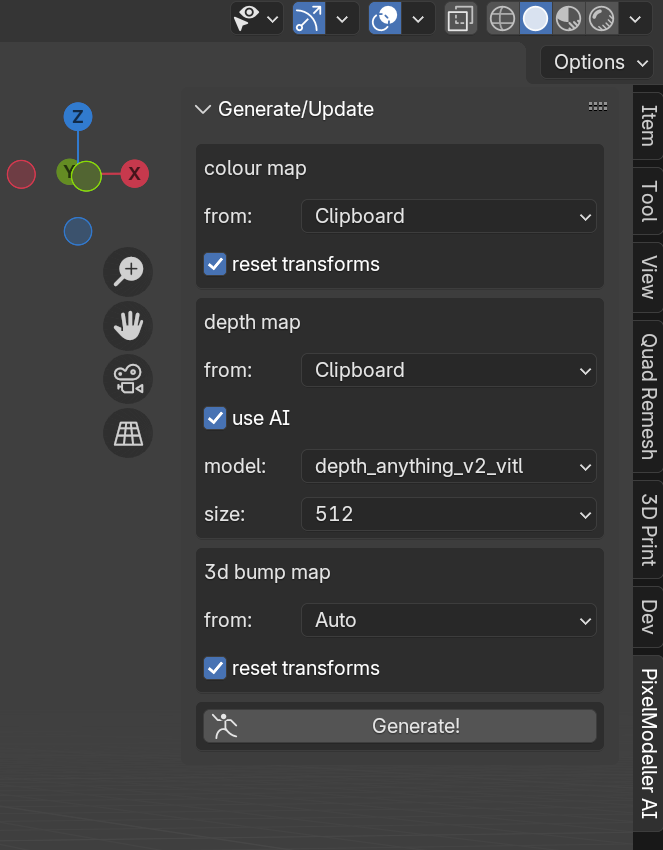
This panel is used to specify where the addon will get the source images from for the colour, depth, and 3d bump, and whether you want to use AI. They all have similar options:
From:

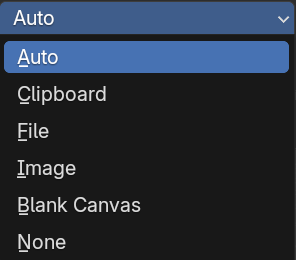
Auto (3d bump map only) - This tells the bump map to use whichever image datablock is currently in use by modifier.
Clipboard will import your clipboard image into blender and save a copy to your images folder.
File – Load an image from disk. IMPORTANT you must use an absolute path (untick the relative path option in the file open menu)
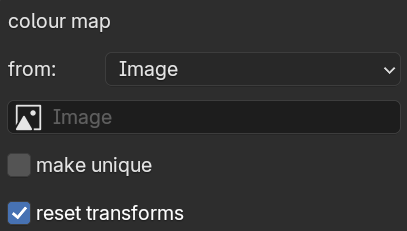
Image – Use an existing image datablock from the blend file. This will also give you the option to ‘make unique’. Check make unique if you want a duplicate image datablock rather than an instance. That will allow you to modify the image without affecting the original. Useful if the image is in use elsewhere in the blend file.
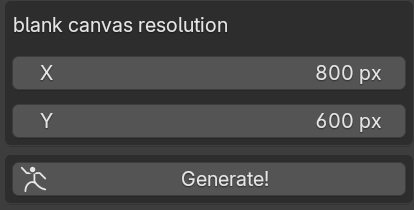
Blank Canvas – Creates a new empty image so you can paint the depth, colour, or bump by hand. If both depth and colour are set to blank canvas, then you’ll also be given a ‘blank canvas resolution’ panel. If only one of colour or bump is set to blank canvas, the canvas will use the resolution of the other. When bump is set to Blank Canvas, it will always use the resolution of the depth map.
None (3d bump only) - No bump map will be used.
AI options
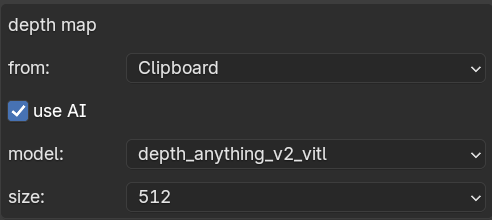
When the Depth source is not Blank Canvas, you will be able to enable AI
Use AI- Enable if you want AI to generate the depth map for you. Leave disabled if you’re using a previously generated depth map.
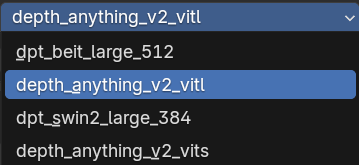
Model – PixelModeller AI is compatible with the models in the dropdown. Choose any of the ones you have downloaded and placed in the ‘AI model path’ in the addon preferences. Unless your computer is underpants, I’d recommend always using depth_anything_v2_vitl (the l on the end stands for ‘large’)
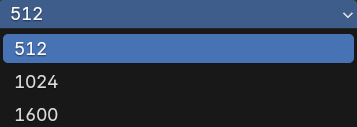
Size – Be very careful! This increases the size of the model so that it captures more of the smaller details from the input image. I would strongly recommend to always use 512 unless you have plenty of RAM. Before using higher values for the first time, always save your blend file and close other open applications in case you crash blender and possibly your machine.
On my i7-14700k, the 512 option uses around 2GB and takes approximately 1 to 2 seconds (regardless of input image resolution). The 1024 option uses around 8GB RAM and takes up to 40 seconds, and the 1600 option can get up to 32GB RAM and take around 4 minutes! I did test 2048, but it used up my full 96GB RAM and took around 20 minutes (which is why I decided to limit the options with a drop-down).
Using the 512 option and relying on the 3d bump for the fine details, is a better option. And if necessary, you can quickly modify the bump map in the image editor to remove incorrect bright/dark spots that are causing obvious displacements in the wrong direction.
Generate

When no object is selected, the generate button it will create a new PixelModeller AI object. When an object that is not a PixelModeller AI object is selected, the new object will use the existing object’s scale, rotation, and position. Allowing you to create a rough layout of your scene beforehand.
Update

The generate button will change into an ‘Update!’ button when a PixelModeller AI object is selected. This allows you to try different input images, without losing the model’s current settings. Useful for example if you want to re-generate the depth map with a different model, but don’t want to lose all the tweaks you’ve made in the controls.
You can choose which images to replace, so you can for example change the bump map without having to wait for the AI to regenerate the same depth map again.
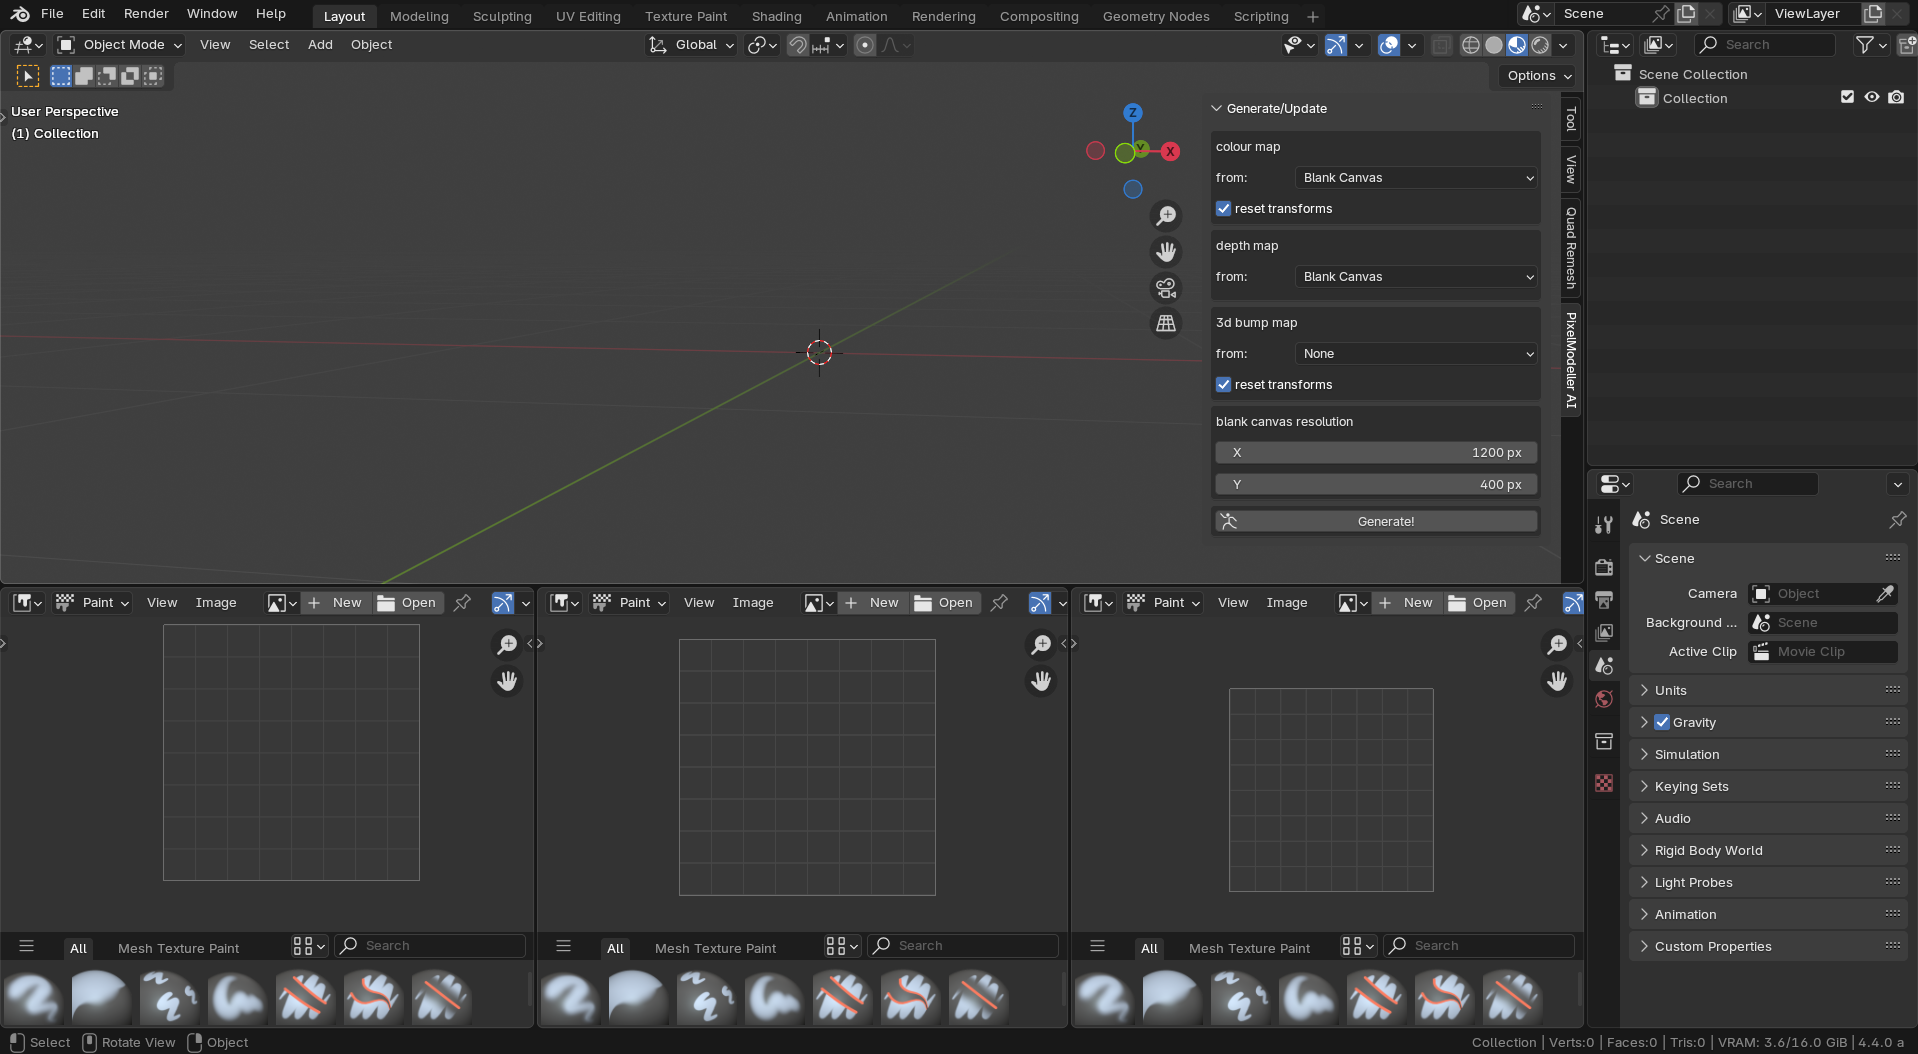
Before using the Generate/Update button, make sure you have an image editor open for each of the maps you'd like modify with the paint tools. They will be automatically populated when the model is created. I generally have three open at the bottom of the screen. :
Controls UI
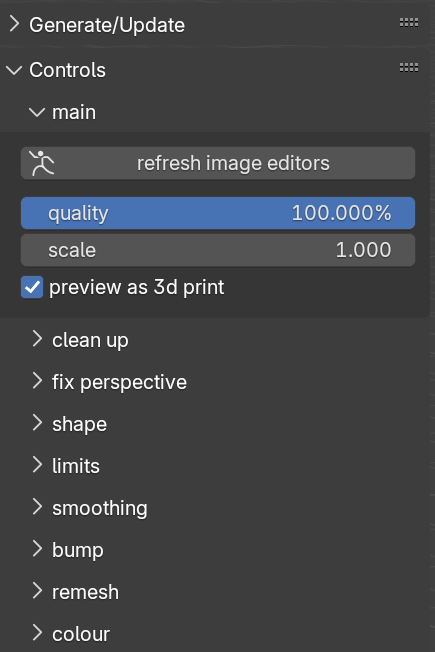
When you have a PixelModeller AI object selected, a new panel will appear below the ‘Generate/Update’ panel. This is where you can fine tune the object’s appearance and topology.
The panels are sorted from top to bottom in the recommended order you modify the parameters. For example - scale the object, then remove unwanted geometry with the clean panel options, then fix perspective, then shape the object etc. Save the smoothing till you've finished getting the rough shape to ensure the UI remains responsive. Use the smoothing options to further improve the shape and remove artefacts, it's best to set the quality slider to the desired level when you're modifying the smoothing, because modifying the quality afterwards may require you to revisit the smoothing parameters. Bump and remesh I usually save till last. If the model is quite low resolution in terms of geometry, then the order isn't as important.
Main
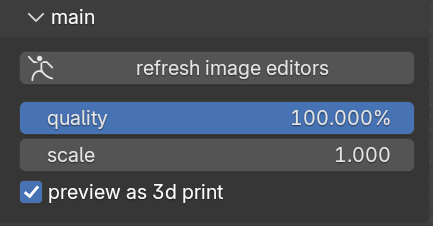
Refresh image editors – update the visible image editors to show the images in use by the selected model
Quality – The resolution of the geometry. 100% will match the resolution of the colour map, ensuring you have sufficient geometry to represent each pixel of the input image. This may be necessary to get accurate colour when 3d printing from vertex colour (which are automatically generated for you).
When you generate or update a model, the quality will be automatically set to a value that won’t crash your computer. For best performance keep it at this value whilst tweaking the various settings. And then increase it as high as your computer can handle when you’re ready to enable the smoothing option.
Scale – Scales the depth of the object. The scale needed will vary from one image to the next, dependant on which elements of the image you’re interested in.
Preview as 3d print – This will change the material to use vertex colour and also disable smooth shading, so you can see what the model will look like when 3d printed. Even with this option enabled, the UV data will still be retained, so you can use the model for both rendering and printing regardless.
Clean Up
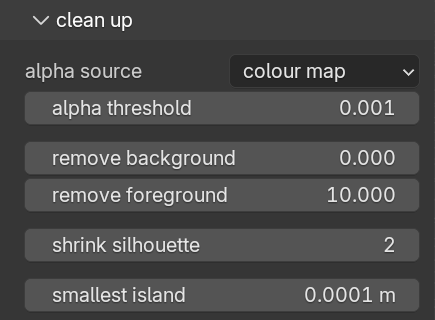
This is where you can remove bits of the model you don’t want
Alpha source – choose which map to get the alpha from. The alpha is used to automatically delete the 3d geometry where the input image is transparent.
Alpha threshold – Delete any parts of the model where the alpha value is lower than this value. 0 = don’t delete anything.
Remove background- deletes areas of the 3d model that are lower than this value. 0 = no effect.
Remove foreground – areas of the model that are higher than this. You will generally need to set this to a value below 1 to see an effect, because depth maps are generally 0 to 1.
Shrink Silhouette – deletes the border geometry to shrink the geometry inwards without affecting the depth. This is useful for removing background colour showing up at the edges of the model, where that colour was mixed with the foreground due to depth of field for example.
Smallest island – this will delete any small islands of geometry whose combined 2d face area is smaller than this value.
Fix Perspective
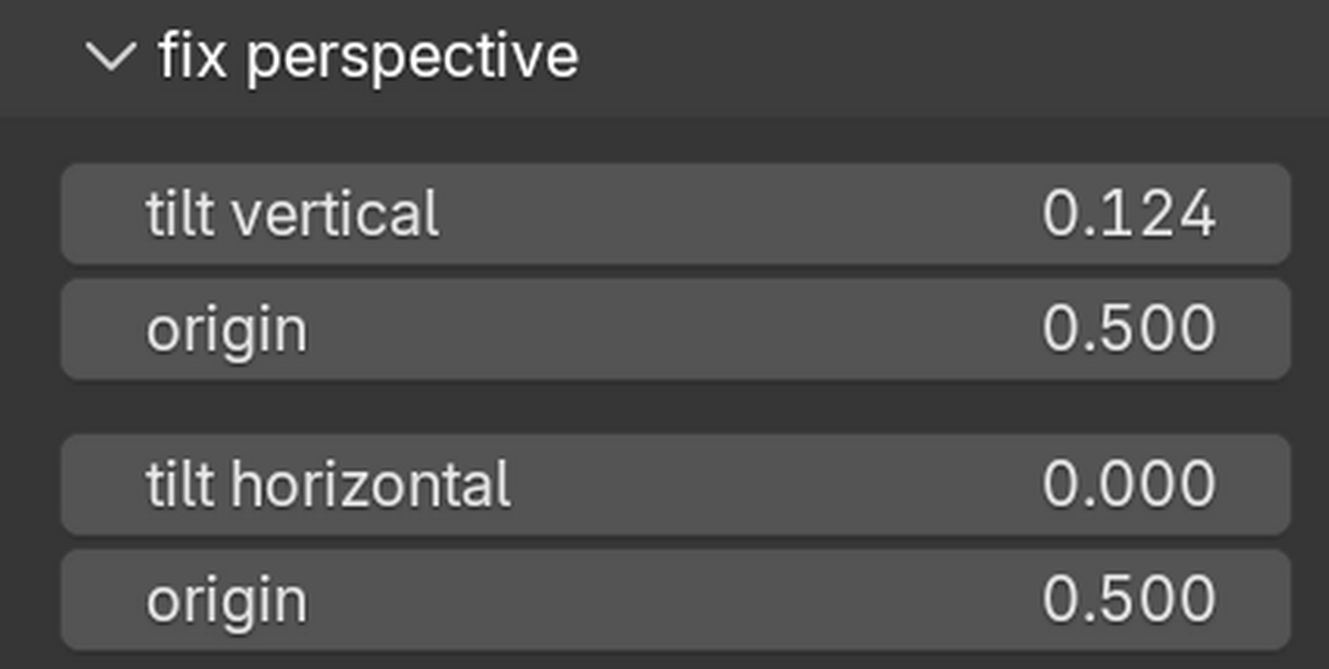
You’ll get the best results when the input image is looking directly at the subject. These options allow repositioning of the camera after the fact, removing unwanted tilt in the resulting 3d model.
The options can also be used artistically, for example if you want to make a cylinder into a snooker cue shape, you could set the origin to the butt end, then tilt until the tip is thinner.
Tilt – number of degrees to tilt the object
Origin – the pivot point of the tilt, 0-1 = bottom to top (vertical), left to right (horizontal).
Shape
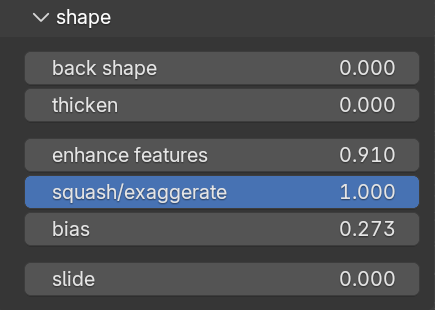
This is where you can start having some fun with the shape of your object.
Back shape – The shape of the back of the object. - infinity to 0.99
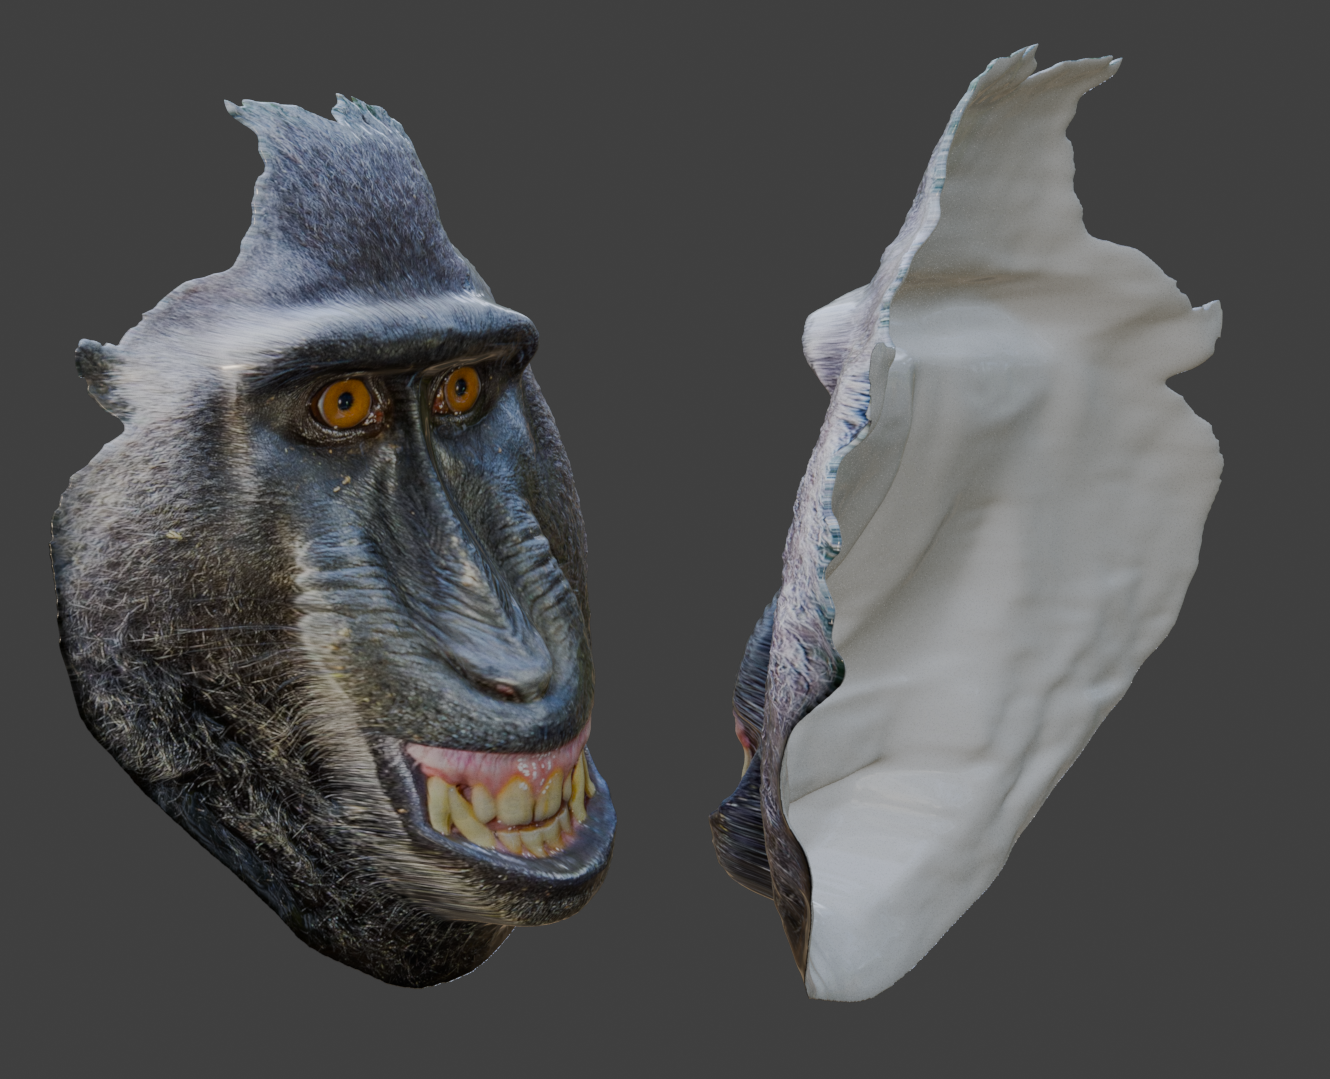
Value of 0.99 – The back will move in towards the front like a mask, whilst remaining a solid 3d printable object. You can then use the image editor’s alpha erase brush to cut out the eyes, print it off, and scare the neighbours with it.
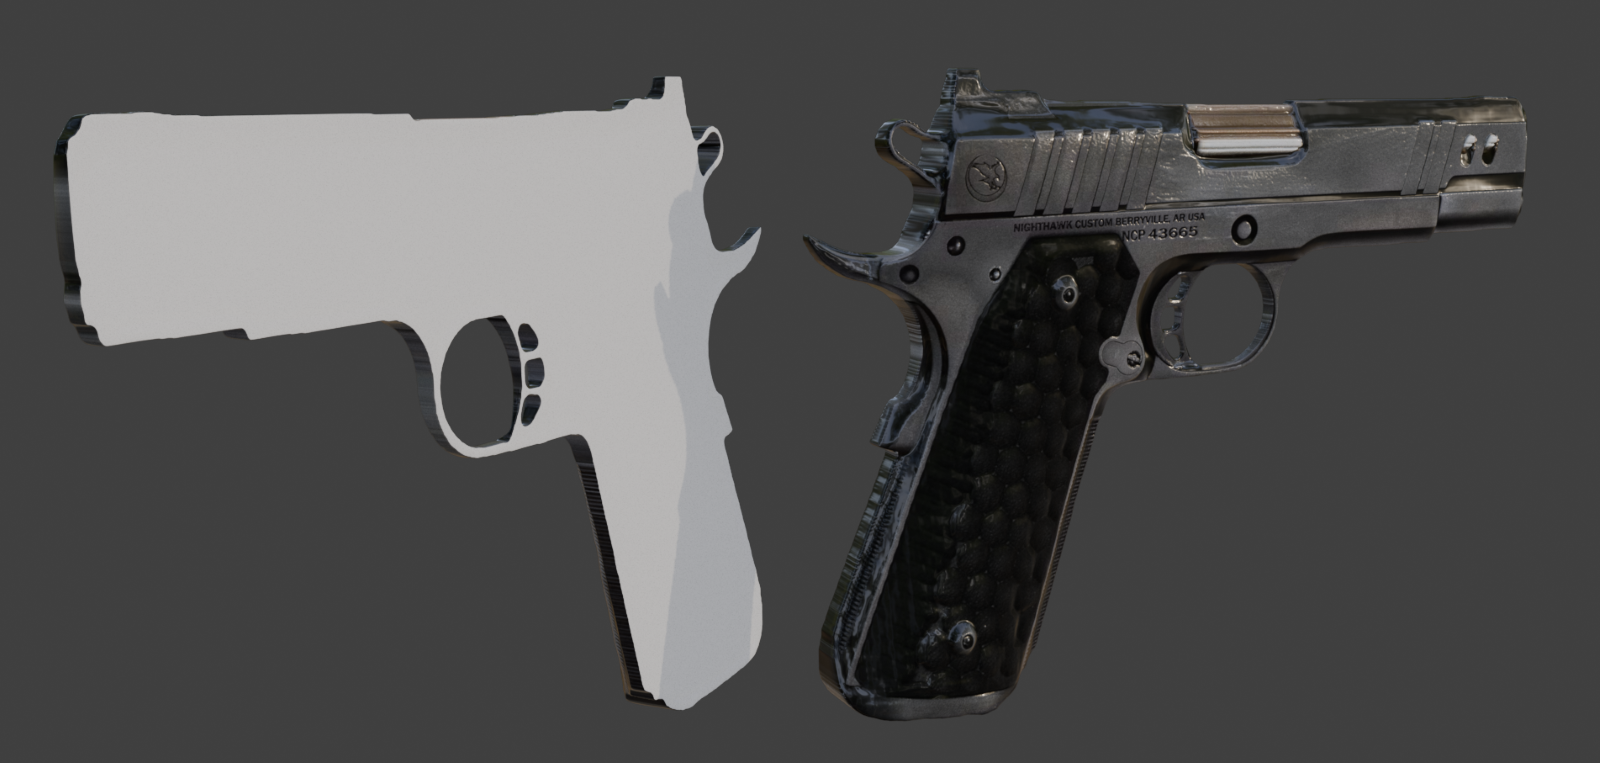
Value of 0 – The back of the object is flat. (Back colour and back bump disabled for clarity). Use the back sharpness option discussed later to prevent the solid back colour stretching towards the front when using the smoothing options.
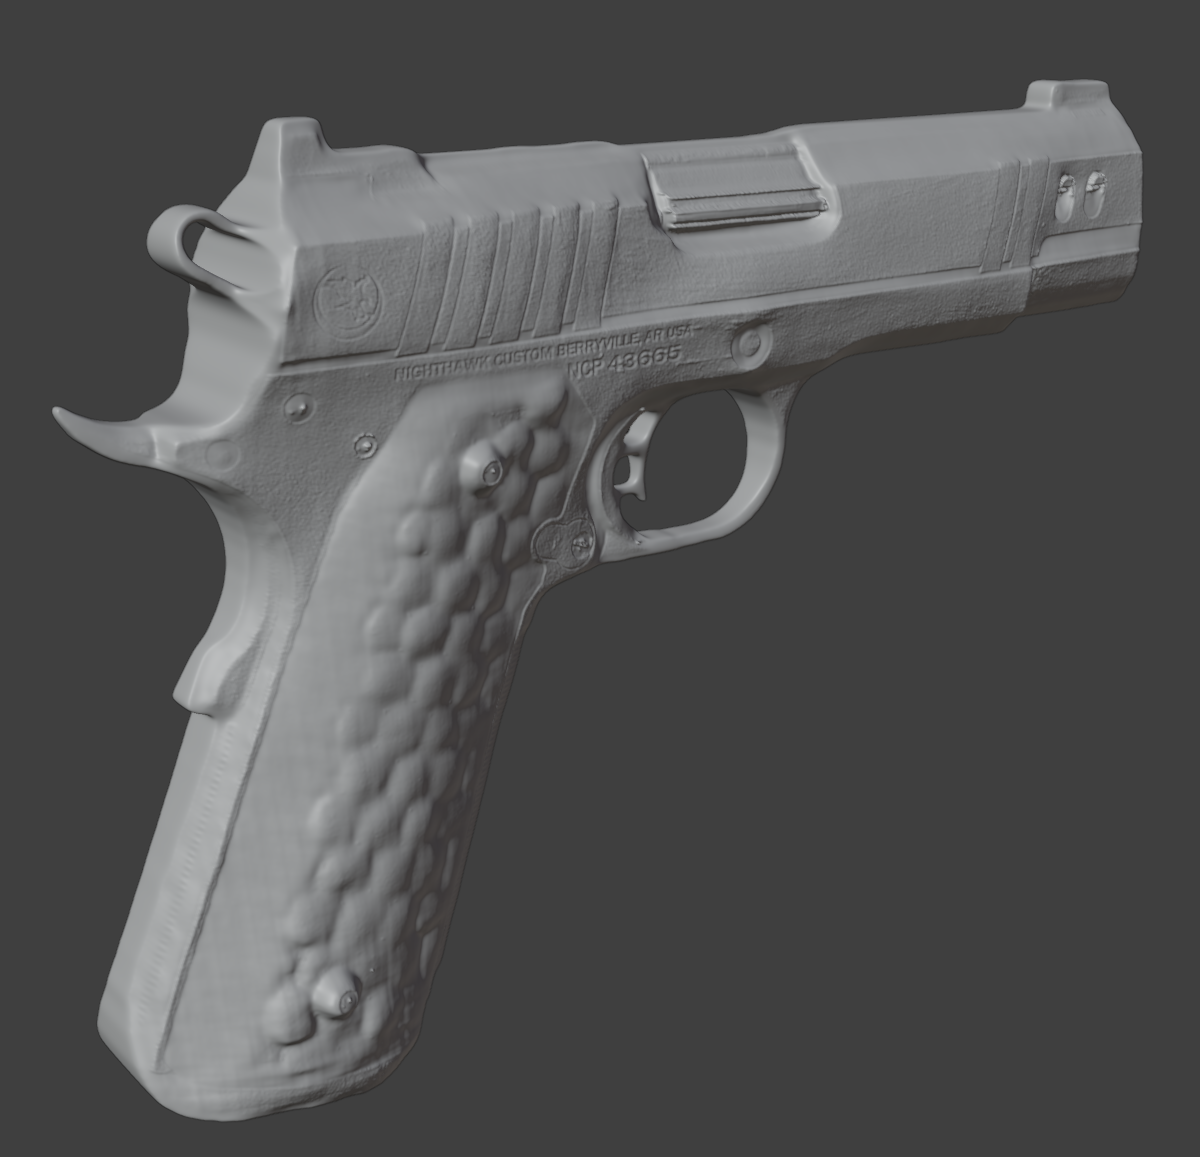
Value of –1 (or less), back will be mirrored in the opposite direction. Perfect for making 3d models from images of symmetrical objects.
Thicken – This will add thickness to the object without affecting the proportions of the features.
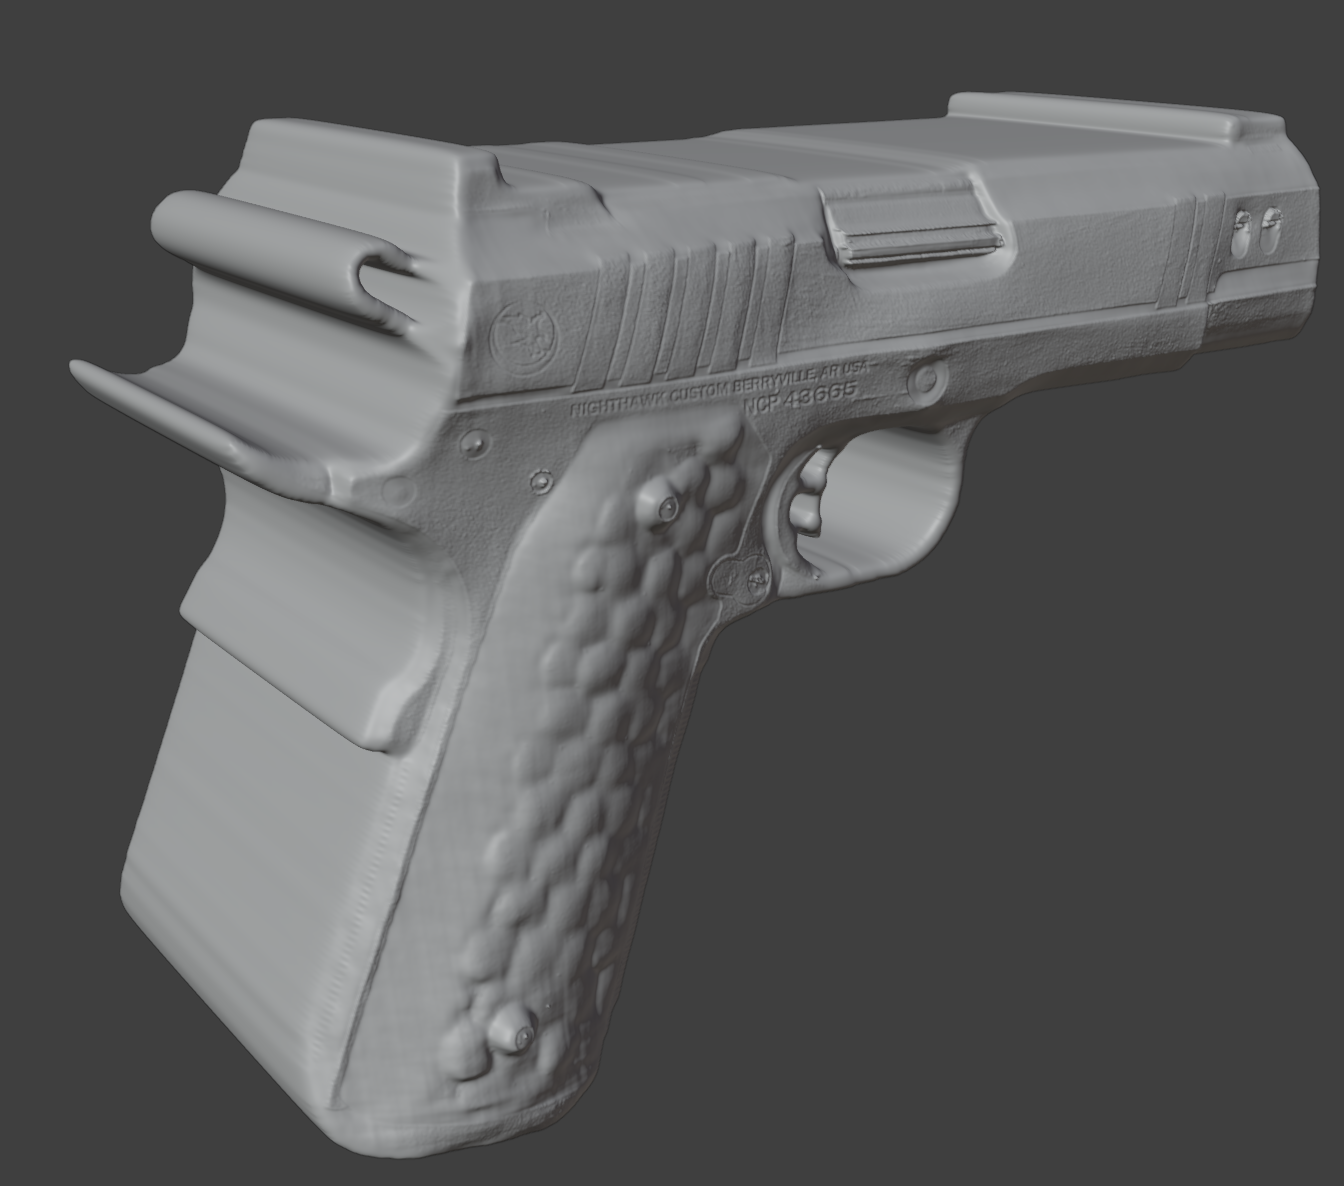
Enhance features – makes the features exaggerated or squashed. Great for making caricatures of people by making their features look ridiculously proportioned. Also useful if the AI generated depth map is missing details.
Left – no feature enhancement, right feature enhancement set to exaggerate.
Squash/Exaggerate - Squash the features forward or exaggerate to add contrast to the height variations
Bias: the depth that acts as the centre point for the enhancement. When exaggerating, areas below the bias point will move backwards, areas above it will move forward. When squashing, areas above this will squash forwards the most. 0 represents the lowest part of the model, 1 represents the heighets/top of the model.
Slide: slides the front of the geometry backwards whilst retaining the features at the front of the model. Good for removing stretched textures in areas that were not in view in the input image.
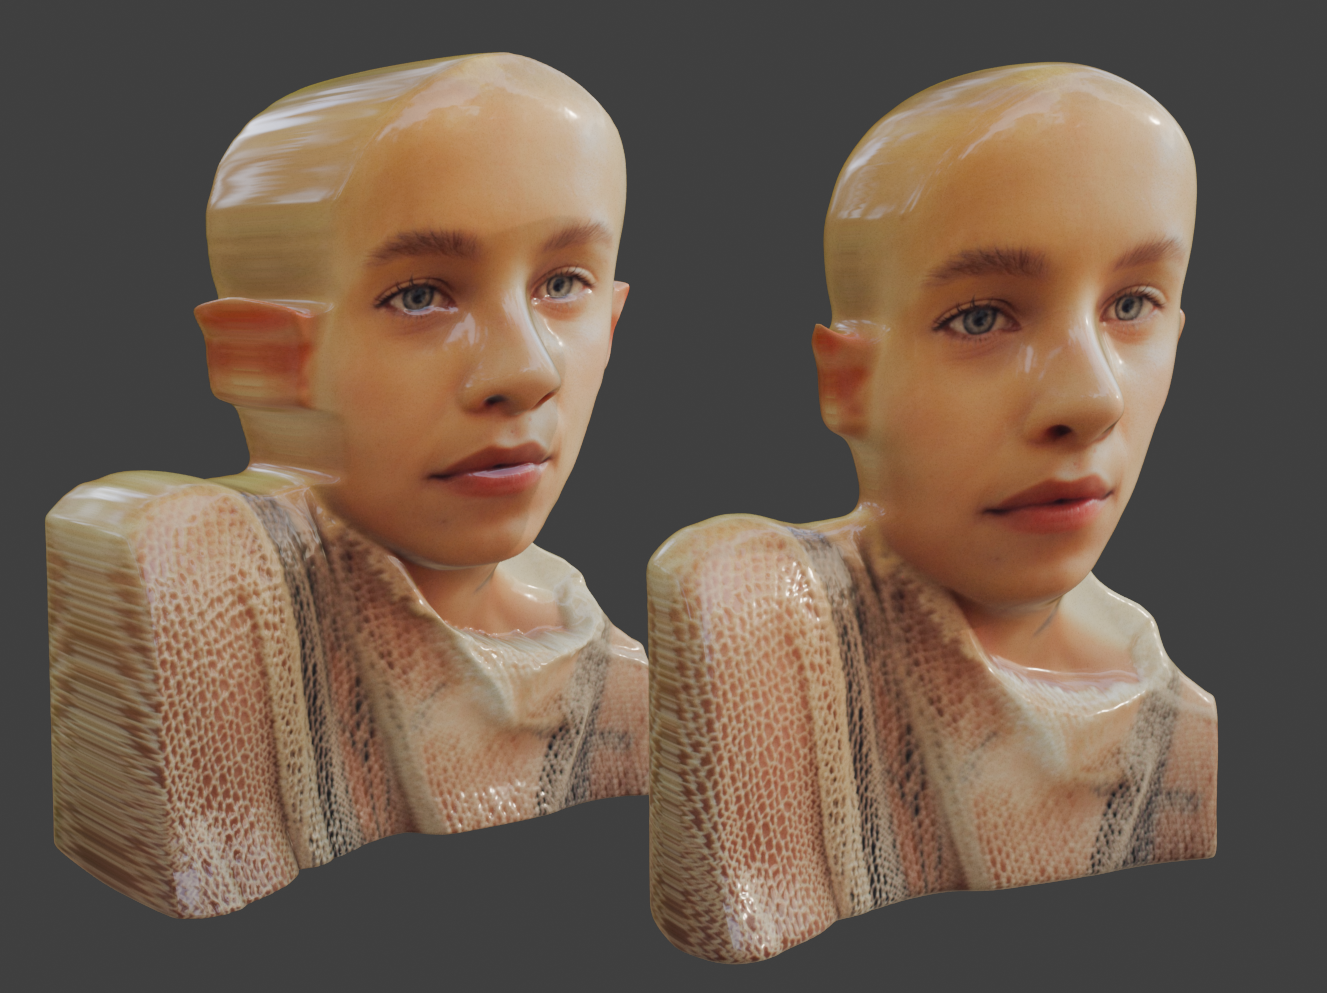
Front of the object is slid backwards to remove stretching on the sides.
Limits
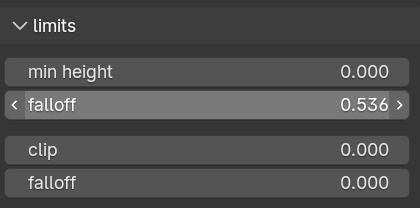
Min height – prevents your model disappearing when the shape options push the geometry backwards.
Falloff – smooths the transition between the geometry that has been un-hidden by the min height and the original geometry.
Clip- Flattens the front backwards. Similar to the remove foreground slider, but this avoids creating holes, as it doesn’t delete the geometry.
Falloff – rounds off the clip if there is sufficient geometry in the vicinity of the clipped edge.
Smoothing
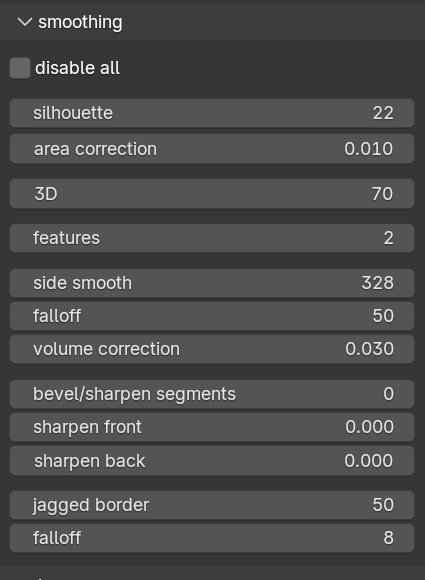
Powerful
options to smooth, bevel, and rebuild the geometry. Great for
shaping the object artistically, and reducing shading artefacts
Disable all – disables all smoothing (default). For good performance, leave this ticked whilst tweaking the previously described sliders.
Silhouette – This will rebuild and smooth the 2d silhouette of the object ensuring decent topology that will work nicely with the bevelling options:
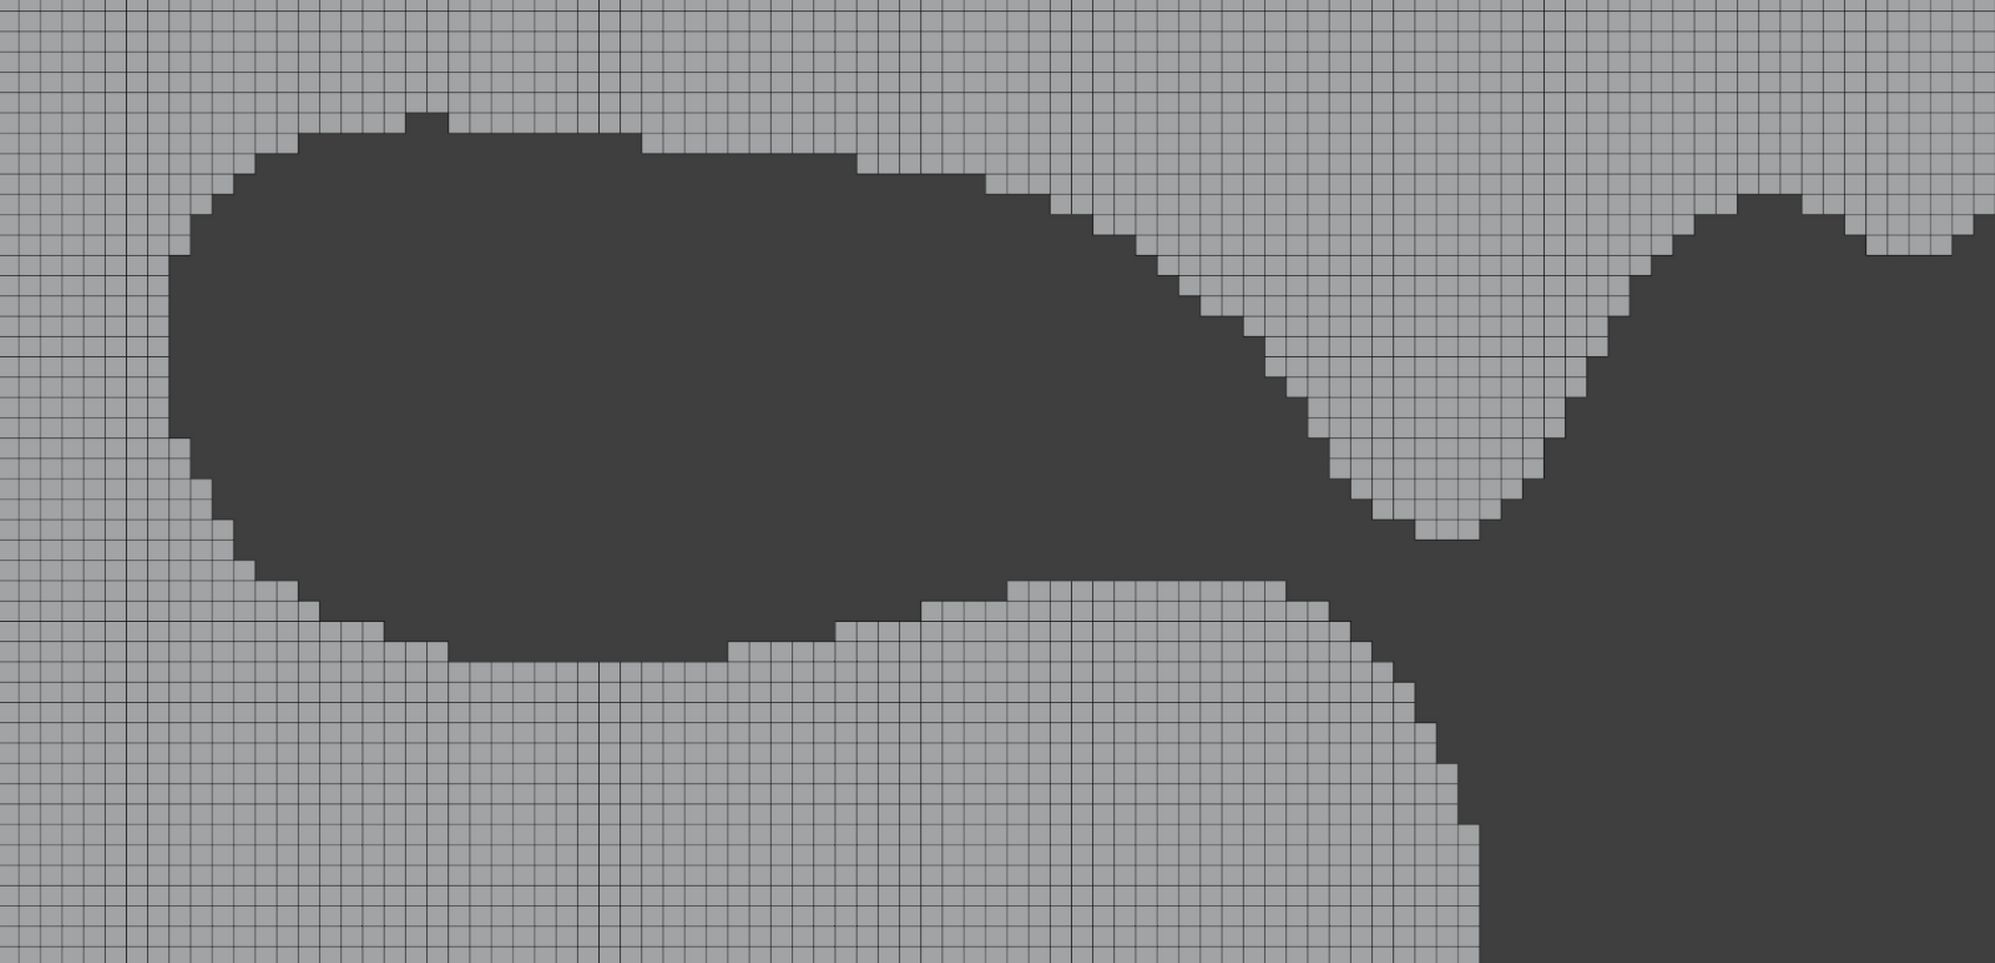
Silhouette set to zero – very jagged edges and topology that will produce bad quality bevels and smoothing.
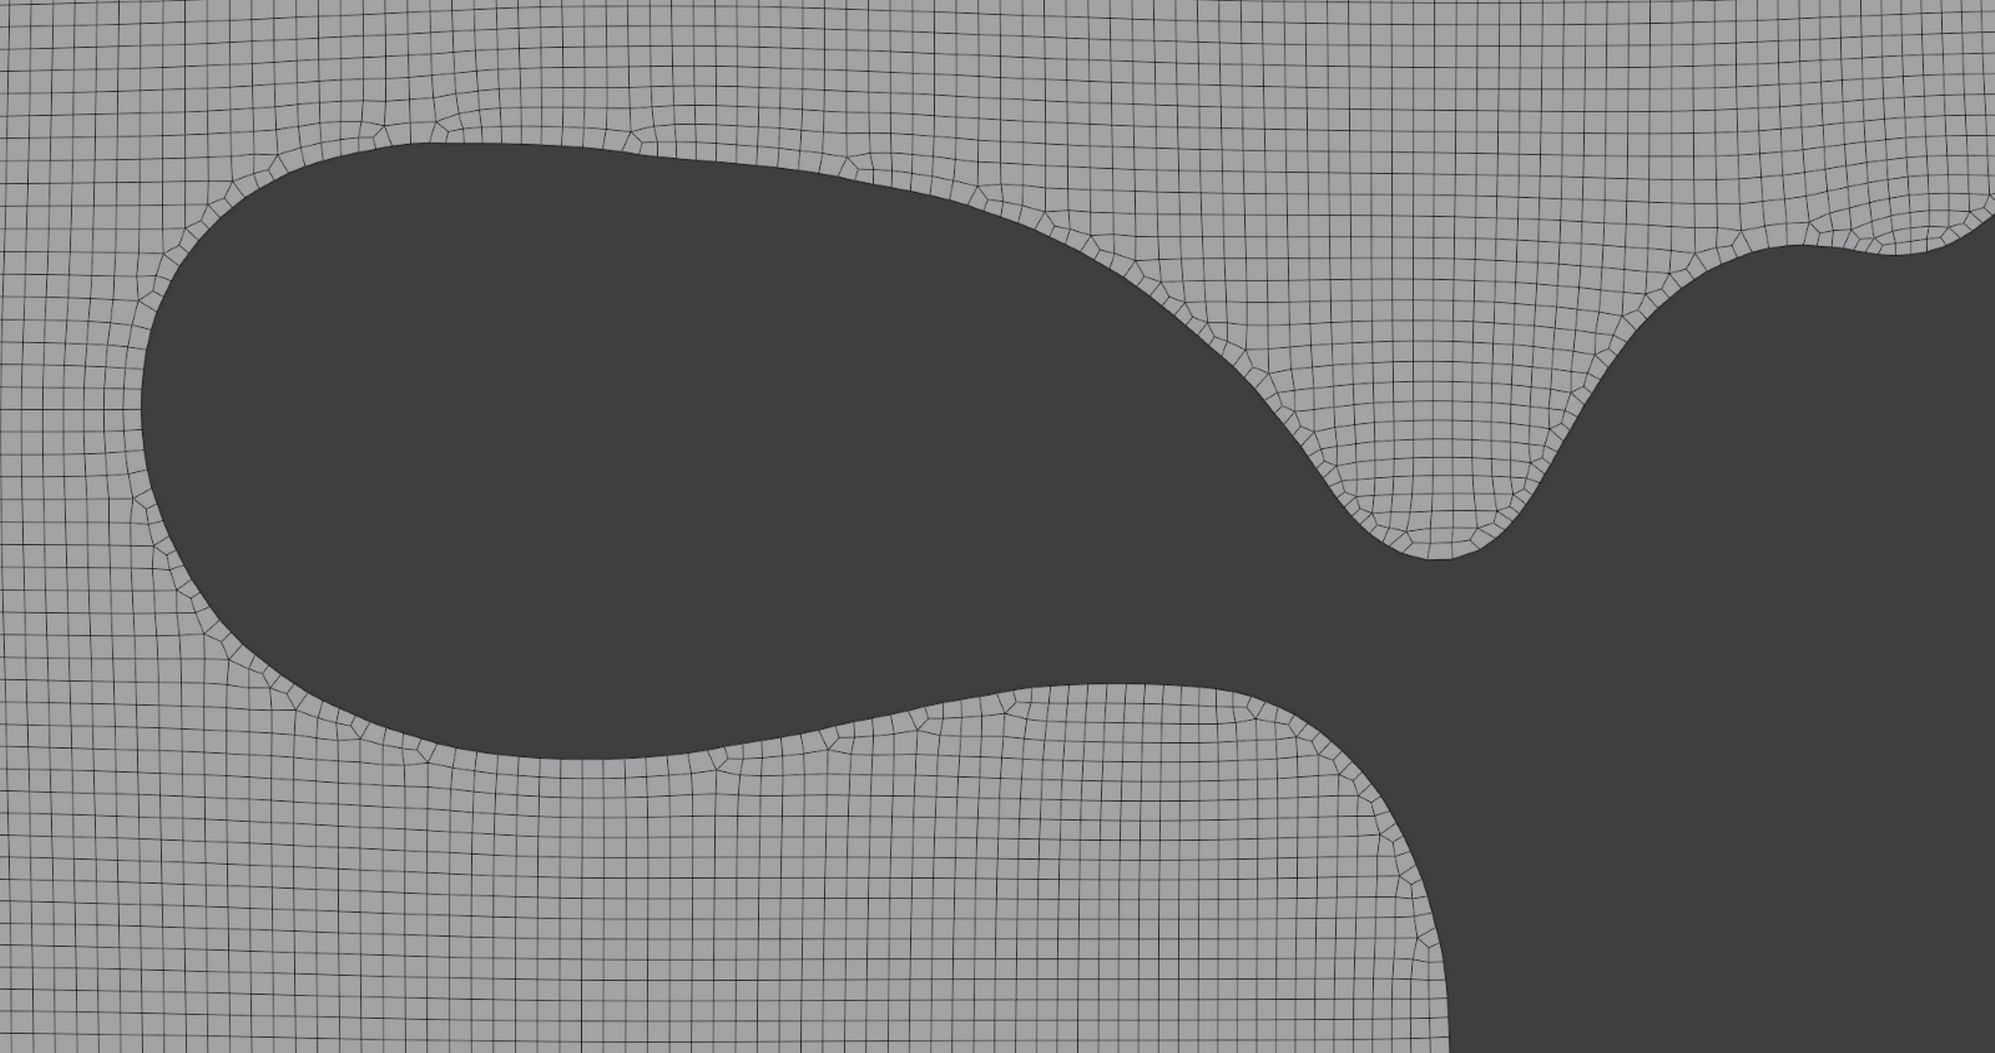
Edges are rebuilt and smoothed, whilst also
using advanced area preservation.
Area correction – increase or decrease the amount of automatic area correction.
3d – This will smooth the 3d geometry on all axis
Features – This will smooth out the depth of the object. Turned high will flatten the object.
Side smooth – Smooths the sides of the object without impacting the front.
Falloff – How far the side smoothing reaches into the front and back of the object.
Volume correction – Similar to Area correction, but will correct 3d volume rather than the 2d area. Bulges the object back out after smoothing to avoid excessive loss in volume.
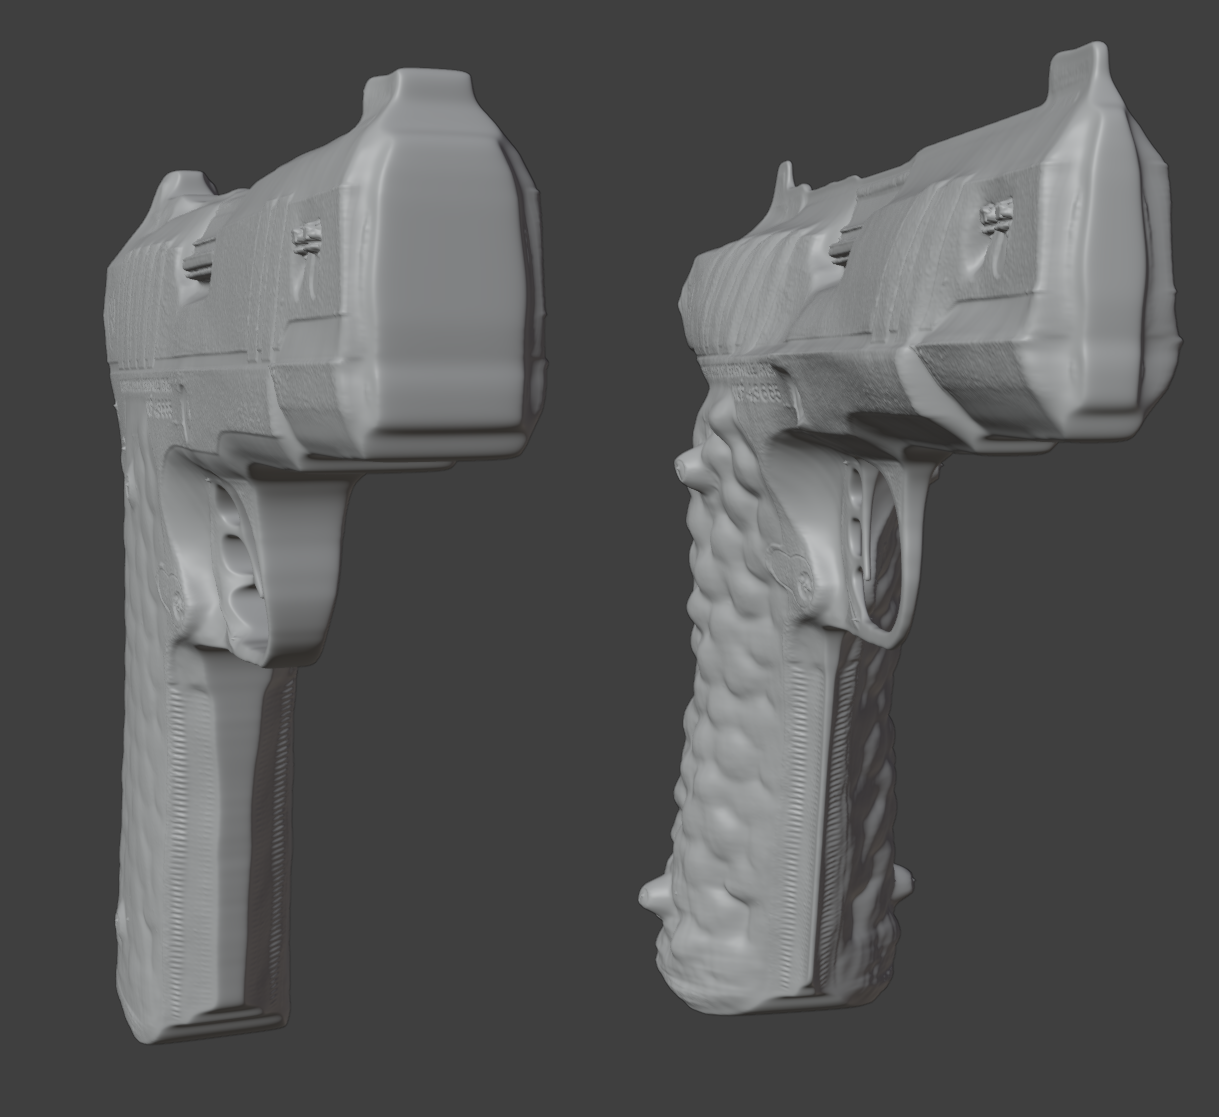
Bevel/Sharpen segments – how many edge loops to add to the side of the object. This assists with smoothing and beveling. Increase this to prevent the smoothing options from distorting the depth at the border of the object.
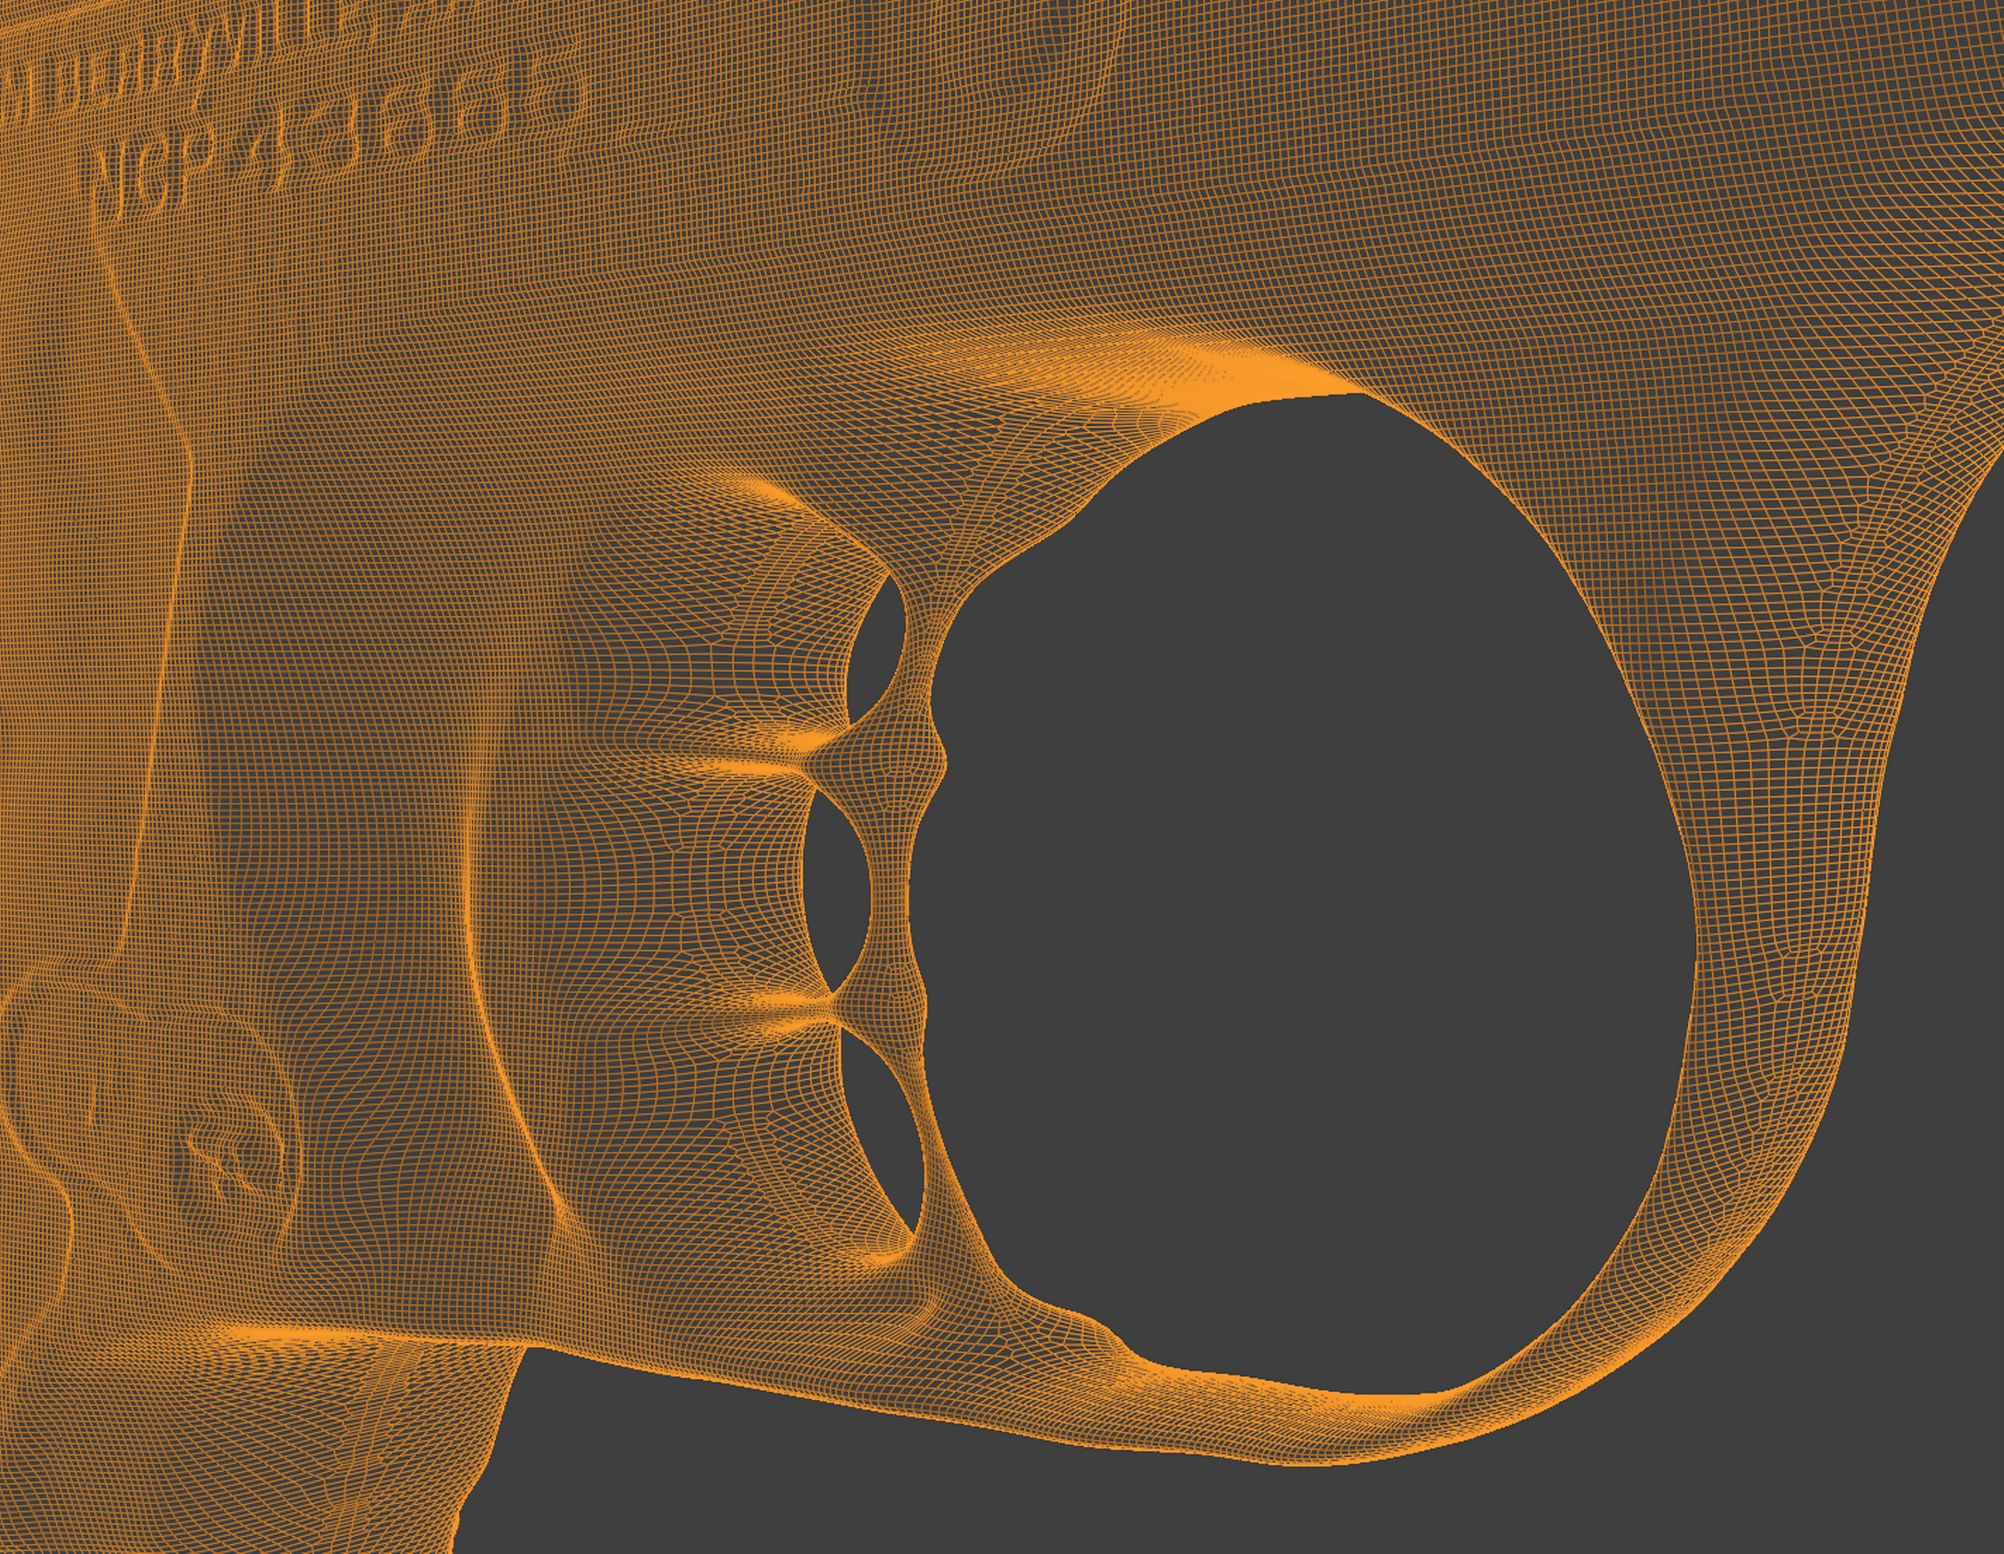
A
high side smoothing value is distorting the gun‘s trigger
unnaturally, making it appear pinched.
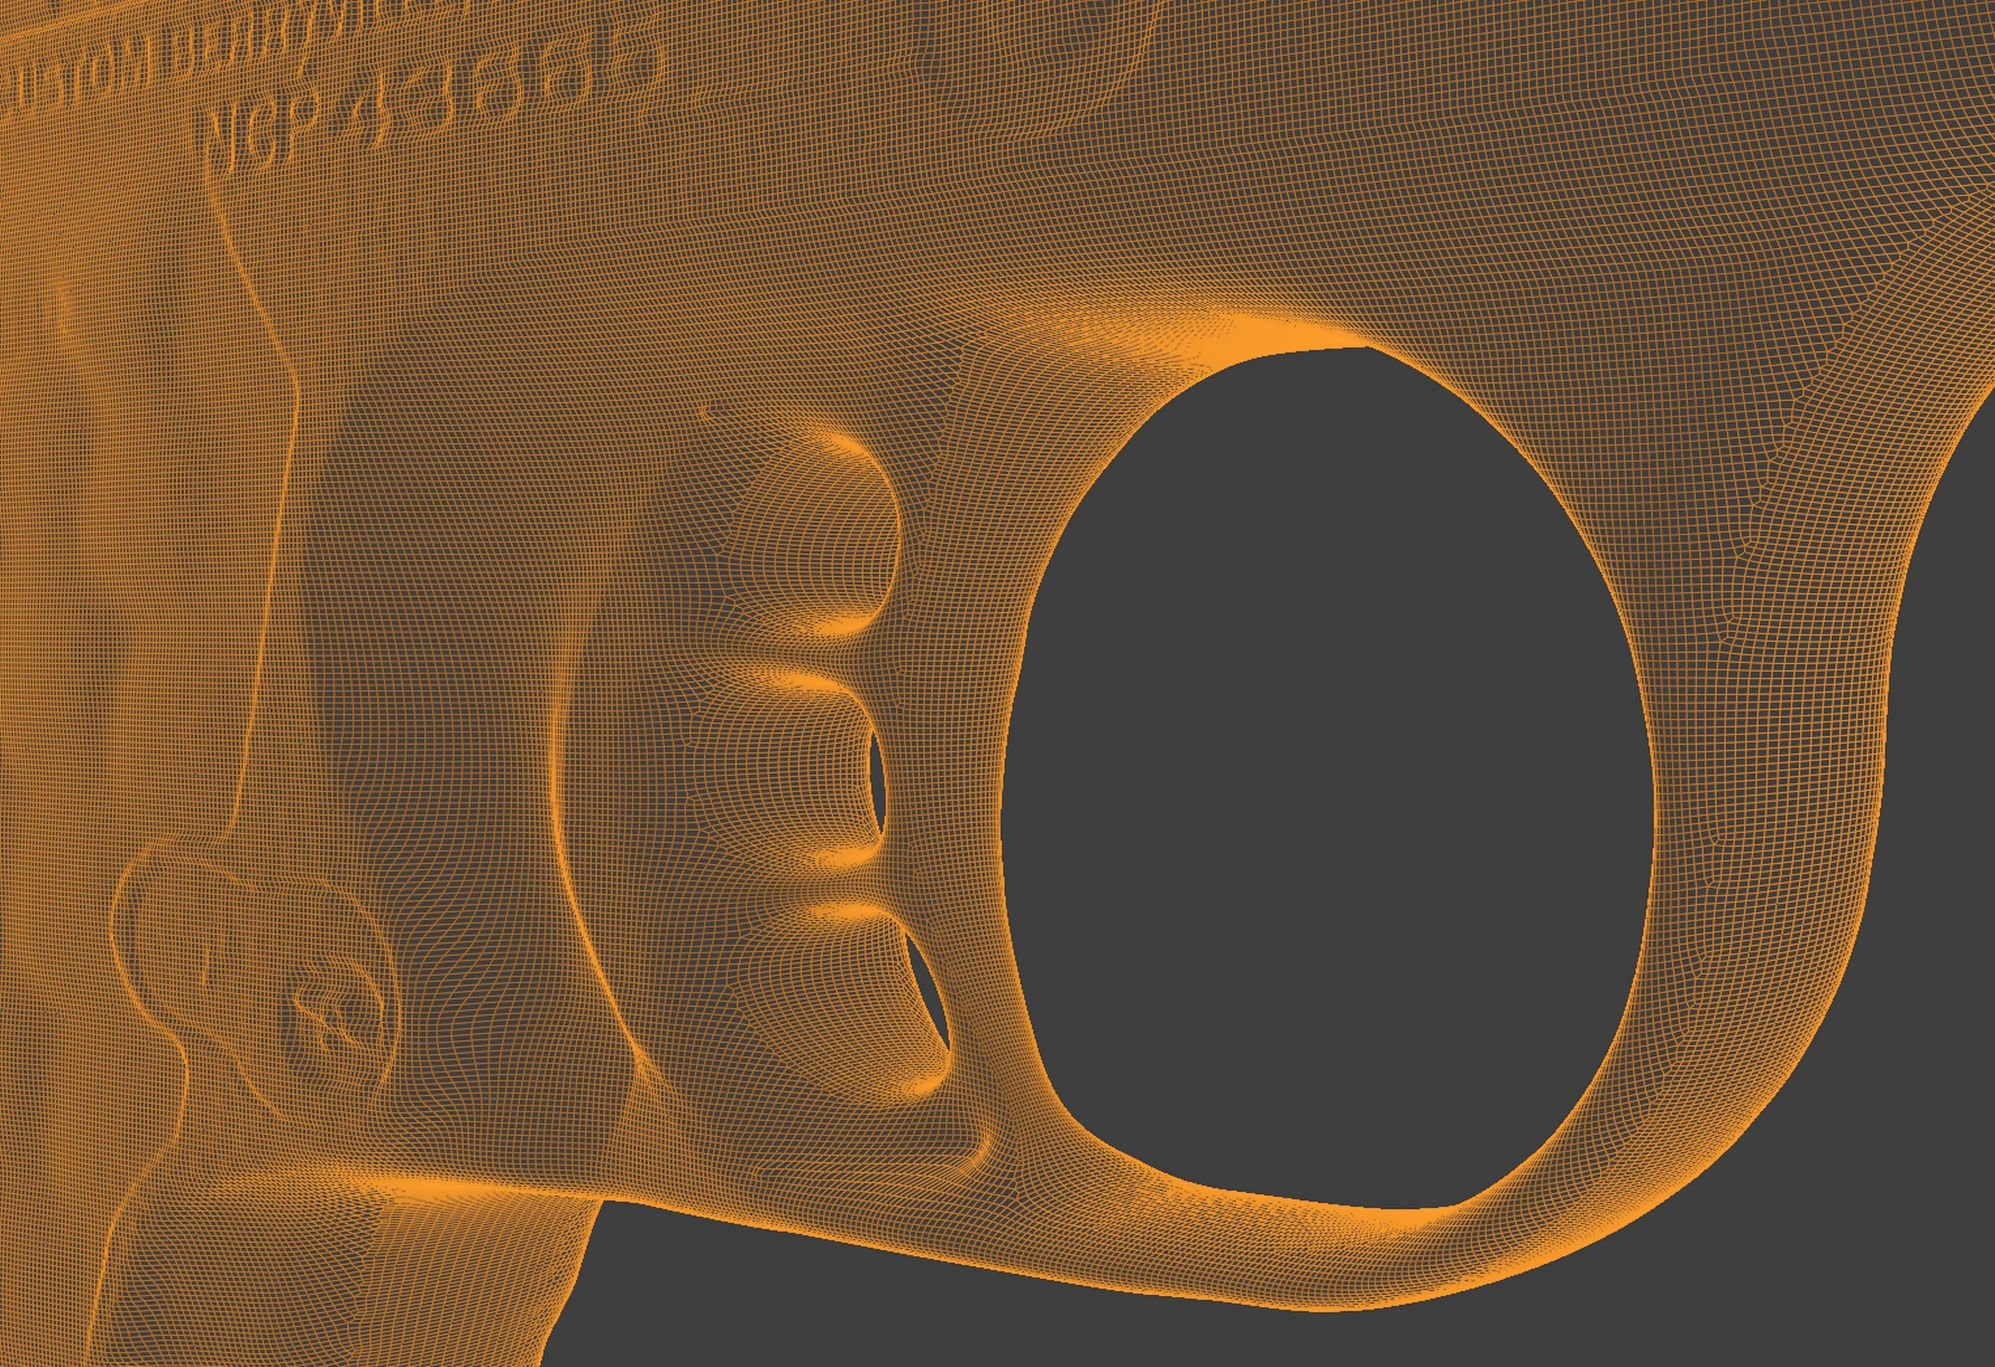
Increasing
the bevel/sharpen segments to 8 has helped the trigger retain its
correct form.
Sharpen Front / Sharpen Back – These two options allow you to control the sharpness of the front and back bevel individually. This allows you to retain sharpness with fewer bevel/sharpen segments, but for beveling, keeping bevel/sharpen segments higher will give a smoother bevel. Reduce the value slightly if high values give you an inward ridge. For example, the below text has beveled edges as a result of side smoothing in combination with bevel/sharpen segments:
Even
bevel on the front and back
Front
sharpen set to a value of 0.99, to give a sharper bevel on the front
vs the back.
Jagged Border – Removes jagged edges at the border of the object if the other smoothing sliders can’t be set high enough:
Set
to 0
Set
to 100, with a slight bit of side smoothing
to remove shading artifacts.
Falloff – how far into the front and back of the model the jagged border smoothing reaches. If you set this value very high, the jagged border smoothing will act similarly to the smooth features option, because jagged border smoothing is basically the same as the smooth features option but limited to the border.
Bump
The 3d bump options add fine details to the object using the specified input image. It works the same as a standard bump map in the shader editor. The light parts of the image cause the geometry to bump outwards, and the black parts stay unmoved.
3d bump – This will displace the geometry along the 3d normal if enabled, and if disabled, the geometry will displace straight forwards. If 3d printing the 2d option will prevent overlapping geometry, although the remesh option we cover shortly will allow you to remove overlapping geometry if you wish to try.
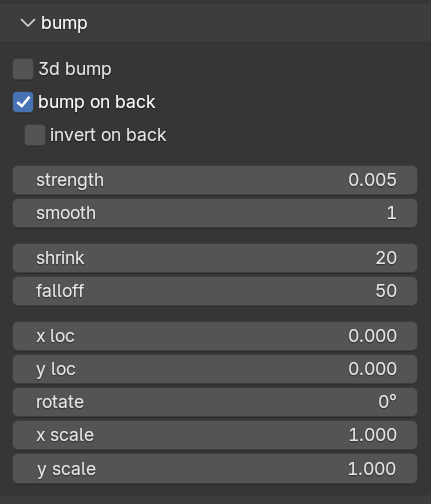
Bump on back – enable if you want the bump to affect the back of the object
Invert on back – enable to make the bump on the back go in the opposite direction to the front.
Shrink – sometimes the border of the object will look a bit too lumpy dependent on the image being used. To avoid that you can shrink the area affected by the bump inwards from the border.
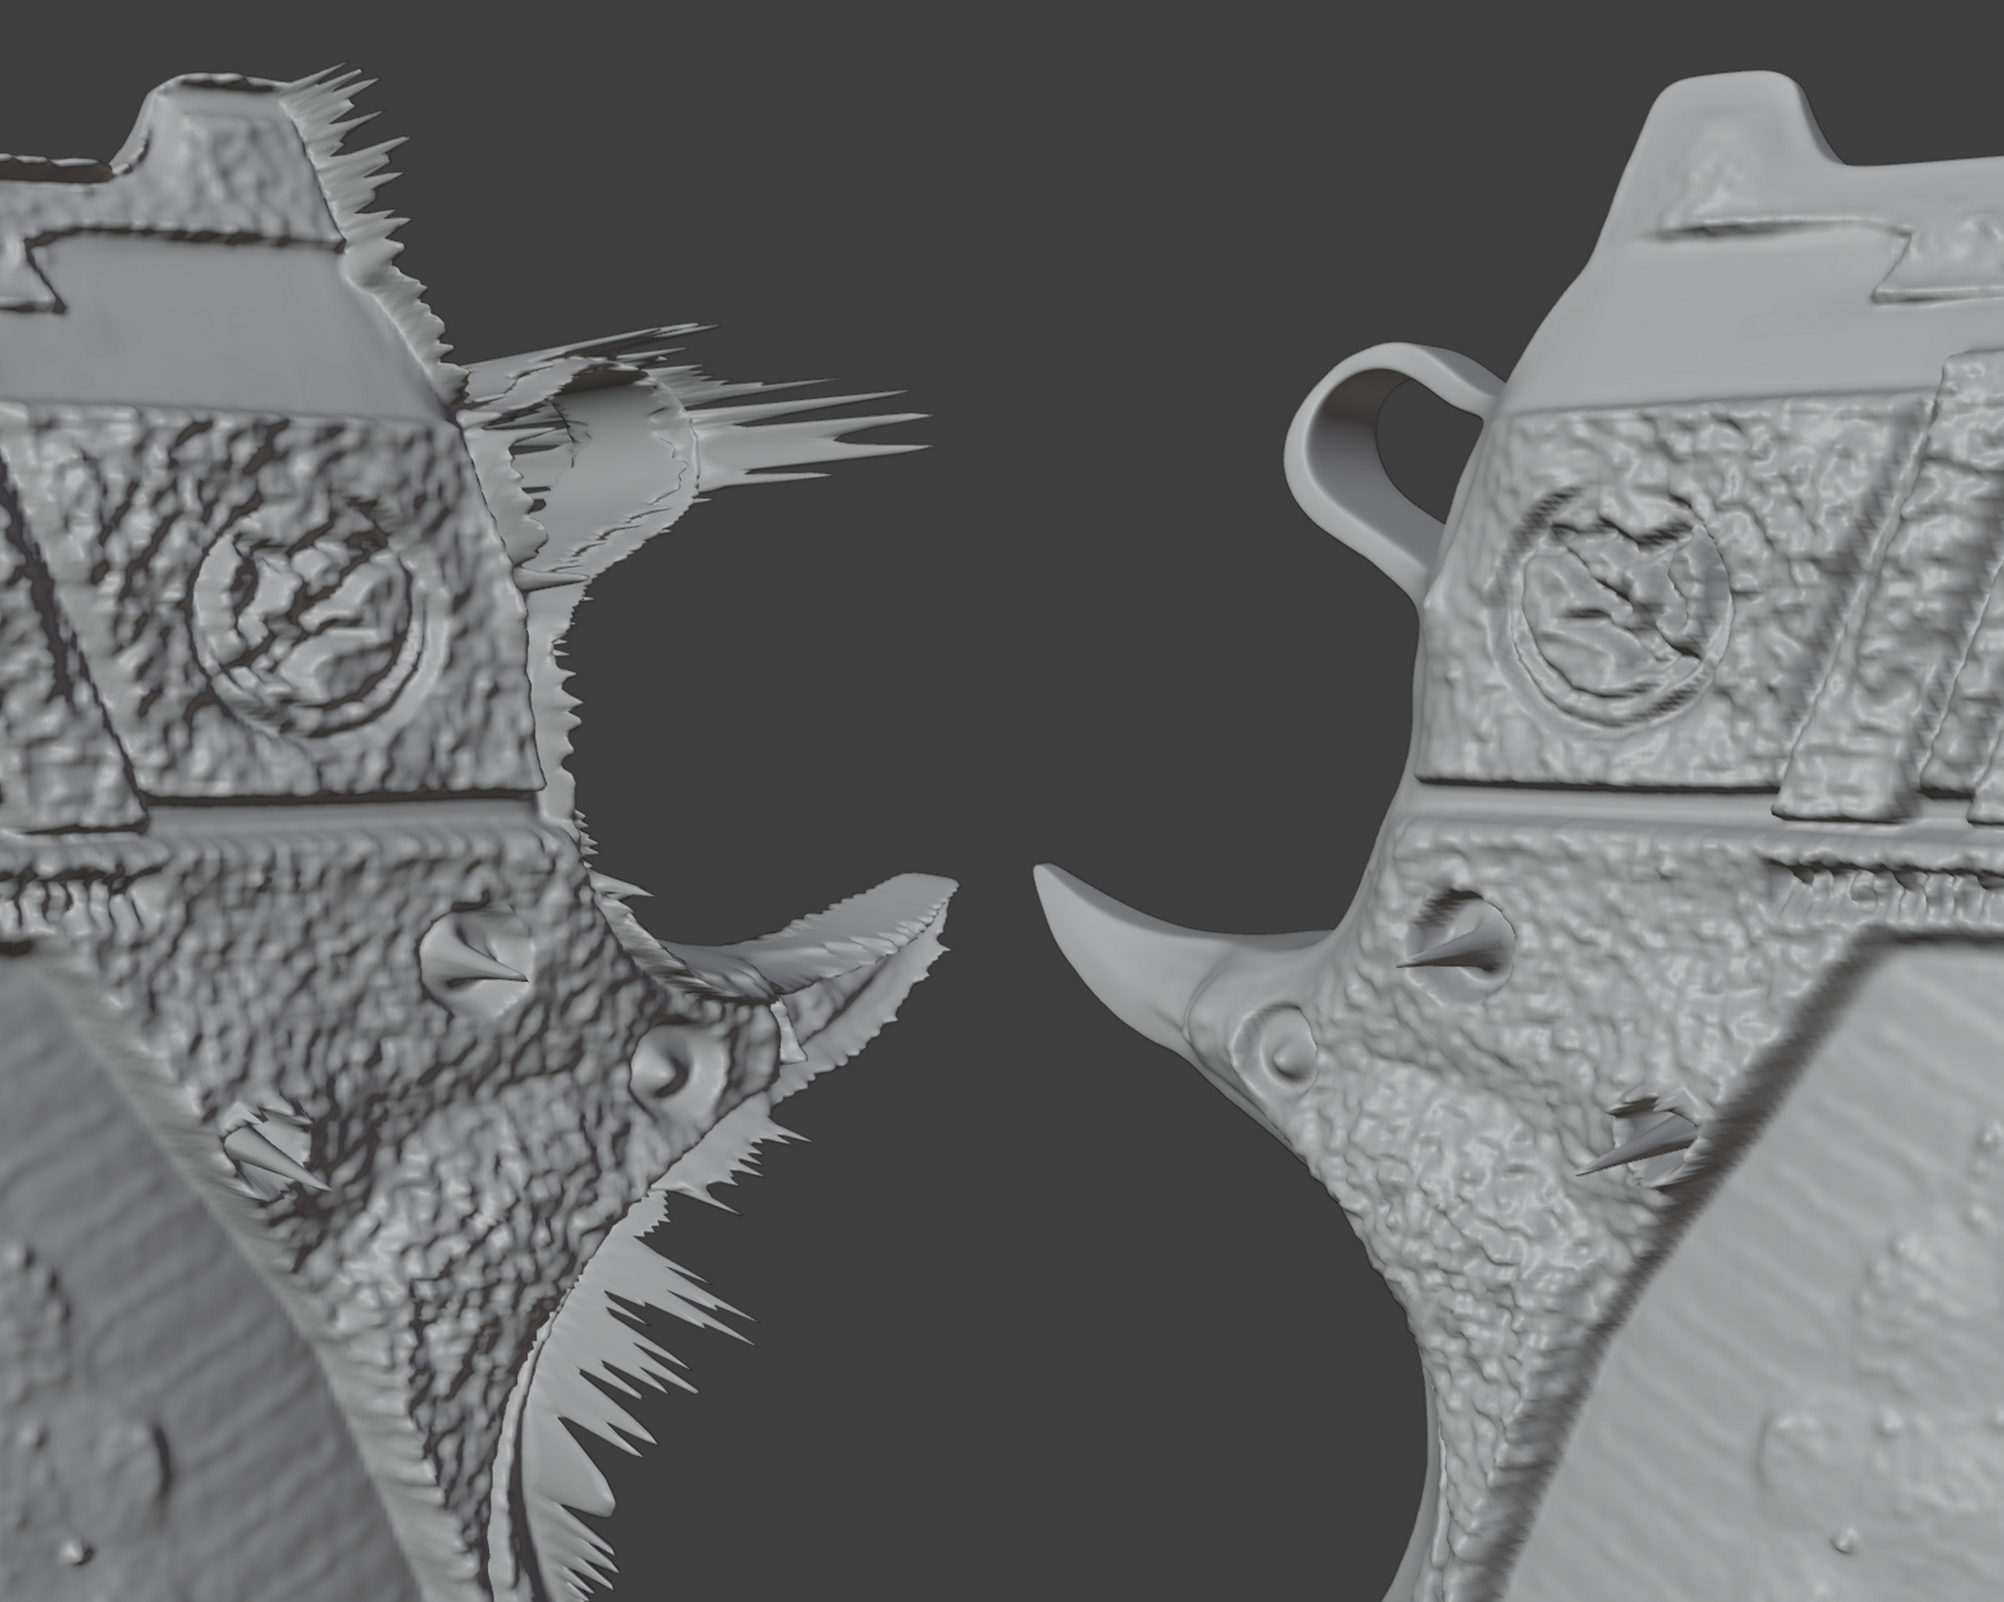
Using
an extreme bump amount for clarity. Left, the border of the
object has artefacts caused by anti-aliasing in the input image.
Right, the shrink value has been set to 20, so that the bump area has
contracted away from border, without reducing the bump affect
elsewhere.
Falloff – how smooth the transition is from the edge of the shrunk area.
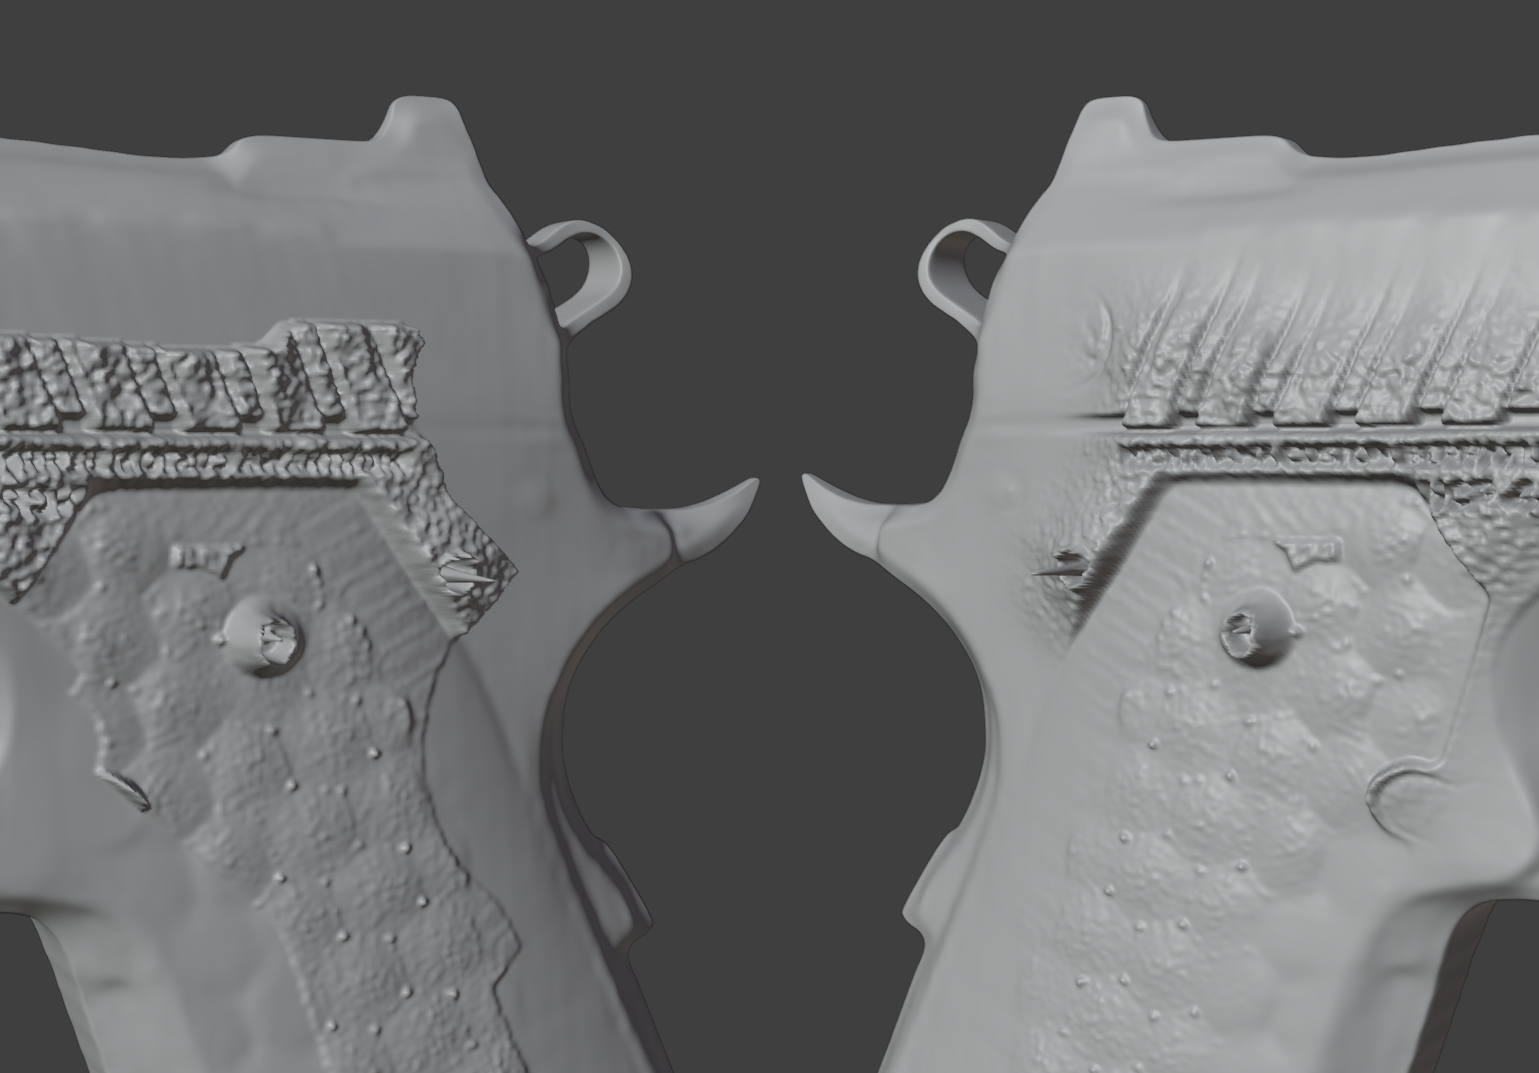
Left, no falloff. Right, a high falloff for a more gradual transition from the shrunk bump map.
X loc, Y loc, Rotate, Scale X, Scale Y – transform the position, rotation and scale of the bump map. When updating the object from the generation panel, you can choose to reset the transform. Be sure to leave that option unchecked if you don’t want to lose the current positioning.
Remesh
The
remeshing feature will voxel re-mesh your model whilst retaining all
colour and UV information. It’s mainly useful in two
scenarios:
Replacing stretched geometry with evenly distributed faces, ready for sculpting or for removing shading artefacts.
Repairing overlapping geometry caused by using extreme values for things like 3d bump. This is necessary if you plan to 3d print the model.
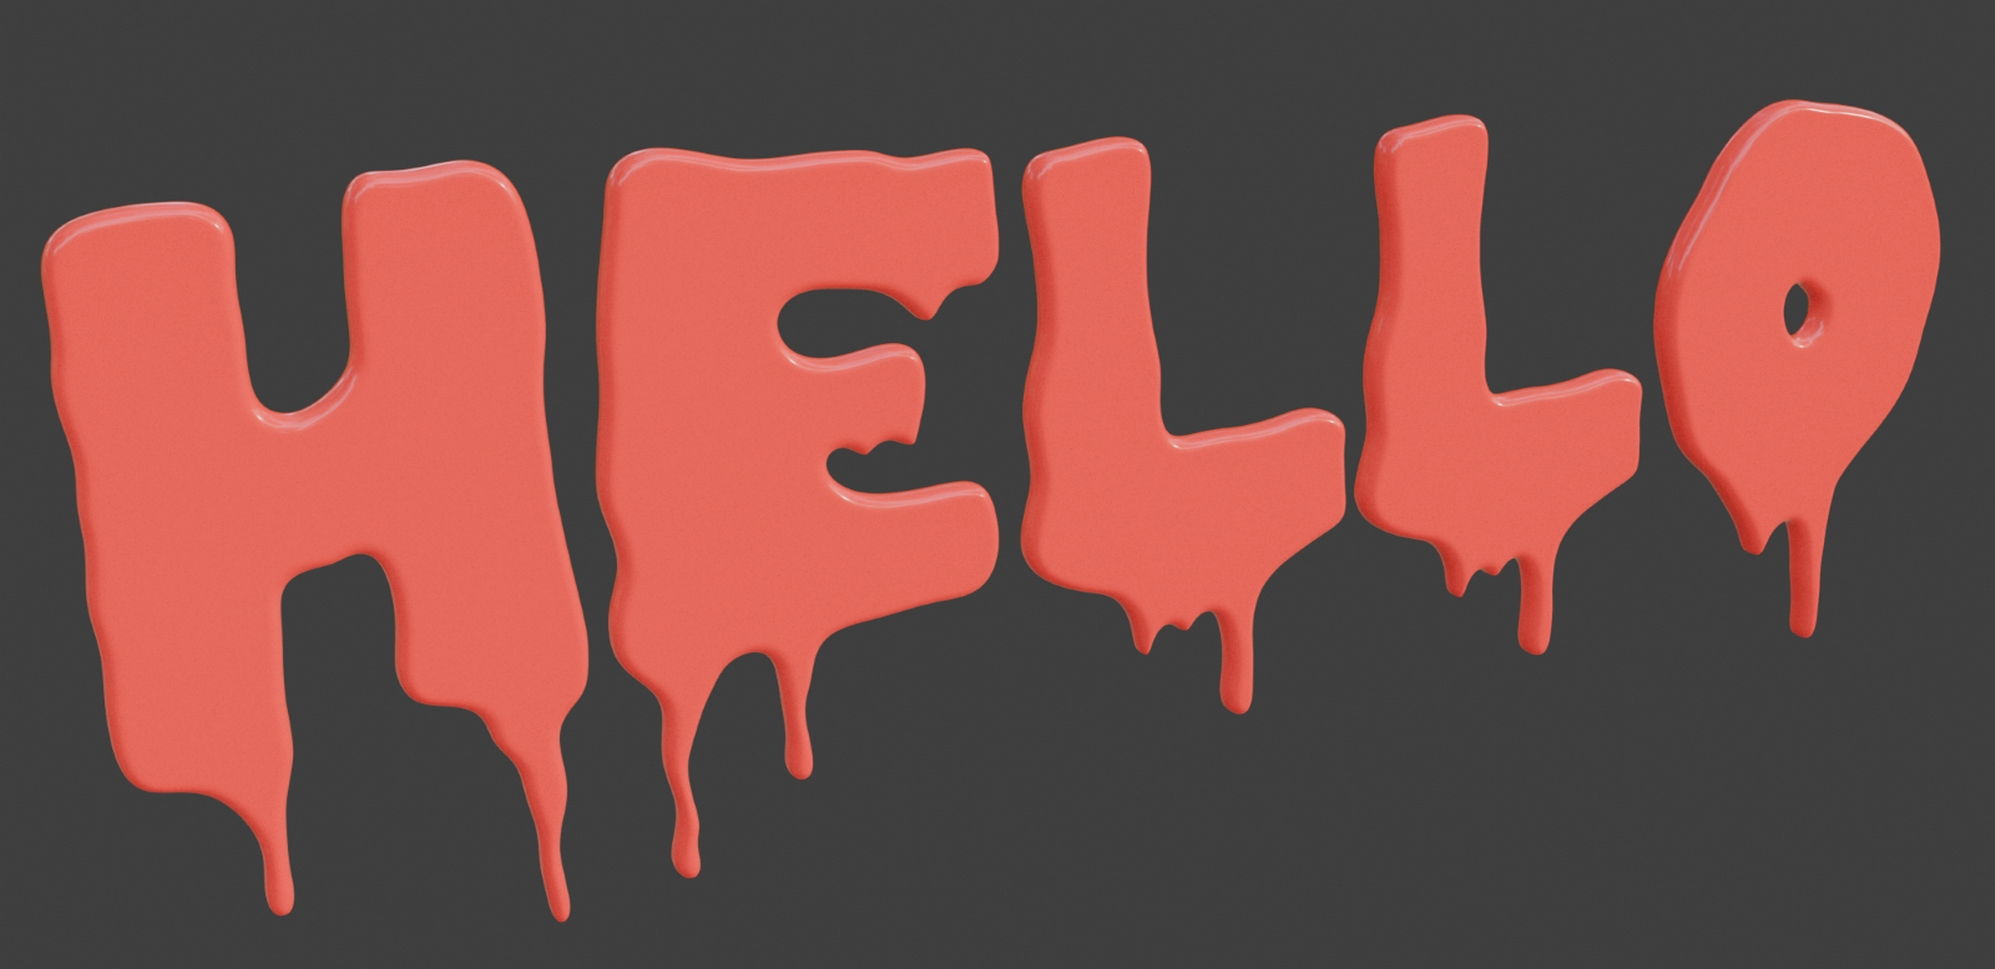
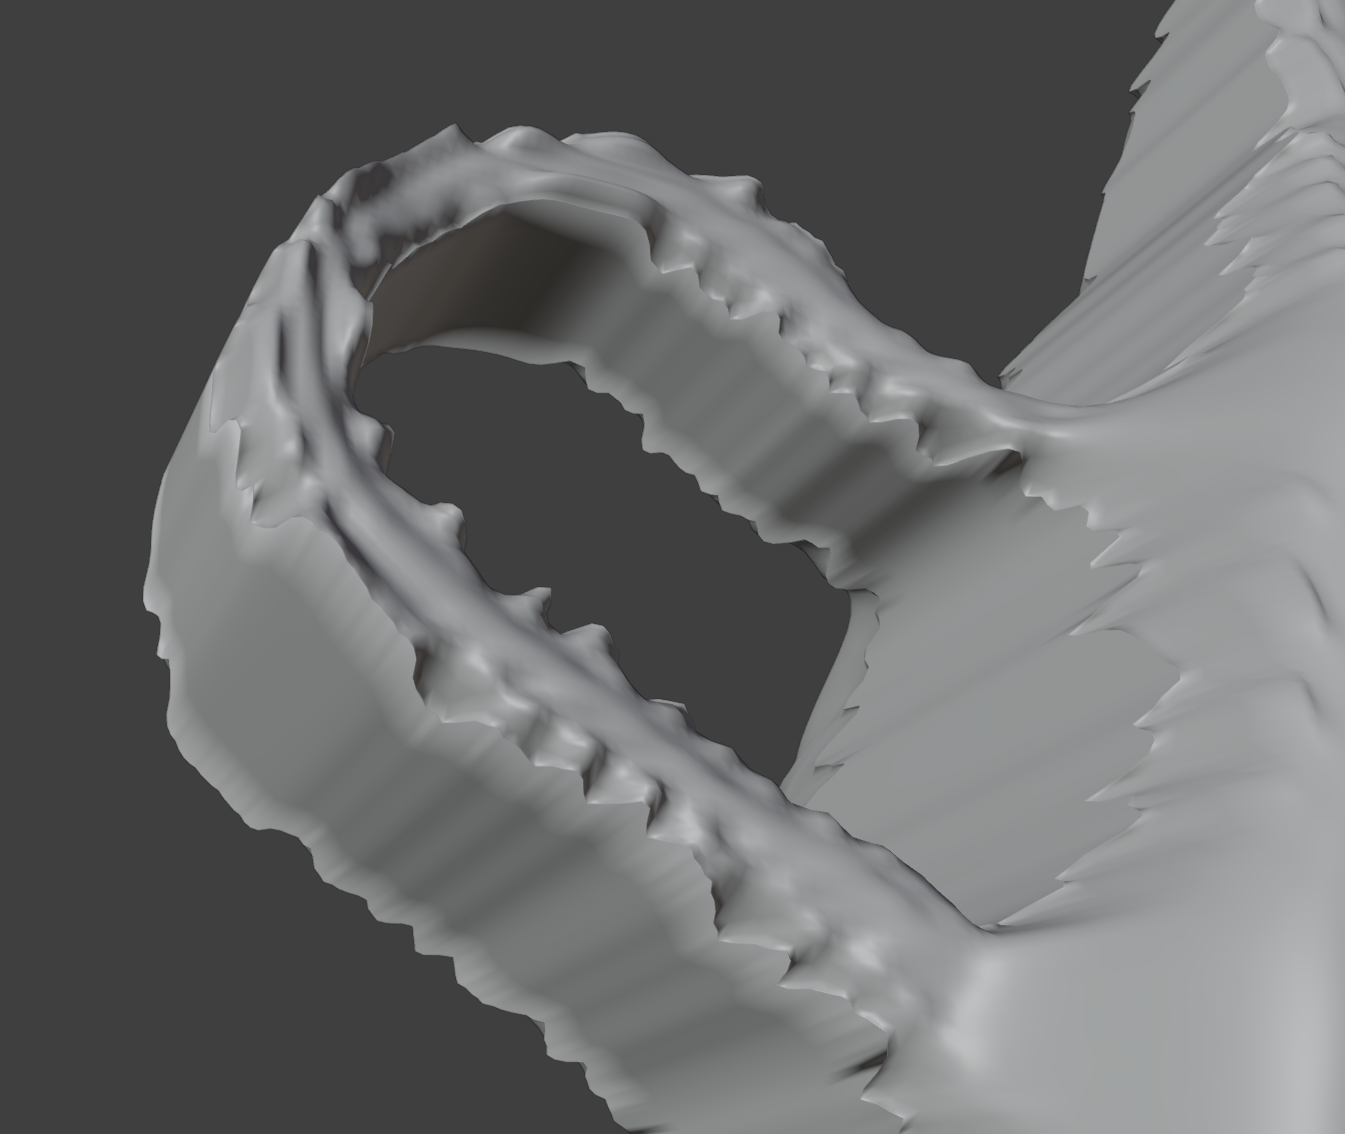
Below is an example where the ‘hello’ text has been assigned a 3d bump pattern, and pushed to extremes to cause overlapping geometry:
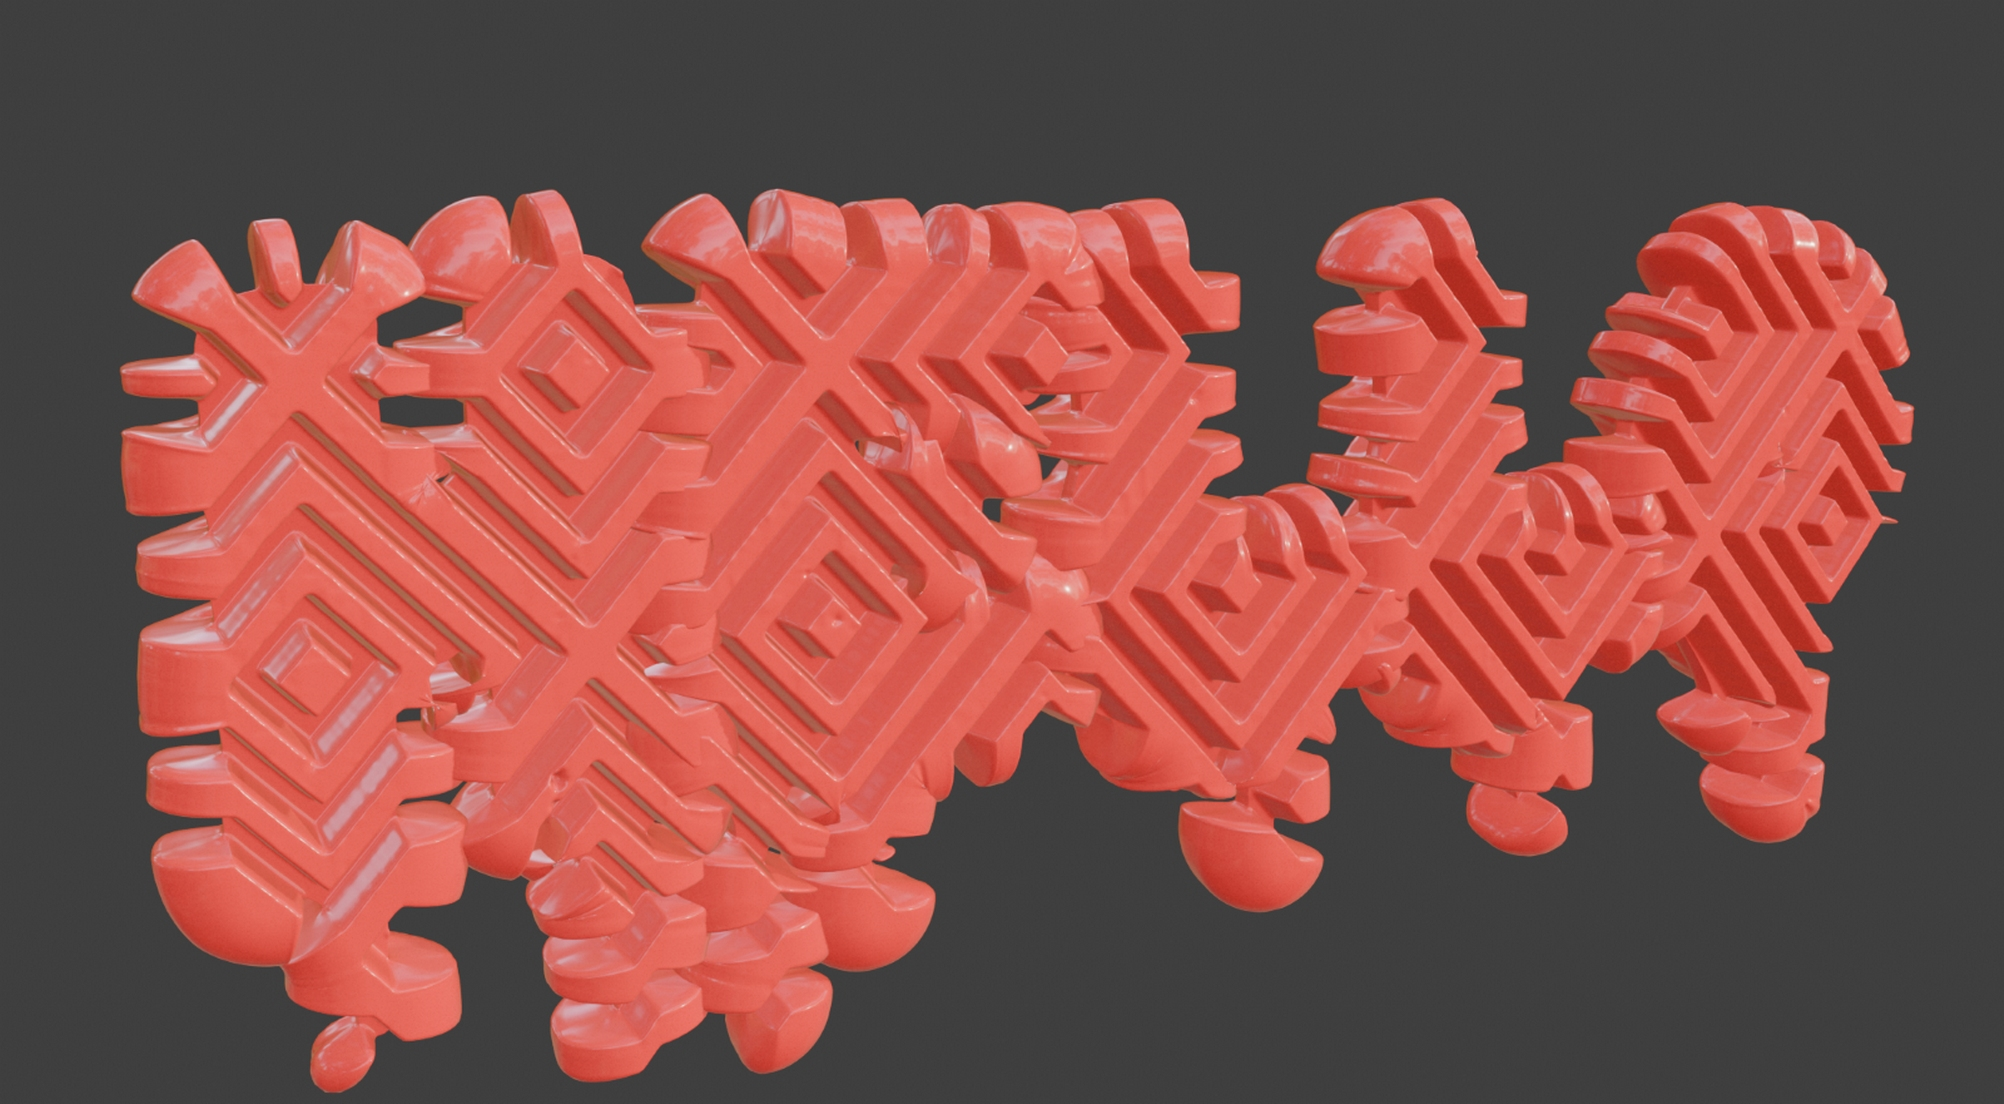
Extreme
3d bump setting to generate unprintable overlapping geometry.
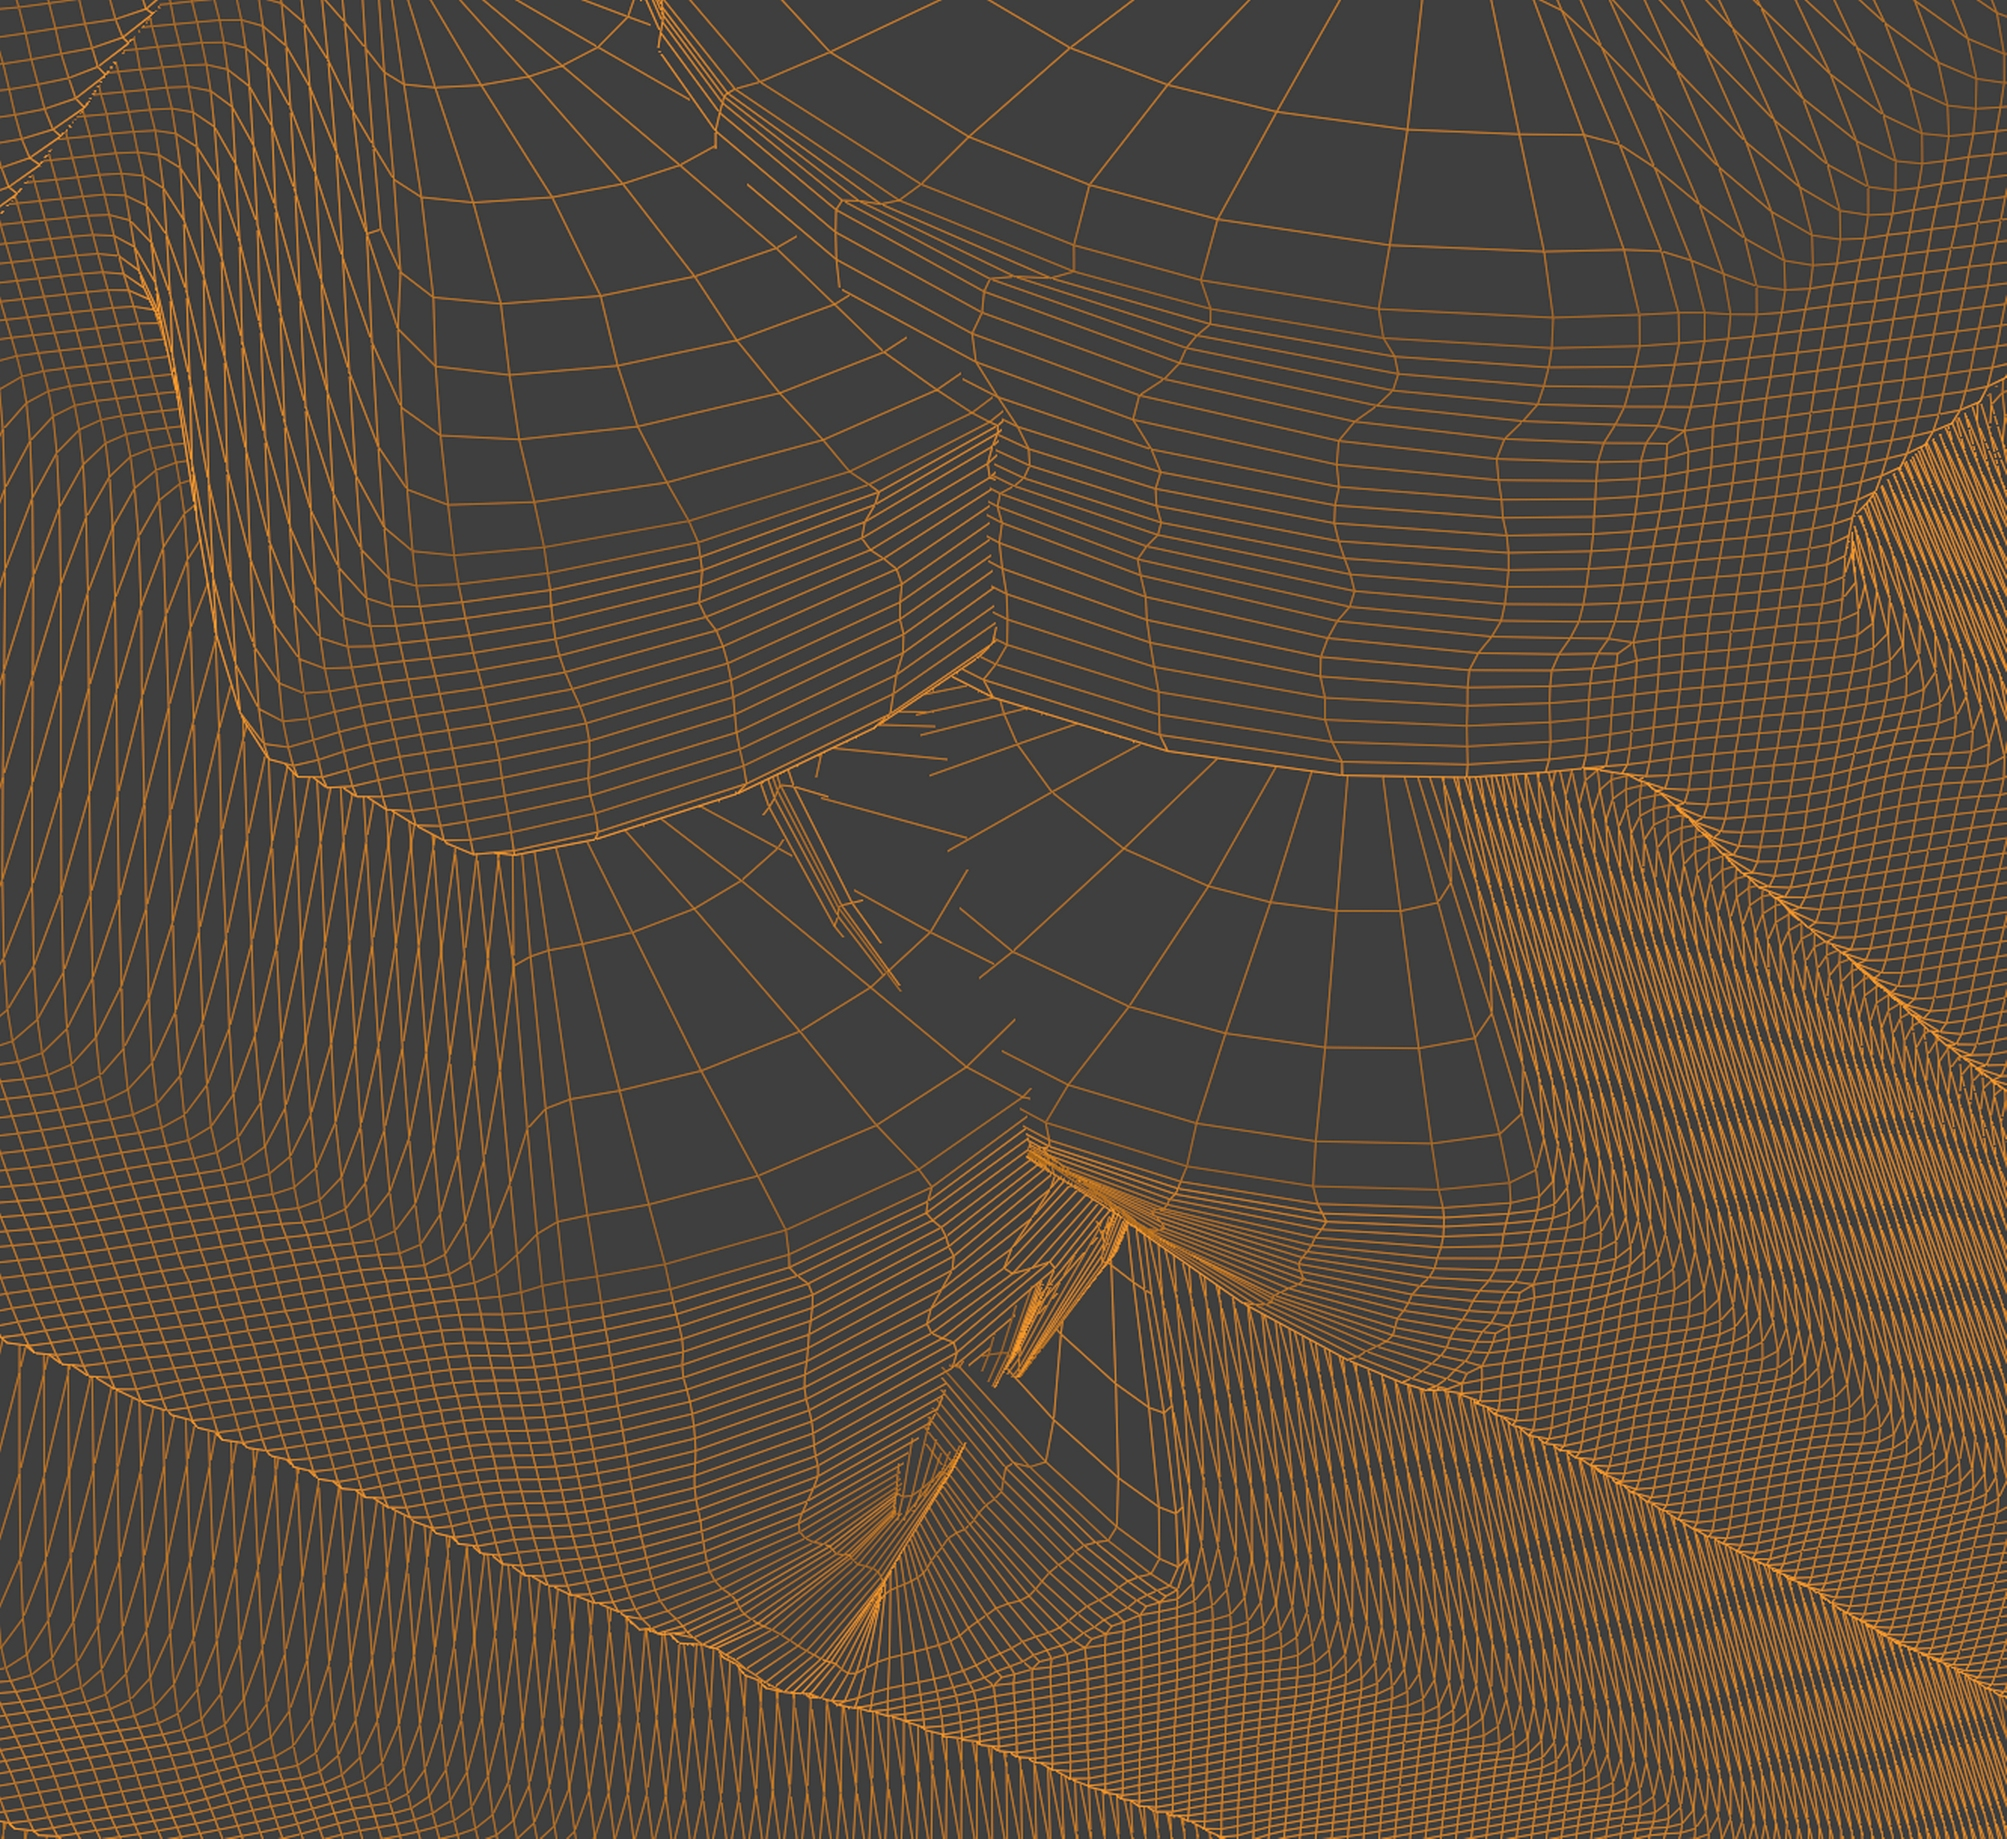
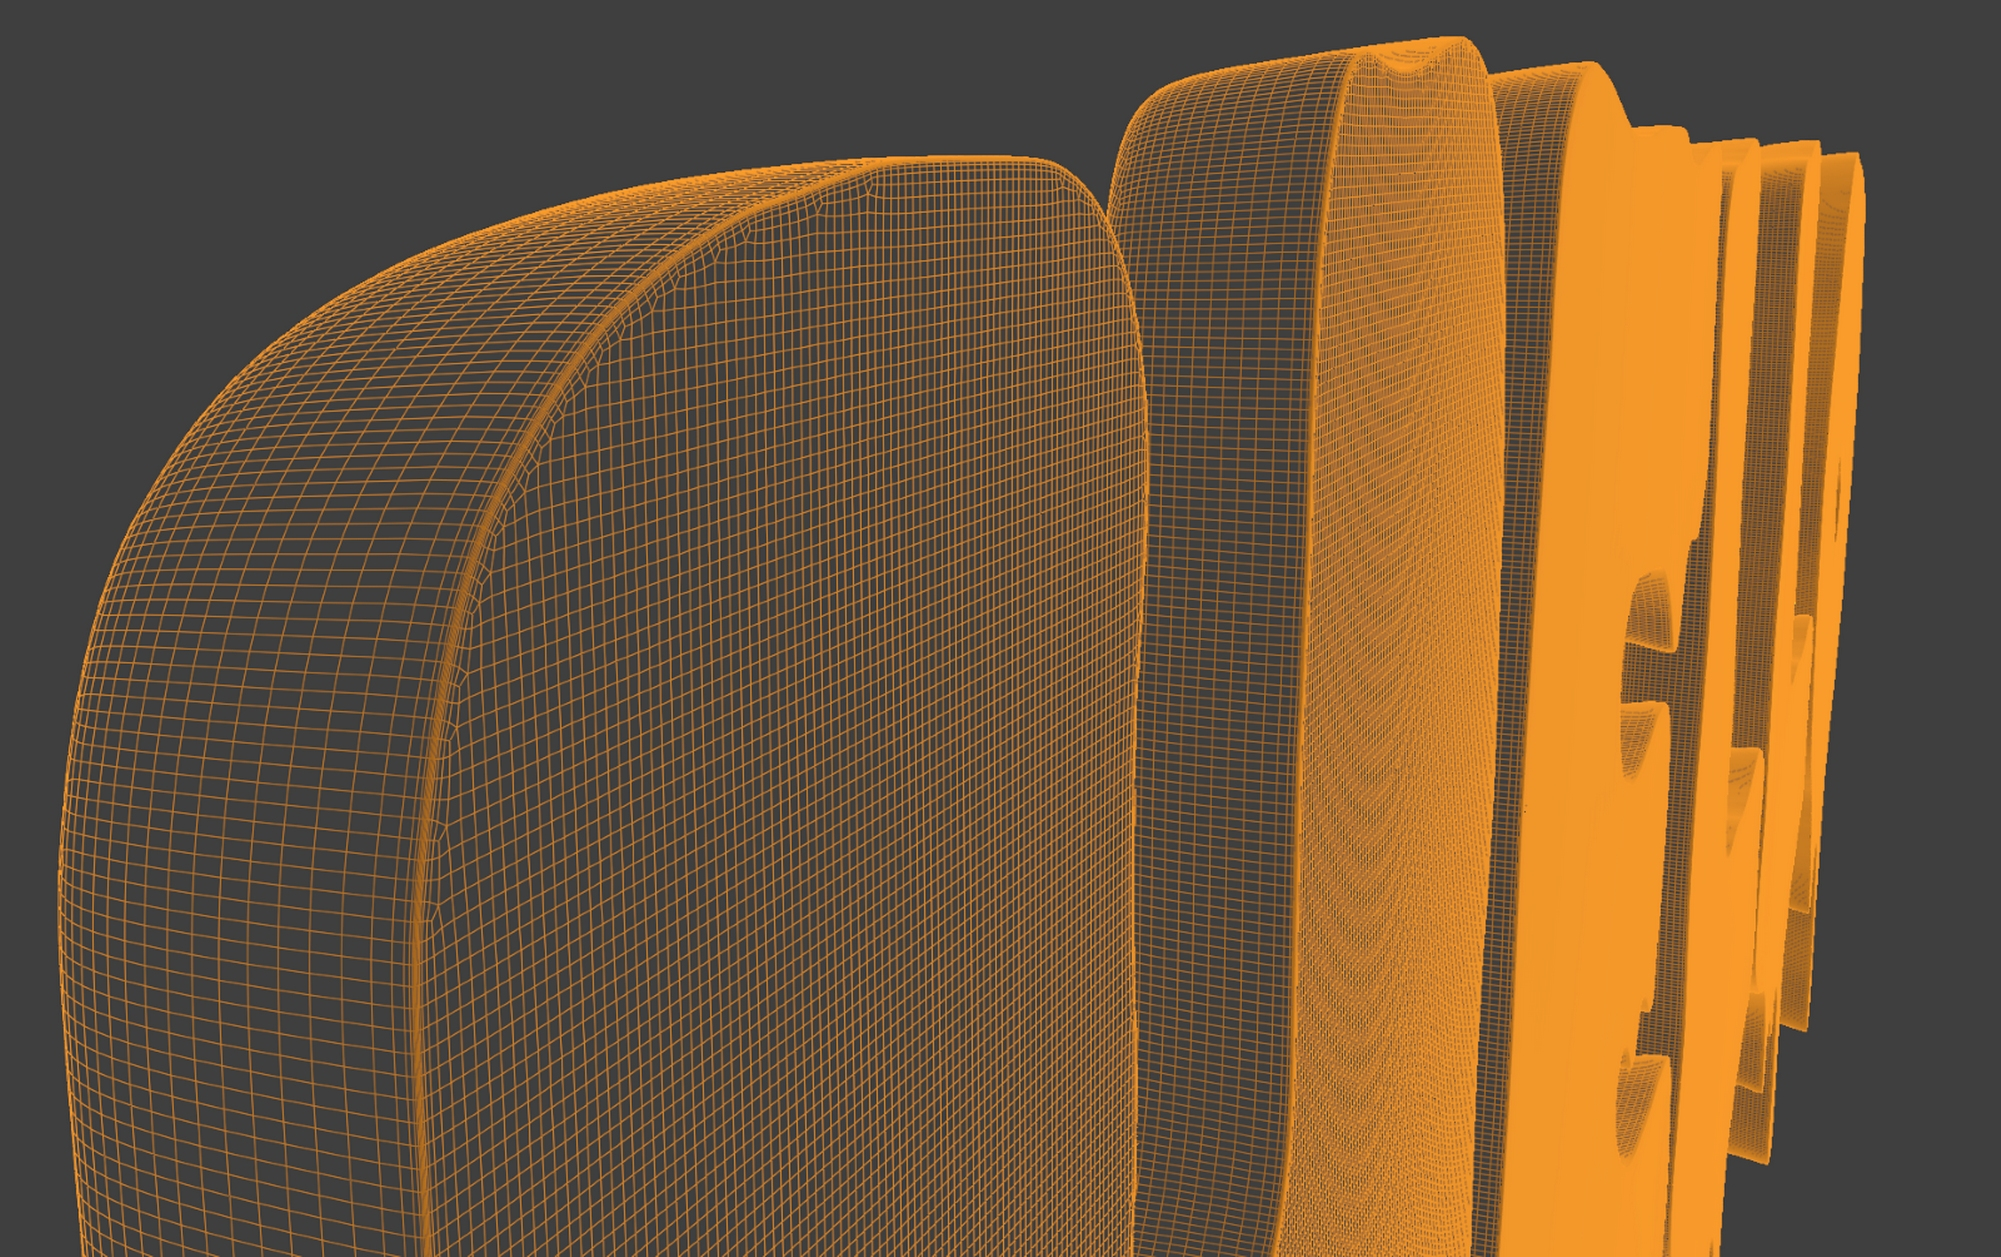
A
close-up reveals the overlapping geometry, which
will make 3d printing impossible.
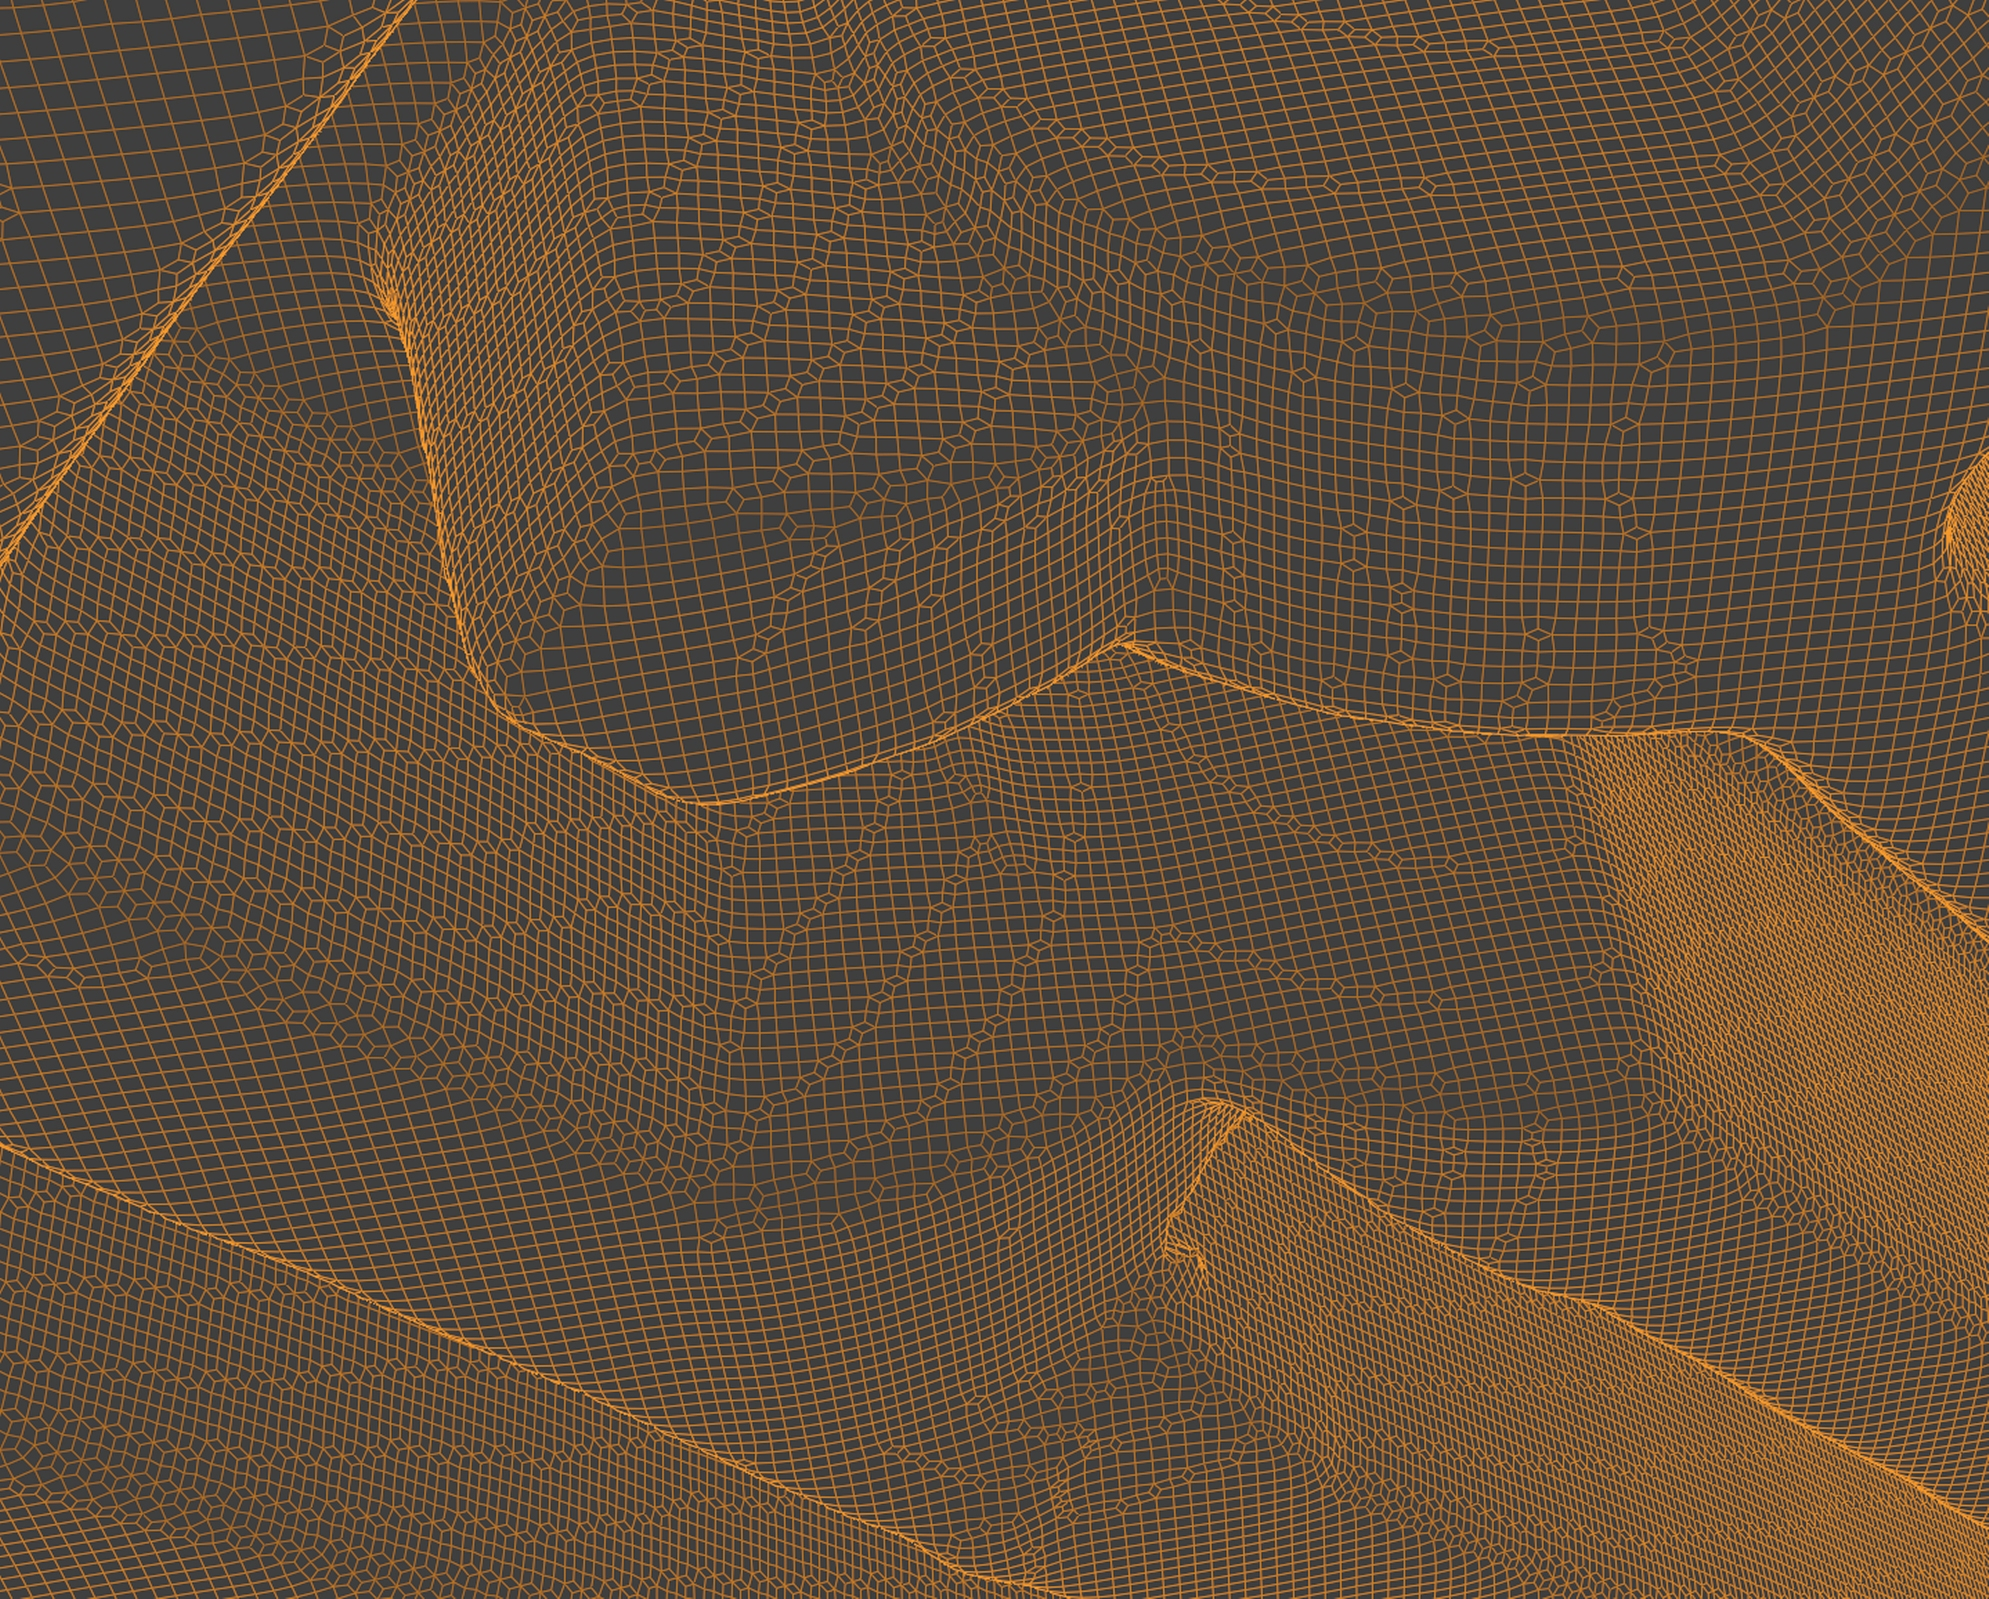
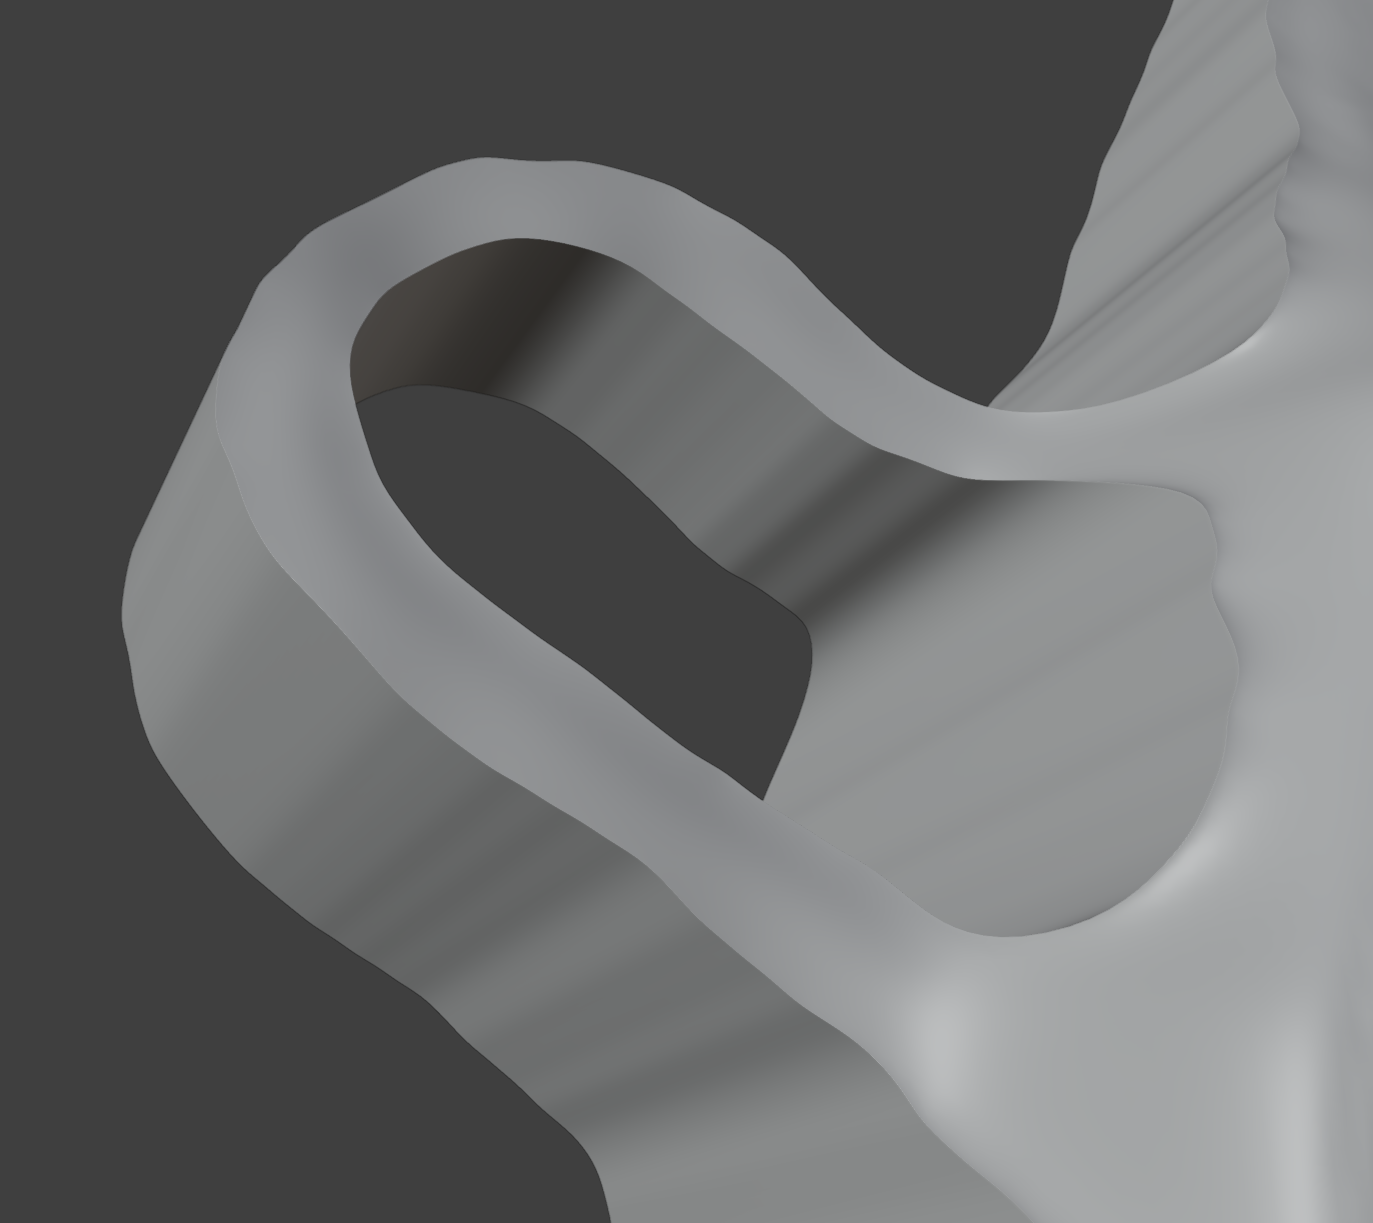
After re-meshing – the overlapping geometry is removed making the model 3d printable again. The faces are evenly distributed ready for additional sculpting after the object is converted to a 3d mesh.
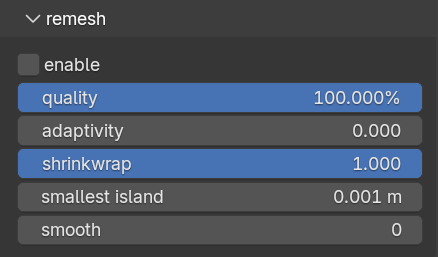
Quality – the quality controls the size of the new faces. 100% will produce faces similarly sized to the original mesh. Sometimes pushing this value to 120 to 200% and then increasing the re-mesh smoothing will give better results. A lower value will allow you to remove unwanted detail from the original mesh.
Adaptivity – This will reduce the overall geometry count by only keeping small faces where they’re necessary, to preserve the shape of the object. I would never use this object on anything other than objects that will be far from the camera. For close up objects the shading artefacts will be too noticeable. Blender’s decimate modifier will do a far better job, so I’d recommend using that instead if you need to reduce ‘hero’ objects.
Shrinkwrap – Ensures the surface is smooth after remeshing. I’ve left it as an option in case people want to create Minecraft style models.
Smallest island – This will remove any isolated islands of geometry that remeshing creates. Necessary for 3d printing, where generally you would want to avoid lots of small bits of disconnected geometry. The value refers to the combined face area of the island. Isolated geometry with an area below this will be deleted.
Smooth – Post re-mesh smoothing on all axis. Similar to the 3d option in the smoothing panel, but will also reduce the 3d bump details.
Colour
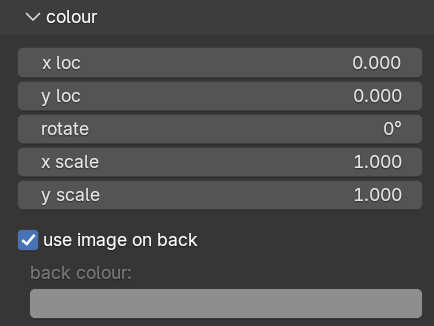
X loc, Y loc, rotate, X scale, Y scale - Translate, rotate and scale the colour map
Use image on back – When ticked the colour map will be used on the back of the model. When unticked, the back colour shown below will be used. When using the back colour in combination with smoothing, you’ll notice the colour will stretch towards the front of the model. If you don’t want that, you can use the ‘sharpen back’ option in the smoothing panel to lock the edge in place (ensure you have sufficient bevel/sharpen segments, and avoid a value of 1 if you don’t have much side smoothing.
Generated Materials
When you generate the model, two new materials will be created. The materials are named the same as the generated model.

The above image shows the outliner from a scene which has two PixelModeller AI models. imgTo3d and Torus. They both have two materials. The material that ends with _img, is the material used when you don't have 'preview as 3d print' enabled, the one ending in _3dPrint is used when 'preview as 3d print' is ticked. The _img material gets it's base colour from an image texture and is glossy, the _3dPrint material gets it's base colour from the model's vertex colours and is less glossy.
You can modify the materials by opening the shader editor, and then selecting the relevant material from the dropdown, then tweak as usual.
If you convert the model to a mesh, both materials will show up in the materials tab of the properties panel. You can just delete whichever one you don't want to use, or alternatively keep both in case you want to switch later. If you do want to change which of the materials is used after converting to a mesh, then you go into edit mode, select all, choose the material you want to use in the material tab, and then click assign (same process as usual).
Acknowledgments
The AI elements of this addon are based on code
from the following sources.
Muggled DPT
author = heyoeyo
year = 2023,
publisher = GitHub,
https://github.com/heyoeyo/muggled_dpt
Simplification of the very cool 'dense
prediction transformer' (DPT) depth estimation model from
[isl-org/MiDaS](https://github.com/isl-org/MiDaS), with the intention
of [removing the magic](https://en.wikipedia.org/wiki/Muggle) from
the original code.
Midas
https://github.com/isl-org/MiDaS
author = "Ren\'{e} Ranftl and Katrin
Lasinger and David Hafner and Konrad Schindler and Vladlen Koltun",
title = "Towards
Robust Monocular Depth Estimation: Mixing Datasets for Zero-Shot
Cross-Dataset Transfer",
journal = "IEEE
Transactions on Pattern Analysis and Machine Intelligence",
year =
"2022",
volume = "44",
number = "3"
author = {Ren\'{e}
Ranftl and Alexey Bochkovskiy and Vladlen Koltun},
title = {Vision
Transformers for Dense Prediction},
journal = {ICCV},
year =
{2021},
@article{birkl2023midas,
title= MiDaS
v3.1 -- A Model Zoo for Robust Monocular Relative Depth Estimation,
author=Reiner
Birkl and Diana Wofk and Matthias Muller,
journal=arXiv
preprint arXiv:2307.14460
year=2023
PyTorch Image Models
https://github.com/huggingface/pytorch-image-models/tree/v0.6.12
(aka timm, specifically v0.6.12):
author = {Ross Wightman},
year = {2019},
publisher = {GitHub},
journal = {GitHub repository},
doi = {10.5281/zenodo.4414861},
howpublished =
{\url{https://github.com/rwightman/pytorch-image-models}}
Depth-Anything (v1)
https://github.com/LiheYoung/Depth-Anything
```bibtex
@inproceedings{depth_anything_v1,
title={Depth Anything: Unleashing the
Power of Large-Scale Unlabeled Data},
author={Yang, Lihe and Kang, Bingyi and
Huang, Zilong and Xu, Xiaogang and Feng, Jiashi and Zhao,
Hengshuang},
booktitle={CVPR},
year={2024}
Depth-Anything-V2
https://github.com/DepthAnything/Depth-Anything-V2):
@article{depth_anything_v2,
title={Depth Anything V2},
author={Yang, Lihe and Kang, Bingyi and
Huang, Zilong and Zhao, Zhen and Xu, Xiaogang and Feng, Jiashi and
Zhao, Hengshuang},
journal={arXiv:2406.09414},
year={2024}
Dinov2
https://github.com/facebookresearch/dinov2
title={DINOv2: Learning Robust Visual Features
without Supervision},
author={Oquab, Maxime and Darcet,
Timothée and Moutakanni, Theo and Vo, Huy V. and Szafraniec, Marc
and Khalidov, Vasil and Fernandez, Pierre and Haziza, Daniel and
Massa, Francisco and El-Nouby, Alaaeldin and Howes, Russell and
Huang, Po-Yao and Xu, Hu and Sharma, Vasu and Li, Shang-Wen and
Galuba, Wojciech and Rabbat, Mike and Assran, Mido and Ballas,
Nicolas and Synnaeve, Gabriel and Misra, Ishan and Jegou, Herve and
Mairal, Julien and Labatut, Patrick and Joulin, Armand and
Bojanowski, Piotr},
journal={arXiv:2304.07193},
year={2023}
Choose a product version:
-
$24.99 Single User
1 user.
-
$199.99 Standard Studio/Business
Up to 10 employees.
-
$999.99 Large Studio/Business
up to 50 employees
| Sales | 100+ |
| Customer Ratings | 2 |
| Average Rating | |
| Dev Fund Contributor | |
| Published | 23 days ago |
| Blender Version | 4.3, 4.2, 4.1, 4.0, 3.6 |
| Extension Type | Legacy Add-on |
| License | GPL |
Have questions before purchasing?
Contact the Creator with your questions right now.
Login to Message