Imago Gif | Render And Import Gif Animations
Imago GIF - Blender Addon Documentation
Table of Contents
Installation
- Open Blender 4.2 or later
- Go to
Edit > Preferences - Click on
Get Extensionsin the left sidebar - Click the dropdown menu at the top that says "Install"
- Navigate to your downloaded
imago_gif.zipfile - Click "Install Add-on"
Location and Access
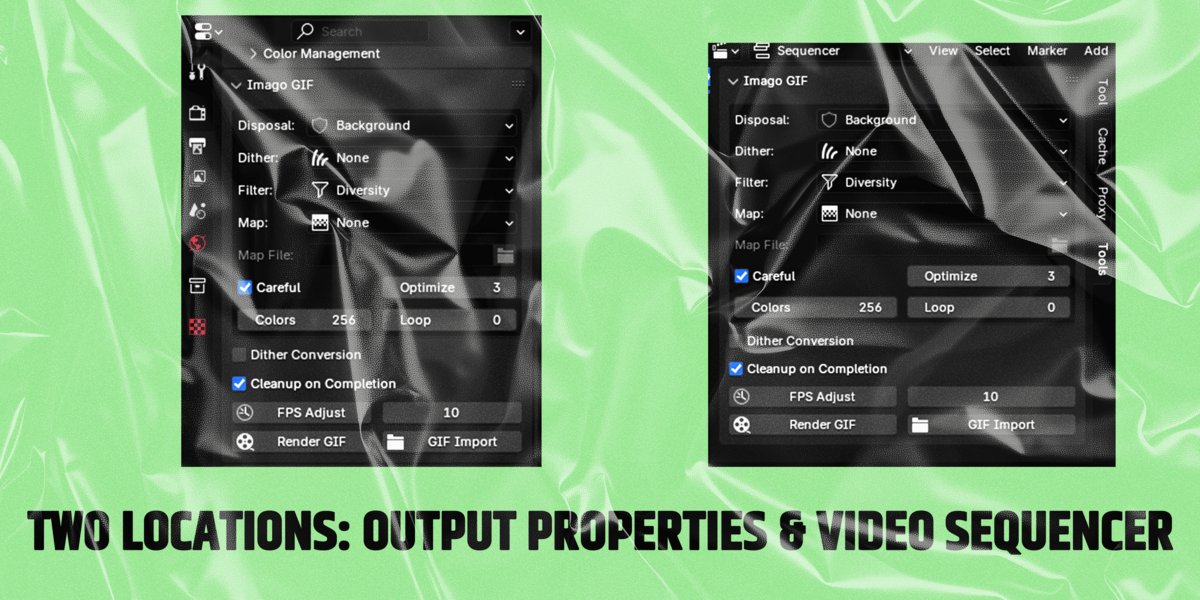
Imago GIF can be accessed from two locations in Blender:
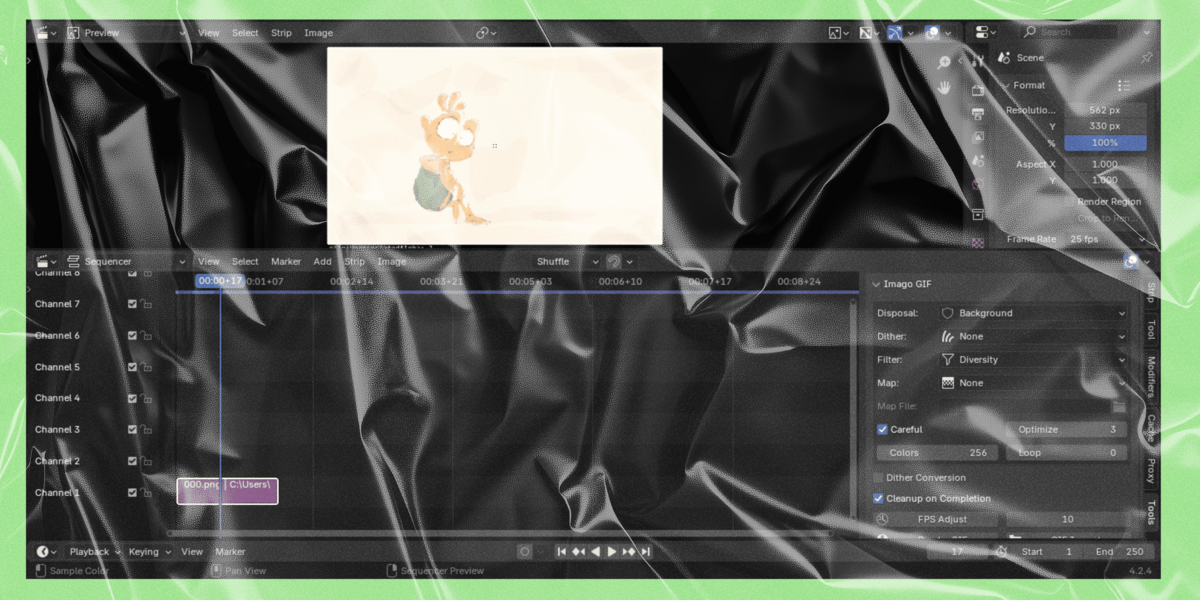
- Video Sequencer: Found in the sidebar of the Video Sequencer (press N to show/hide). This location is ideal for importing existing GIFs and working with them in the sequencer.
- Output Properties: Located in the Properties panel under the Output Properties tab. This location is convenient when you're ready to render your animation as a GIF.
Both locations offer the same functionality, so you can use whichever is more convenient for your workflow.
Basic Usage
Importing a GIF
- Open the Video Sequencer
- Press N to open the sidebar if it's not visible
- Find the Imago GIF panel
- Click "Import GIF" and select your file
- The GIF will be automatically split into frames and imported into your sequence
Rendering a GIF
- Set up your animation in Blender
- Go to Output Properties
- Configure your GIF settings in the Imago GIF panel
- Click "Render GIF" and choose your save location
Features and Settings
Disposal Method
Controls how each frame is handled before displaying the next frame in your animation.
- None: Leaves the current frame visible for future frames to build upon. Use this when frames should stack or blend.
- Background: Clears the current frame before showing the next one. Best for most animations.
- Previous: Restores the previous frame before showing the next one. Useful for complex animations with overlapping elements.
Dithering
Dithering creates the illusion of more colors by mixing existing ones in patterns. Different methods offer various trade-offs between quality and file size.
- None: No dithering. Creates smaller files but may show color banding.
- Floyd-Steinberg: Best quality but may cause animation artifacts.
- Ordered Patterns (ro64, o3, o4, o8): Various sized patterns for different detail levels.
- Special Effects (halftone, squarehalftone, diagonal): Create artistic patterns.
Filter (Color Reduction Method)
Determines how colors are chosen when reducing the color palette.
- Diversity: Uses existing colors only. Good for preserving original colors.
- Blend Diversity: Blends some colors for smoother transitions.
- Median Cut: Balances color distribution. Good for complex images.
Color Map
Controls the color palette of your GIF.
- None: Uses automatic color selection
- Web: Uses the 216-color web-safe palette
- Grayscale: Converts to grayscale
- Black & White: Converts to pure black and white
- Custom: Use your own color map file
Optimization
Controls how the GIF is compressed. Higher levels take longer but produce smaller files.
- Level 1: Quick optimization, stores only changed portions
- Level 2: Uses transparency for better compression
- Level 3: Tries multiple methods for smallest file size
Additional Settings
- Colors: Number of colors in the GIF (2-256)
- Loop Count: Number of times the GIF should loop (0 = infinite)
- Careful: Creates slightly larger files but avoids compatibility issues
- Dither Conversion: Applies dithering during PNG to GIF conversion
Tips and Best Practices
1. File Size vs Quality
- Start with Level 3 optimization for smallest file size
- Reduce colors if file size is still too large
- Use dithering only if color banding is visible
2. Animation Smoothness
- Use "Background" disposal for most animations
- Avoid Floyd-Steinberg dithering if you notice flickering
- Consider frame rate carefully - lower FPS often works better for GIFs
3. Color Management
- Use "Diversity" color method for most cases
- Switch to "Median Cut" for complex gradients
- Consider "Web" color map for maximum compatibility
Troubleshooting
1. Buttons are Grayed Out
- Ensure you're in the Video Sequencer workspace
- Check if you have an active sequence editor
- Verify that your scene has an animation range set
2. Poor Animation Quality
- Try different dithering methods
- Increase the color count
- Check if disposal method is appropriate for your animation
3. Large File Size
- Reduce number of colors
- Increase optimization level
- Consider reducing resolution or frame rate
FPS Adjust
The FPS Adjust feature is a powerful tool that helps you manage frame rates in your GIF animations. It's particularly useful when working with imported GIFs or when you need to modify the playback speed of your animation.
What is FPS Adjust?
FPS (Frames Per Second) Adjust allows you to:
- Change the playback speed of your animation
- Maintain smooth motion when converting between different frame rates
- Adjust the timing of your sequences without re-rendering
When to Use FPS Adjust
1. Imported GIF Optimization
- When an imported GIF plays too fast or too slow
- To match the frame rate with other sequences in your project
- To optimize file size by reducing unnecessary frames
2. Animation Timing Adjustment
- Fine-tune the timing of your animation
- Speed up or slow down sequences without affecting quality
- Match different frame rates in the same project
How to Use FPS Adjust
- Select the sequence(s) you want to adjust in the Video Sequencer
- Set your target frame rate in the FPS Adjust field
- Click the "FPS Adjust" button
- The addon will automatically:
- Adjust the scene frame rate
- Apply speed modifications to maintain timing
- Update the sequence duration accordingly
Important Considerations
1. Strip Independence
- FPS Adjust only works on "independent" strips
- Strips should not be stacked on top of other strips
- If you need to adjust stacked strips:
- Pre-render the timeline section, or
- Create a meta-strip first
2. Sound Synchronization
- Sound strips are automatically excluded from FPS adjustment
- Consider re-syncing audio after adjusting frame rates
- Use meta-strips to keep audio and video in sync
3. Performance Impact
- Adjusting frame rates affects playback performance
- Higher frame rates create larger file sizes
- Lower frame rates might affect animation smoothness
Best Practices
1. Planning Your Frame Rate
- Consider your target platform (web, social media, etc.)
- Common GIF frame rates:
- 12-15 fps: Good balance of smoothness and file size
- 24-30 fps: Smoother motion but larger files
- 8-10 fps: Smaller files, suitable for simple animations
2. Workflow Tips
- Adjust frame rates early in your editing process
- Test different rates to find the optimal balance
- Create a meta-strip after finding the right timing
3. Troubleshooting
- If the button is grayed out:
- Ensure you have sequences selected
- Check that strips are not stacked
- If timing seems off:
- Verify the target frame rate
- Check for any speed modifiers already applied
Common Use Cases
1. Social Media Optimization
- Adjusting frame rates for platform-specific requirements
- Optimizing file size while maintaining quality
- Ensuring smooth playback across different devices
2. Mixed Media Projects
- Matching frame rates of different source materials
- Combining various animations into one consistent timeline
- Maintaining synchronization between elements
3. Creative Effects
- Creating slow-motion effects
- Speeding up time-lapse sequences
- Achieving specific timing for artistic purposes
Discover more products like this
animation tool optimized GIF creation Animation Workflow blender Render 3d artistic rendering frame splitting render animations to GIF GIF dithering advanced animation tools GIF optimization high-quality GIF rendering GIF effects customization blender animation cinematic GIF editing professional GIF tools GIF editor Creative tools dynamic animation export. 3D model for rendering video sequencer Blender video editing GIF rendering GIF customization 3d render frame-level editing GIF compression optimization Blender Productivity Tools color palette editing. blender addon GIF manipulation Blender Plugin FPS adjust Blender creative workflows
