Iclone's Face Puppet In Blender! - Best Facial Animation Tool
How to install and use the addon.
The Face Puppet Tool in Blender is a powerful facial animation addon. Despite its complexity, the installation process is fairly easy. Most of the steps here ought to be done only once. Once you get familiar with the steps, the entire porting process will be taking you a minute.
1. Installation
Inside the package you will find two files:
- FacePuppet.zip
- Full viseme and expressions.iTalk
The former is a blender addon and should be installed normally through Blender's settings -> Add-ons -> Install.
The second file is an iClone/CC4 animation preset and should be drag and dropped on top of your iClone or CC4 character before you export it as fbx (more on that below)
2. Usage
If you have a DAZ character, click here for a porting guide.
Part 1 - CC4 and iClone 8
(click here if you only have CC4)
- Create or customize your character in Character Creator - you can either import an existing one, make your own with sliders or even use the Headshot 2 plugin to convert a photo or mesh into a CC3+ character. Optionally as of addon version 1.6.2, you can import a character from DAZ by following my guide.
Please note that this addon only works properly with DAZ, CC3 and CC3+ characters and ONLY with the CC4 facial profile applied to them. Characters created in CC4 are still CC3+, based on the words of one of iClone developers.
- Make sure to zero out the body animation for your character:

- Apply the extended CC4 facial profile

- Enable wrinkles if needed
- Once your character is ready send them over to iClone 8*
(*) NOTE: If you dont have iClone 8 you can still make the addon work through Character Creator 4 alone. Click here for a full walkthrough.
-
There, first of all set the playback bar to frame 0 (this is important)
- Then, drag and drop the Full viseme and expressions CC4.iTalk file on top of your character. It will load a ton of keyframes
- Optionally, tweak any animations you want as described in the section 4 below.
- Once you are ready, export the character as fbx with the following settings:

Part 2 - Blender
- First install the zip file as an addon. Enable it.
- Dowload and install the version 2.1.7 of the 'CC/iC Pipeline' addon here (it's free): https://github.com/soupday/cc_blender_tools/releases/tag/2_1_7
- Sadly, due to the current CC/iC addon state you can only use it from within Blender 4.2. Please do these steps from within 4.2 and then reopen the project in 4.3, if needed.
- Go to the addon settings and check the 'Shape Keys Drive Head Bone' box:

- After that the 'CC/iC Pipeline' tab will appear. Use it to import the FBX file you created:

- Make sure to check the 'Wrinkles' box if you want to port the wrinkles too. Leave the rest unchecked.
- Then, open the 'Face Puppet' tab and list any hair or accessories that could be affected by the facial expressions. The most common ones are eyebrows, hair, beard, moustache and piercings. NOTE: The more you add the longer the porting will take

- Then, select the armature of your freshly imported character
- If your character has custom mesh names, specify them in the 'Advanced' box within the same tab. This is ONLY needed if you're either setting up a character that was ported from DAZ into CC4 or if you've got more than one CC4 character in your Blender scene. If your character is missing any of the meshes, simply leave that space blank (for DAZ characters it's usually the 'Tearline' and 'EyeOcclusion' meshes that are missing):
- Finally, click on 'Convert CC_Base_Body'. The process will take a few seconds.
Note: Please don't change anything in the character until you are done porting it - don't change any mesh names, bone names, poses, etc. The only exception is if you want to create custom expressions, as described lower.
- After that, you have two options:
- If you had wrinkles enabled in iClone, you may click on 'Port Wrinkles' and wait a couple minutes. Blender will freeze during that time but it's normal and expected behavior.
- If you don't want to port the wrinkles click on 'Finalize' instead.
- Now that the face puppet is ported you can optionally rigify the model and start animating. To do so, switch back to the 'CC/iC Pipeline' addon, uncheck the 'Full Face Rig' box and click on 'Rigify'. You're all set!

- After it's done you can repeat the same porting process with another CC4 character. Please make sure you've done all the steps above before you start porting another character!
Part 3 - Animation
Section 1: Face Puppet
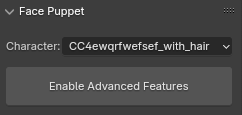
The face puppet panel has a few buttons you can use to switch between different expressions and elements. Simply select the element from the dropdown menu to set it. This will automatically select the icosphere associated with it. By keyframing the position of each icosphere you can keyframe the expressions.

You can move freely the Face Puppet wheel around. If you want to reposition the controllers make sure you select the wheel alone and not the icosphere!
If your scene has more than one Face Puppet-compatible character, you'll be able to switch between them with this dropdown:

Note: Please do not delete, merge or rename any of the collections that start with 'FP_'. Please do not rename your character's armature.
Section 2: Advanced Features


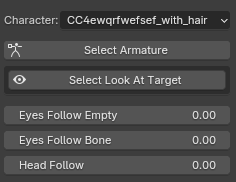
- Eyes Follow Empty: determines how much the eyes of your character follow the empty. Note that this slider will use iClone's Eyes Head (Look Brows), meaning that it will also affect eyebrows, resulting in more natural facial expressions.
- Eyes Follow Bone: If you want to stick to the traditional eye animation instead, you can set this to 1 and use the rigify's 'eyes' bone to control the eyes.
- Head Follow: Defines how much the head bone will follow the 'Eyes Look' empty.

- Auto-Blink allows you to add procedurally generated blinks to the character. You can set the frequency and randomness in the sliders. Pressing 'Set Up Auto Blink' will create the keyframes within the current timeline keyframe range (Fame start and Fame End). Pressing the button again will overwrite any existing auto-blink keyframes within the keyframe range.
- Auto-Look: allows you to add procedural micro-movement to the character's eyes. Won't overwrite any of the existing eye motions. Has two sliders to control the way the keyframes are generated, and an additional one that controls the influence. The influence can be keyframed and changed on the go. For the rest, if you change any of the parameters you'll have to re-generate the keyframes by pressing 'Add Auto-Look' again.
- Both systems allow you to access the generated blink and eye movement keyframes and fine tune them manually.
Section 3: Lip Sync
You can also lip sync with this addon. I use facial shapes that are based off those from iClone. Simply select the character's body mesh, go to the frame you want on the timeline and click the corresponding consonant or wovel.
When clicking on a button the addon will create 3 keyframes - the main one with a default value of 1, and two additional keyframes with a value of 0 - one before and one after. You will notice two sliders - 'Before' and 'After'. These are meant to indicate how long the animation for the inserted keyframes will last.

After you lie down the keyframes, you can go to the curves editor and finetune the strength of every keyframe.
Note: I might overhaul the lip syncing system at some point and make it even easier to use, if there will be demand. You guys let me know if you want it changed or not
Part 4 - Creating custom face puppet expressions
There are several ways you can customize the face puppet expression collection to your animation needs.
4.a iClone
The first way is by creating custom expressions in iClone itself.
- Once you apply the 'Full viseme and expressions.iTalk' on your character, you will find that the expressions are stored on the timeline keyframes - every 10th frame is an expression used later in the Blender's face puppet wheel. Here's a reference spreadsheet to help you with finding the expressions you need.
- You can use iClone's Face Key tool to create your own expressions and facial motions. Just make sure you have the 'Key all Expressions' box checked.
You can even save this italk preset and use it on other iClone characters!

Optionally, you can customize the expressions in Blender.
4.b - Customizing the expressions in Blender
- Once you import the CC3 or CC3+ FBX character through the 'CC/iC Pipeline' addon, you will see that the timeline is filled up with keyframes.
- Just like in iClone, every 10th keyframe represents a pose, with the exception that it starts on the 11th keyframe and not the 10th. So you'd be going for the 11th, 21st, 31st.... 951th keyframes, rather than the 10th, 20th, 30th... 950th. This is due to a peculiarity during the iClone -> Blender conversion. Here's a reference spreadsheet to help you with finding the expressions you need.

- SImply go to the keyframe that represents the pose you want to fine tune; then use the shape key sliders, as well as face bones to achieve the poses you want.
By using this method your custom poses will also create facial wrinkles, when applicable!

- Once you are done you can press the 'Convert CC_Base_Body' button, and do the rest as detailed in Part 2.
- Optionally, you can even change those expressions in the edit mode, though do keep in mind that changes made by this method will not generate any facial wrinkles.
Please let me know if you have any questions, and happy animating!
Discover more products like this
3D Character Animation face parts lip sync face-puppet 3d animation assest 3d animation spring24 daz studio 3danimation bfcm24 facial rig 3D animation tool Daz iclone8-CC4 Iclone 8 and CC4
