Grungit - 1-Click Wear And Tear
How to install:
DO NOT DECOMPRESS THE DOWNLOADED FILE,

Step 1: Go to Edit > Preferences > Add-ons
Step 2: click on "install" and locate the downloaded zip file (Do not decompress it)
Step 3: Click install
Step 4 : Enable it
How to use:
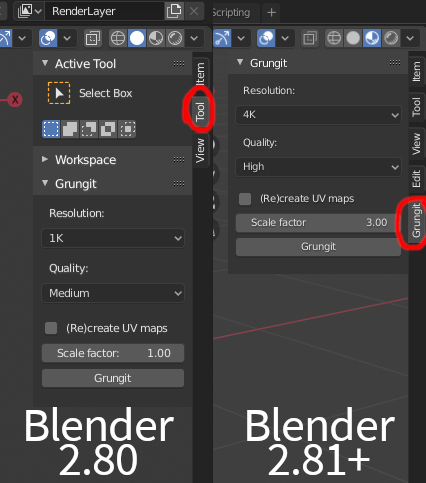
You can find the Grungit panel in the properties panel (shortcut "N"). In Blender 2.80 you can find it under the "Tool" tab, and in 2.81 and it's under "Grungit"
To start, make sure your Blend file is saved, then select one object and click on "Grungit".
The interface will freeze for a few seconds, then that's it, your model has Grungit applied to it.
note: If your model is complex (ie: more than 100K polys without subdivision) and it doesn't have UV's, Blender can freeze for a few minutes. This has nothing to do with Grungit, but UV unwrapping dense models is slow in Blender, and you will be spending more time doing it manually in any case. Additionally, the performance is heavily dependent on your hardware. The tests were made on an AMD Ryzen 5 1600x and a GTX 1060. Better hardware (eg: Intel i7-8700K and an RTX 2060 or better) will finish the task even faster
Settings:
-
Resolution: The resolution at which the required textures (pointiness/cavity and ambient occlusion) are baked. The baked texture is only used for masking, and you can get away with 1K or 2K in most cases, but if your model is extremely complex then you can increase it to 4K or, in extreme cases, 8K.
- Quality: The quality of the bake. It depends on the model complexity, but "Medium" or "High" is a good starting point and a good balance between speed and quality.
-
(Re)create UV maps: If your model doesn't have proper UV's, or you changed the geometry and need to adjust the UV's, you can enable this. It is automatically enabled if your model doesn't have UV's.
-
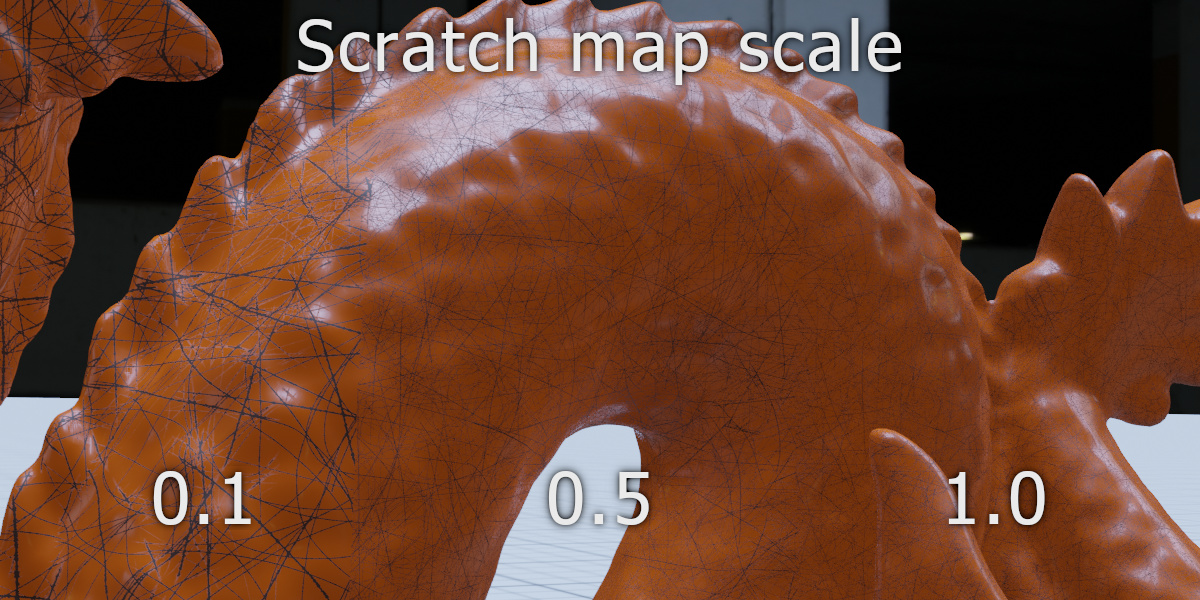
Scale Factor: This applies a scale factor to the effect. A small factor makes the edge wear smaller and sharper (works well for models with small details), and a larger factor makes the edge wear "spread" more.

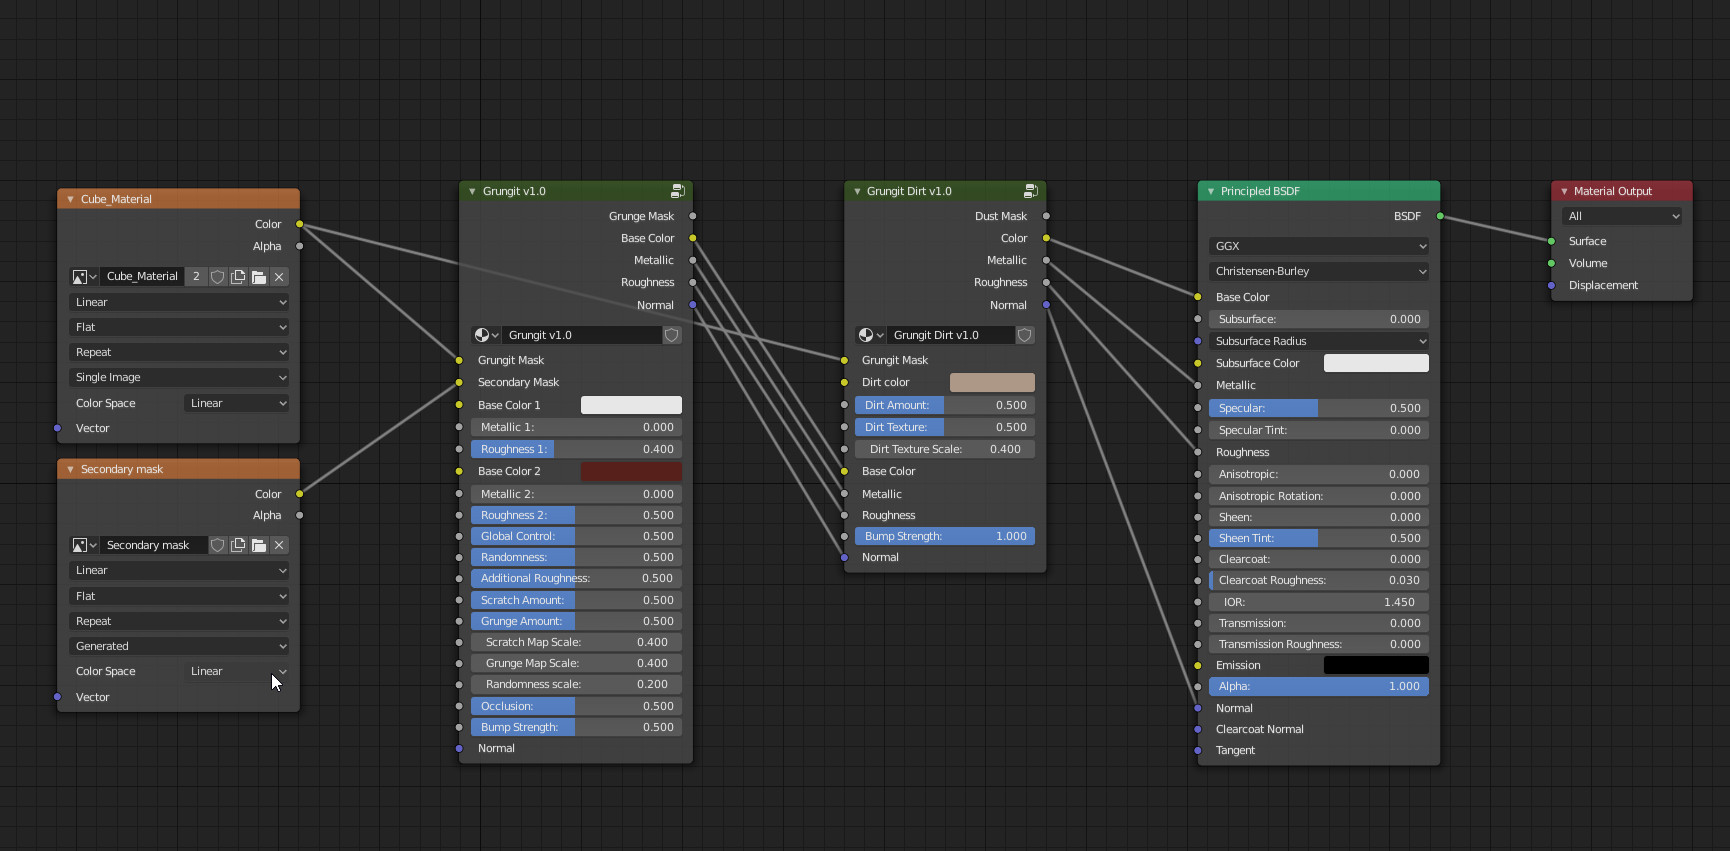
After the process finishes, you can open the shader editor to adjust the parameters and customize it.
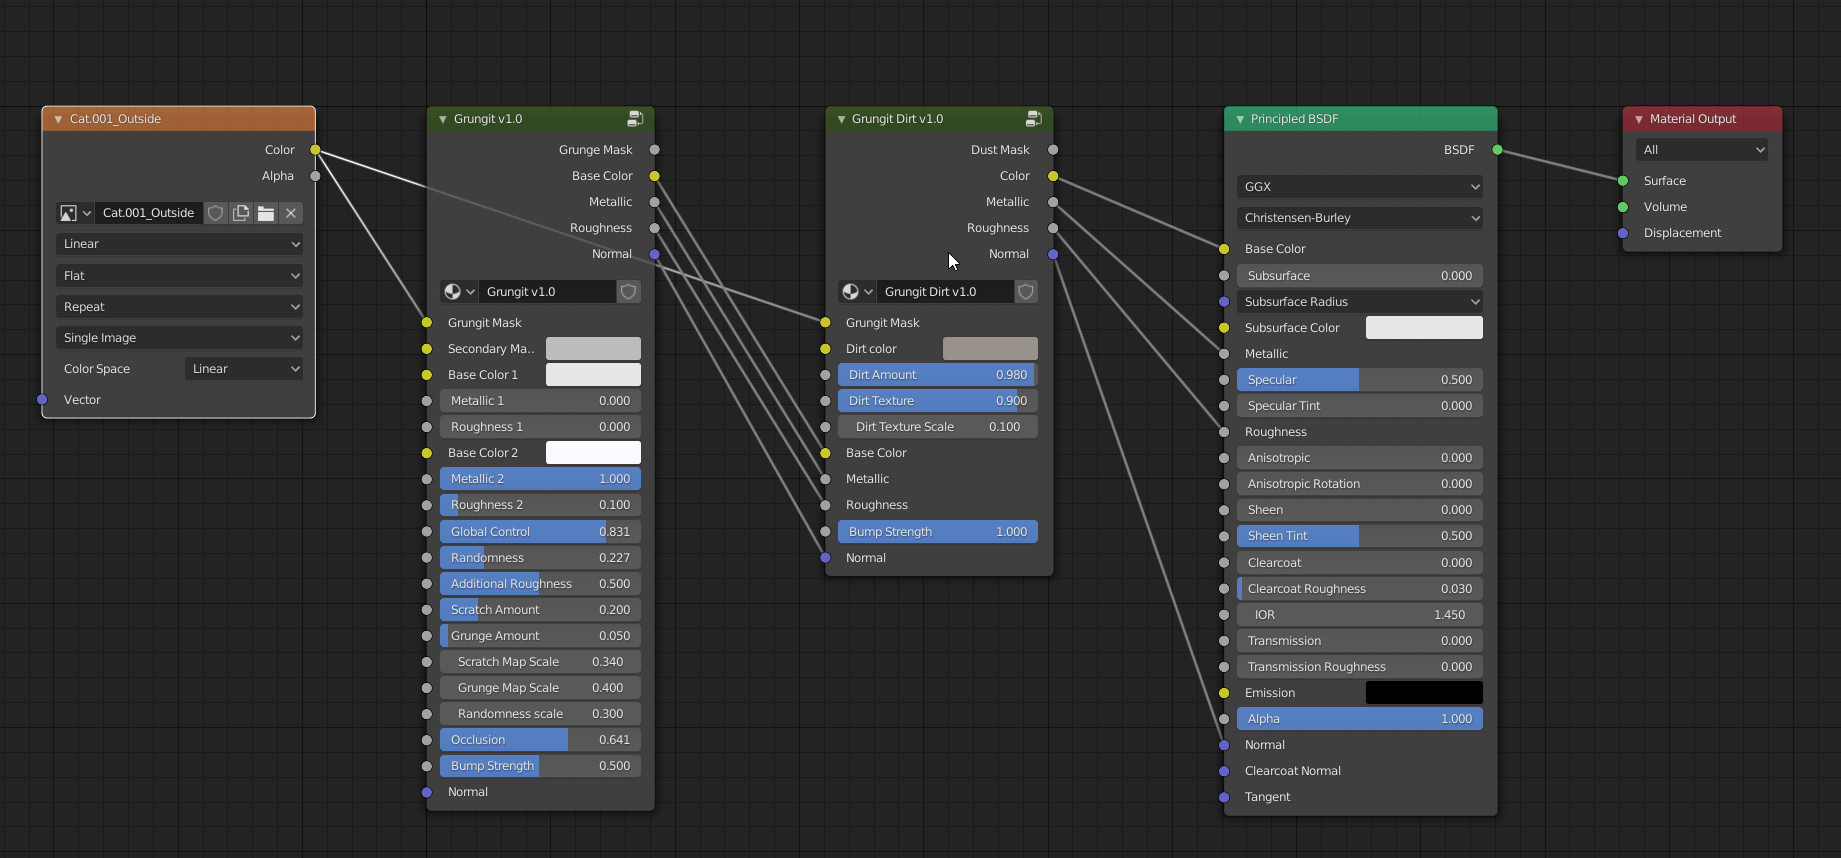
Shader parameters:
-
Base Color, Metallic, Roughness: The standard PBR maps for the top layer (#1) and the bottom layer (#2)
-
Global control : This controls the overall amount of the effect. Use 0 for a clean look and 1 for full damage.

-
Randomness: It randomly removes the effect to create more interesting patterns.


-
Additional Roughness: Applies additional roughness to the material. Perfect for subtle surface imperfections.

-
Scratch Amount: Controls the amount of scratches to add to the model

-
Grunge Amount: Controls the amount of grunge to add to the model

-
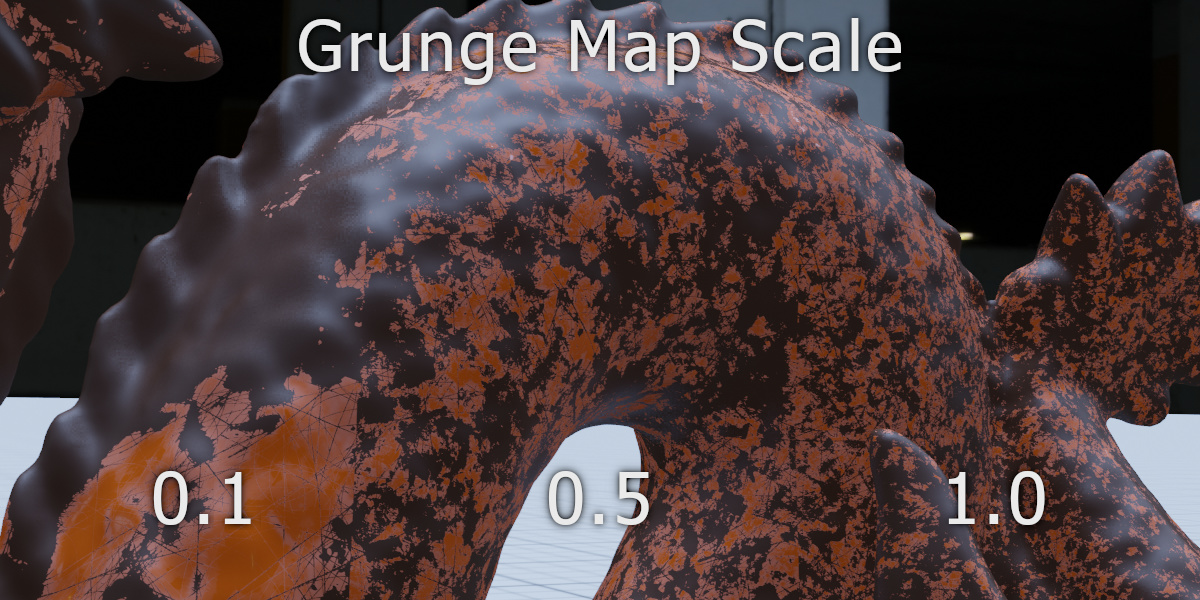
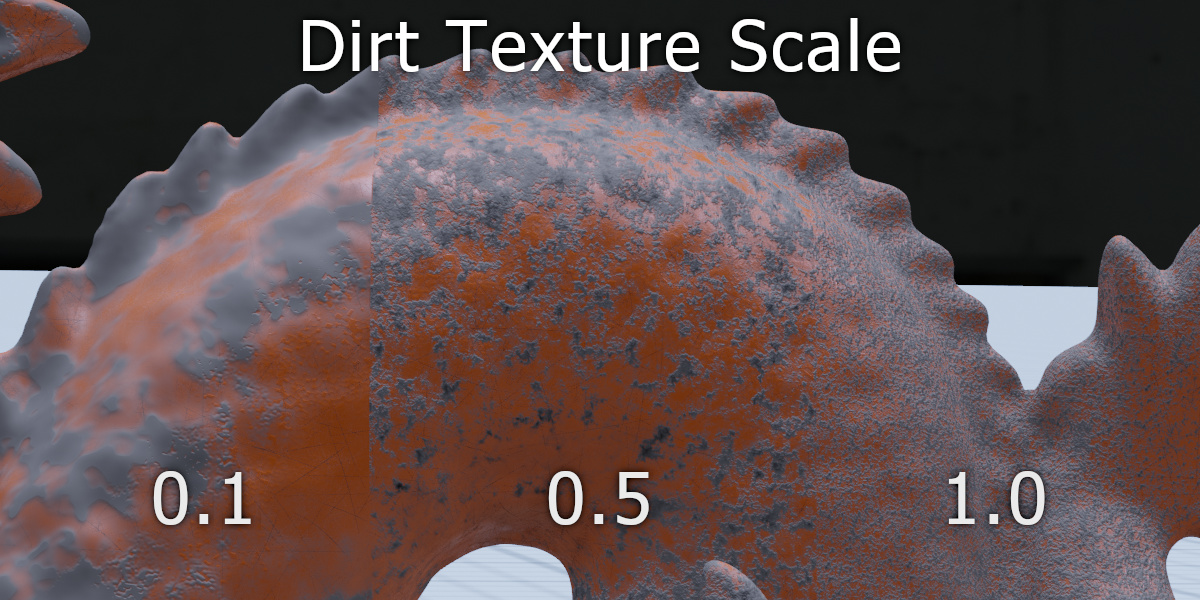
Scratch Map Scale, Grunge Map Scale, Randomness Scale, Dirt Texture Scale: Scale for the different maps

-
Occlusion: This removes wear from surfaces that are hard to reach, which adds more realism

-
Bump Strength: Controls the strength of the bump

Using additional masks:
In order to manually control the effect with a texture, you can create an image texture and connect it to the "Secondary Mask" input of the Grunge node, then you can use texture painting.
A white value increases the strength of the effect (ie: adds grunge and scratches), and a black value removes it. Gray leaves it unchanged.
Discover more products like this
Damage spring24 damaging wear grunge eevee 2.80 edge edge wear plugin pbr-baking summer21 spring22 summer24 PBR spring20 spring23 Automatic bfcm20 blender2.80 summer23 winter24 tearing bcon22 summer22 Blender 2.8 blender2.81 PBR Bake Cycles summer20 mask withering bfcm21 bfcm23 spring21 2.81 loveblender addon masks baking bfcm22 bake masking tear wither wearing