Extra Lights - Photometric Lighting For Blender
 Orange Turbine


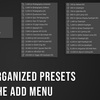
To use, enable the addon and press Shift + A!
Install the provided .zip as an addon by heading to Blender's Preferences, going to the Addons section, and clicking Install in the top right. Check it on once it's installed and save your preferences. Now all lights will be available in your Add menu. You can tweak the values upon creation using the Redo panel in the bottom left.
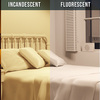
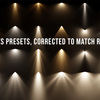
The lights are organized into four categories - natural, incandescent, LED, and fluorescent. To keep things simple I've placed halogen lights under incandescent and metal halide & high intensity discharge lights under fluorescent. They're not technically the same, but for artistic uses they're close enough.
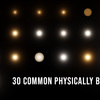
There are four different types of lights according to the addon: Point, Sun, Spot, Area, and IES.
Once added, you can adjust the properties of the light in the Redo panel.
Point Lights
Added at the 3D Cursor.
Lumens - sets the strength of your light using lumens rather than watts.
Set Color With - Choose whether you want to use a Kelvin temperature or and RGB color to color your light. Changing the color in either case will not affect the lumen value (perceptual strength) but will change the watt value (absolute strength).
Use Nodes - This option only works with Cycles since Eevee can't use nodes. It sets the light strength to 1 and the color to white and uses a Lumens Conversion node to drive the strength and color instead. This allows you to change the parameters at any time rather than just during creation.
Set Exposure - Sets the scene exposure to match the newly added light's strength. It's especially helpful for very dim or very strong lights. Using this option will also change the Light Sampling Threshold for dim lights so that Cycles won't ignore samples and thus result in a noisy render.
Sun Lights
Added at the X and Y of the 3D cursor and set to be 10% above the Z location of the camera. They are automatically rotated based on the preset.
Irradiance - set the strength of the light in watts per square meter, which is Blender's usual unit for sun lights.
Color Temperature - Set the color of the sun in Kelvin.
Use Nodes - This option only works with Cycles since Eevee can't use nodes. It sets the light strength to 1 and the color to white and uses a Lumens Conversion node to drive the strength and color instead. This allows you to change the parameters at any time rather than just during creation.
Create Linked Sky - This adds a Sky Texture to the existing world (or creates a new world if needed) and sets up drivers so that the rotation of the sky texture will match the rotation of the new sun object. The properties of the sky are defined in the sun's preset.
Set Exposure - Sets the scene exposure to match the newly added light's strength. It's especially helpful for very dim or very strong lights. Using this option will also change the Light Sampling Threshold for dim lights so that Cycles won't ignore samples and thus result in a noisy render.
Spot Lights
Added at the 3D cursor and rotated based on the light's preset. Flashlights and Headlights are rotated forward for convenience.
Lumens - sets the strength of your light using lumens rather than watts.
Spot Angle - Changes the with of the spotlight cone and compensates for the light lost outside the cone (i.e. the light gets focused as the angle decreases, like in the real world, to keep the number of lumens output the same).
Set Color With - Choose whether you want to use a Kelvin temperature or and RGB color to color your light. Changing the color in either case will not affect the lumen value (perceptual strength) but will change the watt value (absolute strength).
Use Nodes - This option only works with Cycles since Eevee can't use nodes. It sets the light strength to 1 and the color to white and uses a Spot Lumens Conversion node to drive the strength and color instead. This allows you to change the parameters at any time rather than just during creation. The difference between the Lumens Conversion and Spot Lumens Conversion nodes is that the spot one takes into account the spot angle via drivers and automatically compensates for the amount of light lost.
Set Exposure - Sets the scene exposure to match the newly added light's strength. It's especially helpful for very dim or very strong lights. Using this option will also change the Light Sampling Threshold for dim lights so that Cycles won't ignore samples and thus result in a noisy render.
Area Lights
Lumens - sets the strength of your light using lumens rather than watts.
Set Color With - Choose whether you want to use a Kelvin temperature or and RGB color to color your light. Changing the color in either case will not affect the lumen value (perceptual strength) but will change the watt value (absolute strength).
Use Nodes - This option only works with Cycles since Eevee can't use nodes. It sets the light strength to 1 and the color to white and uses a Lumens Conversion node to drive the strength and color instead. This allows you to change the parameters at any time rather than just during creation.
Spread Angle - Lower values throw light forward rather than evenly in all directions. This should be roughly equivalent to the same setting in LuxCore.
Set Exposure - Sets the scene exposure to match the newly added light's strength. It's especially helpful for very dim or very strong lights. Using this option will also change the Light Sampling Threshold for dim lights so that Cycles won't ignore samples and thus result in a noisy render.
IES Lights
IES lights can either be spot or point lights but have their own set of properties when created. If Use Nodes is not enabled, they act just like a regular light. EEVEE does not currently support nodes, so the texture will only appear if using Cycles.
Lumens - sets the strength of your light using lumens rather than watts.
Set Color With - Choose whether you want to use a Kelvin temperature or and RGB color to color your light. Changing the color in either case will not affect the lumen value (perceptual strength) but will change the watt value (absolute strength).
Use Nodes - This option only works with Cycles since Eevee can't use nodes. It sets the light strength to 1 and the color to white and uses an IES Lumens Conversion node to drive the strength and color instead. This allows you to change the parameters at any time rather than just during creation. The difference between the Lumens Conversion and IES Lumens Conversion nodes is that the latter takes an IES file as an input. Since not all IES files have accurate strength values, it may be necessary to lower the IES Texture's strength to match if you are using your own.
Set Exposure - Sets the scene exposure to match the newly added light's strength. It's especially helpful for very dim or very strong lights. Using this option will also change the Light Sampling Threshold for dim lights so that Cycles won't ignore samples and thus result in a noisy render.
Adding Your Own Presets
To add your own preset, head to the addon's directory.
On Windows it's:
User\AppData\Roaming\Blender Foundation\Blender\Version\scripts\addons\extra_lights
On Mac it's:
blender.app/Contents/Resources/Version/scripts/addons/extra_lights
- Open up light_presets.py in a text editor
- Pick which menu you'd like it to appear in, either Natural, Incandescent, LED, or Fluorescent.
- Choose which type of light you'd like it to be, either a Point, Spot, Sun, Area, or IES.
- Copy any of the light types of your choice, including the comma at the end:
- PointLight(
name = '250 lm Vintage Decorative Light',
tag = '250vintage',
radius = 0.025,
temp = 2700,
lumens = 250,
exposure = 6,
),
- PointLight(
- Paste it into the section of your choice. Order does not matter as it will be sorted later by strength.
- Adjust the values to your liking.
- IES lights grab the text blocks from real_lights.blend that share the same name as the light, so add your IES data there as a new text data block and save.
- Quit Blender and launch it again and your new presets will appear.
-
$13.99
-
$27.99
-
$73.99
-
$195.99
Have questions about this product?
Login to message
| Sales | 3200+ |
| Rating | 26 ratings |
| Published | almost 5 years ago |
| Software Version | 4.4, 4.3, 4.2, 4.1, 4.0, 3.6, 3.5, 3.4, 3.3, 3.2, 3.1, 3.0, 2.9, 2.83, 2.82 |
| License | GPL |