Curves To Mesh
Installation
You will be provided with the following files:
- curves_to_mesh.zip - the main add-on file (do not unzip).
- samples.zip - a set of example files for the main add-on.
- animation_nodes_curves_to_mesh.zip - an extension add-on for animation nodes (do not unzip).
- animation_nodes_samples.zip - A set of sample.blend files demonstrating the animation node setup.
Instructions for how to install the add-on and additional features are below.
Main Add-On
Blender 4.2 and Above
Drag and drop the curves_to_mesh installation zip file into Blender to install the add-on.
If you have any issues do not hesitate to get in touch via info@configurate.net.
Previous Blender Versions
The add-on can be installed through the Blender UI:

- Go to Edit -> Preferences.
- Select the Add-ons tab on the left it is not already.
- Select the Install... button along the top.
- This will open a file dialog where you should navigate to where you have downloaded the "Curves To Mesh" zip file. This file should not be unzipped.
- Then, click the "Install add-on from file" button.
- Search for the add-on by typing "Curves to Mesh" in the search box if it does not already appear.
- Make sure the checkbox next to the Add-on (Add Mesh: Curves to Mesh) is ticked.
- Next, search for the name "Curves To Mesh" in the search bar. You should see the add-on entry under "Add Mesh: Curves to Mesh".
- Check the checkbox for this entry.
- The options that appear under the entry allow you to change the colours of the Preview Mode, as well as change the keyboard shortcuts relating to the tool.
Animation Nodes Version

There us a bonus feature in that will allow you to animate and dynamically modify quad curve surfaces using the freely available Animation Nodes addon:

With animation_nodes_curves_to_mesh.zip:
- Make sure you have installed the latest version of Animation Nodes available here: https://animation-nodes.com/#download
- Make sure you have installed the main Curves To Mesh addon as above.
- In Blender, Go to Edit -> Preferences.
- Select the Install... button along the top.
- This will open a file dialog where you should navigate to where you have downloaded the zip file. This file should not be unzipped.
- Then, click the "Install add-on from file" button.
- Search for the add-on by typing "Animation Nodes: Curves To Mesh" in the search box if it does not already appear.
- Make sure the checkbox next to the Add-on (Add Mesh: Animation Nodes: Curves To Mesh) is ticked.
The nodes are described below and have the same parameters as the main add-on.
Tip: to animate bezier curve points, you will need to activate the AnimAll add-on which comes already bundled with Blender:

...you can then add key frames to bezier points by selecting the curve and making sure that the 'Points' checkbox is selected in the tools panel:


Let us know if you have any problems!
Also Recommended...
I recommend you install Add Curve: Extra Objects, available with the standard Blender installation. This will give you a lot more shapes to play with out of the box:

How it works
The add-on works by automatically:
- Creating a set of evenly distributed vertices and edges along the curve(s) you have selected to create an edge loop.
- Then the edge loops will be joined using either a Grid Fill ("Surface to Mesh") Bridge Edge Loops ("Profiles to Mesh" or "Sweep to Mesh") or operation.
The add-on works on Bezier Curves. That is, curves that have control handles along them:
How the vertices are distributed

The add-on distributes the vertices evenly along the curve. This ensures that, when creating a surface, the vertices are connected across edges as smoothly as possible.
This is different from the standard Blender conversion of curves to mesh objects which does not distribute vertices evenly. The distribution algorithm nudges the vertices along the curve until they are equally distanced from one another.
This feature does have a performance impact on more complex curves - to disable the feature, set the nudges parameter to 0.
Use
Introductory Tutorials
Beginner's tutorials are available on YouTube.
Control Panel

The add-on has a set of parameters in Blender's parameter toolbar on the left hand side. If you do not see the toolbar, try pressing 'N'. Select the "Curves To Mesh" tab.
Preview Mode
Enable/Disable Preview mode:

Collection to operate on

By default, the addon will operate on curves in Blender 2.8's default Collection, helpfully named "Collection". If you wish to manage the curves separately, you can add them to a different scene collection and select that collection from the tool's options.
Conversion Method
You can choose different ways to convert curves to a mesh, depending on how they are arranged:

Surface to Mesh
Create a mesh between sets of four interlocking curves:

Options:

- Across: The number of cuts across a mesh surface.
- Down: The number of cuts down a mesh surface (only available when 2 or 4 curves are selected)
- Use Curve Resolution: If checked, Instead of using the subdivision options, use the curve's resolution_u setting found under the standard curve options panel. This is useful for controlling the individual subdivisions on a more complex surface.
- Surface Creation: If selected, Check direction of curve will only create surfaces based on the direction of a curve. Only cyclic 2x2 curves will have surfaces created. Useful for enforcing a particular way of creating curves, such as when a cylinder has ambiguous 2x2 curves:

Profiles to Mesh
Create a mesh between sets of curve cross sections:
Options
- Curve Subdivisions: The number of cuts per cross section curve.
- Bridging Subdivisions: The number of cuts between the cross sections.
- Use Curve Resolution: If checked, Instead of using the subdivision options, use the curve's resolution_u setting found under the standard curve options panel. This is useful for controlling the individual subdivisions on a more complex surface.
- Twist: Similar to how the twist parameter is used in the standard Bridge Edge Loops in Blender, this will control which vertices in both loops are connected to each other.
-
Bridge Ordering: This controls the order in which the curves are joined together:
-
Position: By default, the curves will be bridged by how close they are to one another:

-
Curve Name: The curves will be joined in alphabetic order, so you can control which order the curves are joined by their name. Here the first bridge occurs at the center curve because it's name is 'Bezier Circle 1':

- Reversed: When ordering by Curve Name, this reverses the order of the curves, in case the results appear incorrect (a minor Blender bug)
-
Position: By default, the curves will be bridged by how close they are to one another:
-
Smoothing
-
Smooth Type: This controls the smoothness of transition between the curves. The Surface type in particular will create a smoother transition:

- Smoothness: This is the amount of smoothing factor to apply to the algorithm.
-
Smooth Type: This controls the smoothness of transition between the curves. The Surface type in particular will create a smoother transition:
-
Profile
-
Profile Shape: Shape transition factor for the cross section profiles.

-
Profile Type: The type of profile interpolation used. This can give a range of different effects:

-
Profile Shape: Shape transition factor for the cross section profiles.
Sweep to Mesh
Similar to "Profiles to Mesh" mode, but with the addition of using a guiding curve to offset the shape. Now you can create more sophisticated profiles such as rings and pipes:


Options

- Sweep Curve: This is the main curve for controlling the deformation between cross sections. You can either select the curve from the drop down box or use the eye dropper tool.
- Subdivisions: This is the number of subdivisions for the sweep curve, controlling how many subdivisions between the cross sections.
- Accuracy: This controls the level of accuracy for when cross sections are placed on the curve. Higher values will increase accuracy at the expense of compute time. The default setting should suffice and does not need to be changed.
- Cross Sections: The cross sections are taken from Collection to operate on. The subdivisions setting controls the number of subdivisions on each curve cross section.
- Use Curve Resolution: If checked, Instead of using the subdivision options, use the curve's resolution_u setting found under the standard curve options panel.
- Twist: This will twist the profile curve by a number of degress. Different to the "Profiles to Mesh" setting, this can twist in multiples of 360 degress to produce extreme amounts of twist, allowing you to fashion twisted cables and rings.

Mesh Settings
These control how the mesh will be created:

- Snap to control point: This option will move the vertex to it's nearest control point if it has one. Useful for maintaining shaped:

- Mirror X/Y/Z: Select whether you wish the created mesh to be mirrored along the global X, Y and/or Z coordinates.
- Flip Normals: Flip the faces of the mesh.
- Shade Smooth: Apply smooth shading to the faces of a mesh.
- Show All Edges: When creating a mesh, all the edges will be shown in the wireframe view.
- Show Wire: The full wireframe will be show even in Solid view mode.
Show All Edges and Show Wire can be turned on or off later under the Object panel:

Create Mesh

And finally, you can create the mesh when you are happy by pressing the 'Create Mesh' button, or by pressing Alt-Enter by default.
Other Notes
Suggested workflow
The tool allows you to have a preview mode to interactively work with the mesh as it is created. Once you are happy, you can create the mesh as a single action. You can skip preview mode if you wish.
- Create a curve or curves in the form above.
- You can access the tool either by:
- Pressing Space and type "Curves to Mesh" and select the option.
- Select "Curves to Mesh" under Object -> Curves to Mesh or Curve - > Curves To Mesh.
- By using the following default shortcuts:
- Shift-V: Activate Curves to Mesh Preview Mode.
- Alt-Enter: Create the Mesh from curves.
- There are two options:
- Preview Curves to Mesh: Create an interactive preview of the mesh.
- Apply Curves to Mesh: Skip the preview mode and create the mesh straight away.
Creating Curve Surfaces
In the default "Surface to Mesh" mode, the add-on uses curves to create mesh surfaces. The curves will be in interlocking 'patches', as described below.
To create 4 interlocking curves:
- Ensure that the Snap during Transform magnet icon is selected and that the Snap Element type is set to Vertex. This will ensure you can create a curve that can snap to another curve's corners:


- Create 4 curves and arrange them in a 2x2 layout:

- Note that you can add as many control points as you like to make complex layouts:

- You an also create a network of interlocking 3 sided curves to create more complex surfaces:

Splitting Shapes
You can split the shapes into 4 by selecting the vertices to separate and pressing 'p':

Advanced Parameters
Vertex Settings
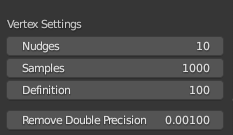
These controls how mesh vertices are created and distributed. It is best left untouched unless you are having some issues with accuracy at smaller or larger scales. Contact me if you are having any issues.
Nudges/Samples/Definition:
These parameters do not normally need to be changed. They control how the vertices get distributed along a curve. It is a non-trivial maths problem to evenly distribute the vertices, as the nature of a Bezier curve is designed to put more vertices along more pronounced part of it. The add-on distributes the vertices along the curve by nudging them along for a set number of times, attempting to make the vertices equally spaced each time.
- Nudges: number of times each vertex is nudges along the curve. Note: By setting the parameter to zero, vertices will be distributed in a more Bezier like fashion.
- Samples: Number of samples between vertices to nudge them along by.
- Definition: How well a point is calculated on a Bezier curve.
Remove Double Precision:
This controls the how close to vertices need to be in order to be merged. Particularly with Surface to Mesh mode, vertices are merged along the edges between curves.
Curve Connections

Decimal places to round to: When calculating the curve intersections, the add-on temporarily rounds the corner coordinated so it can easily find nearby curves. Increasing this parameter will increase the decimal points to corners are rounded to. Increasing this value may be helpful when there are many points that are very close togehter.
Animation Nodes Version
There is also the option to use the add-on as a node in the powerful Animation Nodes Blender extension. This is useful if you want to either create animated effects, or control the effect dynamically as an alternative to the preview mode.
The node is called 'Splines to Surface' and looks like this:

It has the following main inputs:
- Splines: The set of splines to operate on which can be supplied from the Splines from Object node.
- Subdivisions: The amount of subdivisions to divide the resulting quad patched by.
An example nodes set up is shown which is also included in animation_nodes_samples.zip:

Any Questions?
Do not hesitate to get in touch with me if you have a question, a new feature suggestion, or an image you'd like to share. You can contact me through this website, my blog, or by my Twitter page.
Discord
Share your work and get support through the Configurate support channel here.