|
-
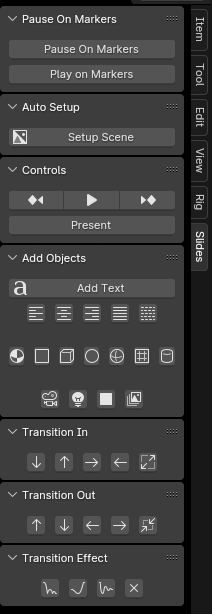
Pause On Markers (Creating "Slides")
- Slides can be any length of time.
- Create a slide by placing Markers on the timeline by pressing "M" with your cursor in the timeline.
-
Auto Setup
- Setup Scene adds a backdrop, two lights and a camera.
-
Controls (Presentation Mode)
- Controls are Previous Marker > Play > Next Marker
- Present maximizes your window and toggles gizmos and overlays to off.
- Make sure you are in Camera View when you click on Present.
-
Exit "Present" mode press Ctrl+Atl+Space
-
Toggle Overlays with Shift+Alt+Z
-
Add Objects
- Add text
- Add material - plane - cube - circle - sphere - grid - cylinder
- Add camera - light - backdrop - image
-
Transition In
- Animate in from above.
- Animate in from below.
- Animate in from left.
- Animate in from right.
- Scale in from 0.
-
Transition Out
- Animate above and out
- Animate down and out
- Animate left and out
- Animate right and out
-
Transition Effect
- Add bounce effect
- Add back effect
- Add elastic effect
- Cancel effect
Troubleshooting:
If your timeline Playback is set to Skip Frames, Slides will only stop on marker if Blender isn't skipping that frame.
(Make sure Playback is set to Every Frame)
|
|
|