Newgrowth Interactive Trees
This manual is also included as a .pdf file in the download.
NewGrowth user manual
NewGrowth is a Blender add-on that lets you draw trees interactively. Using brush strokes you can direct the growth of twigs and let them grow into branches. You can prune existing branches as well. NewGrowth gives you full control to create unique trees with real character.
Once a tree is created many aspects of the generated mesh and leaf particle system are parameterized, like the overall thickness of the trunk or the amount of tiny twigs that are pruned, giving you control over your creation even after you have saved the result.
NewGrowth is designed for intuitive drawing and comes with on-screen help as well as a comprehensive manual.
"The best time to plant a tree was 20 years ago. The second best time is now.”
― Chinese proverb
"You know me, I think there ought to be a big old tree right there. And let's give him a friend. Everybody needs a friend."
― Bob Ross
Changelog
Version |
Date |
Comments |
201812241608 |
24 December 2018 |
Initial BlenderMarket release |
201908301018 |
31 August 2019 |
2.80 port |
201909041709 |
7 September 2019 |
Exclusion zone support and bug fixes |
202007271434 |
31 July 2020 |
Added a new final trunk mesh model based on curves and added a twig option. Also added experimental options for straight weight and apical control and made more draw settings interactive. 2.83 LTS compatible |
From interactive tree drawing, to configurable mesh to end result in a few simple steps.
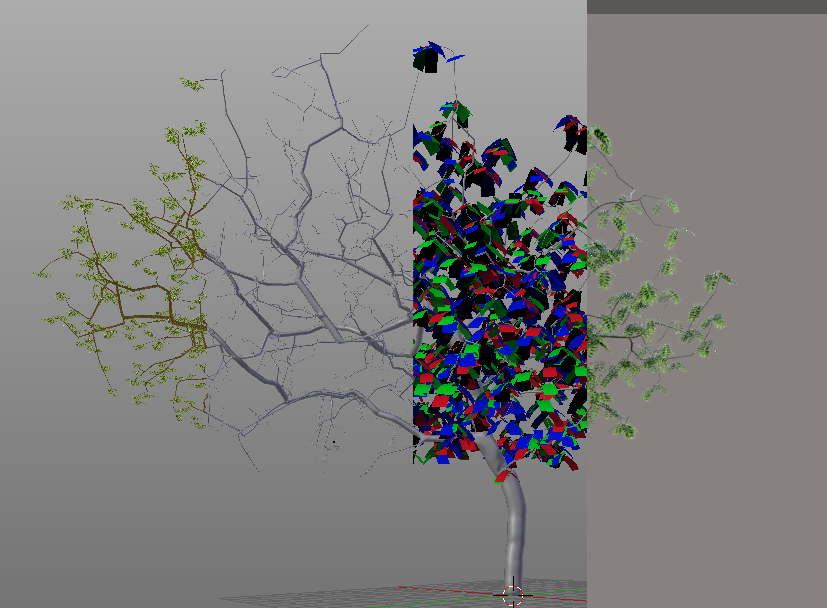
Table of Contents
🔗 Changelog a bit of history
🔗 Installation for new installations and updates
🔗 Workflow how to use the add-on
🔗 Interactive options / keys all drawing options
🔗 Tree options all tweakable options in the final tree
🔗 Add-on preferences general behavior of the add-on
🔗 Frequently Asked Questions some common questions (and answers)
🔗 Credits cc0 assets used that deserve mention nonetheless
Installation
First time installation
Installing NewGrowth for the first time is simple:
Unpack the .zip file
you probably already have done that as it contains this document (NewGrowth User Manual.pdf) and the add-on itself (another .zip file, newgrowth.zip)
Select Edit → Preferences ... → Add-ons from the menu
Click ‘Install …’ (at the top right) and select the file newgrowth.zip
Click ‘Install Add-on from file ...’ (at the top right)
Check the enable check box to the left of the add-on you just installed
The add-on will add an Add → Add Mesh → Tree entry to the Add menu in the 3D-view.
Several NewGrowth management panels will be available in the ‘NewGrowth’ tab in the tools region of the 3D-view (if the tools are not visible press N).
Installing a newer version of NewGrowth
If you want to replace a previous version of NewGrowth you have to remove the old version first. To do this, go to Edit → Preferences ... → Add-ons and either search for NewGrowth or go to the ‘Add mesh’ category where it will be located. Click on the add-on and then on the ‘Remove’ button. After removing the old version follow the instructions above to install the new version.
Workflow
When creating a tree, the workflow consists of two steps: drawing a tree interactively and then finalizing the result. In this short video this is shown step by step for a simple tree
There is also a video available with a more extensive overview of all the features
Interactive drawing
A new tree can be drawn by selecting Add → Add Mesh → Tree from the menu in the 3d-view. This will position the root of the tree at the location of the 3d cursor.
Drawing the tree consists of painting virtual points of light to which the tree will grow its branches and leaves. The points of light are positioned randomly in a small radius around the cursor when you press the left mouse button.
You can change the view in the usual manner with the middle mouse key and others.
When you are satisfied with the result you can press Enter to produce the final tree. You also press Esc to discard the tree.
Positioning the cursor
New light points are painted at the cursor in a plane perpendicular to the view. This plane passes through the 3d cursor. This setup closely resembles the way the grease pencil works. This means that if you paint new light points the growing branches are more or less aligned with this plane. If you rotate the view the plane rotates with it and this will mean that subsequent strokes might result in branches along a plane too far from or too close to the camera.
Now if you want to grow multiple branches from the same point you can position the 3d cursor anywhere on an existing branch by simply shift right clicking on a branch to snap the 3d cursor. Rotating the camera and painting new light points will then cause new branches to form perpendicular to the camera, a setup that is especially convenient if you lock the view to the 3d cursor (an option always available in Blender’s view options).
Pruning
Many trees in real life have a characteristic silhouet because of pruning, either by natural causes like storms or by human intervention. In NewGrowth you can prune a branch by shift right mouse clicking the point where you want to cut and then removing the branch by pressing K.
Pruning will remove a branch but not affect the thickness of existing branches or the trunk, it acts like you have sawn off a piece. If you want to remove a branch you just added but don’t like, you can press Ctrl-Z to undo your action.
Adding a new root or trunk
When you start drawing a tree interactively, the root of the tree will be positioned at the 3d cursor. You are not limited to a single root however: pressing R will add a new root point at the position of the 3d cursor which makes it easy to create multi-trunk trees or bushes.
You can move the 3d cursor with a shift right mouse click. If you click outside a branch section a popup will remind you that you are not actually selecting a branch (so for example pruning will not have any effect) but the cursor is positioned nevertheless.
Controlling the brush
The way light points are positioned by the brush greatly influences the shape of branches and the overall look of a tree: putting down lots of light points with a wide brush while moving slowly will give you a bushy tree with lots of small branches and many leaves, while a smaller brush with a slower flow rate may result in straighter branches.
While drawing, the shape of the brush can be controlled by the following keyboard shortcuts:
Ctrl numpad + - will change the radius or size of your brush
Alt numpad + - will affect the flow rate, i.e. how quickly light points are produced while drawing
Shift numpad + - affects the hardness of the brush
All effects are visualized in the shape and opacity of the brush.
Tip: start with a small brush
In a typical workflow you may want to start with the general shape of the tree by drawing its branch skeleton first. If you choose a wide brush however this will result in many small side twigs and lots of leaves. So in general it might be a good idea to keep the brush size fairly small with a moderate flow to start with to allow for relatively straight branch segments at first. In the final stages you can then widen the brush and maybe increase the flow rate to give bulk to the crown. Remember that after you have finalized your tree it will still be possible to change the particle system used for the leaves so you will have some control still, but you will no longer be able to change the structure of the branches.
The exclusion zone
Before you start drawing you can select a collection in the Draw Options panel. If a collection is selected here, branches are prevented from growing into (mesh) objects that are part of this collection. This makes it possible for example to guide (or train as some gardeners call it) branches along a wall.
Segment length and Kill distance
These options directly influence the tree drawing algorithm. A shorter segment length gives more detail and in combination with a smaller kill distance will in general create a bushier tree. You should experiment with these settings to get a feeling for their behavior.
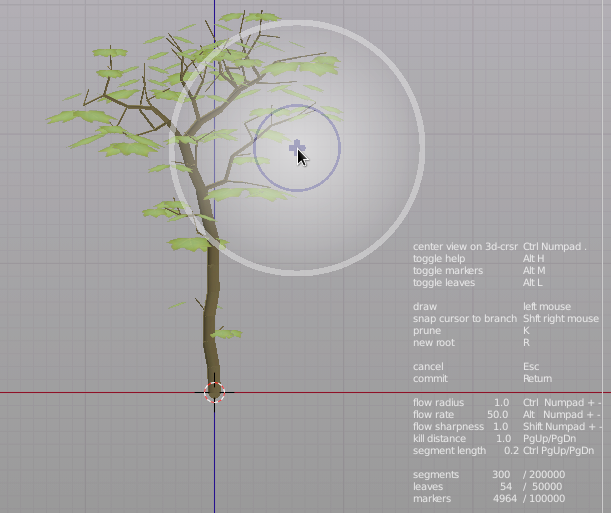
While drawing the kill distance can be changed with PageUp/PageDown and the cursor gives an indication of the size of the kill distance with a dark ring.
The segment length can be changed with Ctrl PageUp/PageDown and the cursor gives an indication of the size of the segment by a dark cross.
(Kill distance gets its name from its effect: it determines how many of the virtual light points you are drawing are killed when a growing branch moves towards them.)
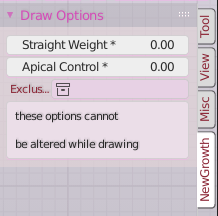
Straight Weight and Apical Control
[These two options are considered experimental. Their behavior may change in future versions!]
These options influence the overall shape of branches. A higher straight weight will give straighter branches (branches that tend to run in the same direction for longer) while more apical control will reduce the number of side shoots from a growing branch. These options are not changed interactively but should be set before starting to draw.
Thickness and Leaf size
These options determine how a tree is displayed during the interactive drawing process. They do not influence the final look of a tree.
During drawing the thickness can be changed with Ctrl-up arrow/Ctrl-down arrow, the leaf size with Shift-up arrow/Shift-down arrow.
Finalizing the result
When you are done drawing the tree and satisfied with the result you can convert your tree to an actual object in the scene by pressing Enter.
This will result in a mesh object that shows just the skeleton of the branches. Don’t worry though, there is a lot of information stored along with this skinny tree: it is in fact a parameterized object. This means it comes with a set of properties that you can keep on tweaking, like the diameter of the trunk, the particle system used for the leaves, etc. Even after you have saved your .blend file these properties can be changed.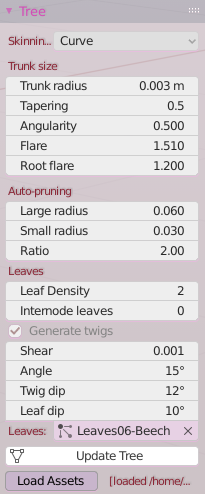
The properties of the tree are available in the NewGrowth tab in the toolbar. (Press N if the toolbar isn’t visible).
If you change any of the properties you need to click the Update tree button to see the effect. This is because generating the mesh for the bark can take quite some time on a slower computer and rapidly changing values may slow down Blender to a halt.
The defaults are chosen to match the interactive look as well as possible. Most properties will not alter the general look and feel of the tree but changing the particle system or the material of the bark will of course have a large visible impact.
The final tree consists of several objects, all grouped together and parented to the tree skeleton: the tree mesh itself, a mesh or curve object representing the bark and a mesh of small quads that acts as the leaf emitter. The latter two will be regenerated/replaced every time you click Update tree. Note that the properties are associated with the tree skeleton mesh and will only be visible if you have selected this object.
The way the trunk is modeled depends on your choice in the drop-down menu: the Curve option is the default and generates a curve object. Any twigs that are generated will also be part of this object. The Fork-Knee and Ball-Pipe methods will generate a mesh object and a separate mesh object for any twigs.
Adding leaves and bark
After finalizing the mesh one of the objects that is created is the leaf emitter mesh. It will have a particle system with the correct number of particles. If you choose particle settings from the Leaves drop down, an unique copy will be generated for this with all the settings. If you left this empty, default particle settings will be generated that show leaves as just halos.
You can change this particle system to anything you like and it will stay associated with the tree. This means that if you update the tree and the number of leaves changes for example, this will be reflected in your particle system.
You can use your own particle system but if you click the Load Assets button a few bundled particle systems will be appended to your .blend file. These can then be selected in the Particle Settings selector of the particle system or from the Leaves dropdown where you can click Update Tree.
The same goes for the material assigned to the trunk. Once you add a material to the trunk mesh or curve, this material stays associated with this object even if you update your tree.
Interactive options / keys
Once in interactive mode you have several options to change the behavior of your brush and several other things as well. Most common options are shown in a handy on-screen help that can be hidden if you wish by pressing Alt H.
Draw |
left mouse |
|
Snap cursor to branch/ position 3d cursor |
Shift right mouse |
|
Accept drawn tree |
Return |
Converts to skeleton mesh |
Cancel and discard drawn tree |
Esc |
|
Flow radius |
Ctrl numpad + - |
|
Flow rate |
Alt numpad + - |
|
Flow hardness |
Shift numpad + - |
|
Kill distance |
PageUp PageDown |
Increase or decrease the kill distance |
Prune |
K |
|
New root |
R |
|
Undo |
Ctrl-Z |
|
Toggle marker visibility |
Alt-M |
markers are a synonym for lightpoints |
Toggle leaf visibility |
Alt-L |
|
Toggle on-screen help |
Alt-H |
|
Change trunk diameter |
Ctrl Up/Down arrow |
Only affects interactive draw, not the final tree |
Change leaf size |
Shift Up/Down arrow |
Only affects interactive draw, not the final tree |
Center view on 3D cursor |
Ctrl numpad . |
Tree options
After a tree is drawn you can add a bark material and leaves to the generated tree. In fact you can keep on changing some parameters even after you have saved the tree. The following options are available in the NewgrowthTreePanel and will affect the look of your tree when you click Update Tree
Radius
Controls the overall thickness of the tree trunk and branches.
Taper
Controls how fast or slow the thickness of branches tapers towards the tips. The default value of 0.5 is often a good starting point because it conforms to the so-called pipe model of sap transport in many trees.
Skinning method
The curve model generates a trunk based on bezier splines. It generates a good looking tree quickly and allows you control over the poly count (via the u and v subdivision settings in the curve properties panel). A few configuration options are different from the other models.
The ball-pipe model generates a fast, relatively low poly trunk, while the fork-knee model gives a slightly higher poly count but better mesh that is somewhat slower to generate for large trees. The fork-knee model also offers some additional options to control the overall appearance of branches and small twigs.
Tightness
[Fork-Knee model only]
Controls how sharp the joint between a branch and a twig looks.
Leaves
Lets you select a particle system to be used for the leaves.
Autoprune options
Auto Pruning removes very small twigs that are attached to very large branches. This can be used to get a clean lower trunk for example if it sprouts some small errant twigs. This behavior can be controlled with the following settings:
Larger radius
Only twigs connected to branches with at least this radius will be considered
Smaller radius
Only twigs with a radius less than this will be considered
Ratio
Twigs where the ratio of their radius to the radius of a bigger branch is smaller will be removed.)
Smooth
[Not available for the curve model]
Sets the number of smoothing iterations for generated branches. Any non-zero value will likely prevent straight angles in twigs; values higher than 1 do not in general give a notable different effect.
Wiggle
[Not available for the curve model]
Adds a tiny amount of randomness to branch segments to prevent unnaturally looking long straight sections.
Leaf density
The number of branch segments counted from the tip which will have leaves attached. Set to 1, only the very tips will carry leaves.
Internode leaves
If non zero will generate leaves or twigs halfway down a branch segment as well.
Shear
At a value of zero, leaves or twigs will be generated at exact opposite locations. Increasing this value will cause them to sprout at alternate locations.
Generate twigs
If checked twigs instead of leaves will be generated where each twig consists of three leaves joined by a slim cylindrical mesh.
Flare
[Only available for the curve model]
Larger values will make the connection of a branch to another branch wider.
Root flare
[Only available for the curve model]
Larger values will make the root segment wider.
Angularity
[Only available for the curve model]
Influences the sharpness of bending sections of branches.
Mesh details
Once you have clicked Update tree the final result consists of several objects, the skeleton, the skin, the leaves emitter and optionally the twigs mesh. The last three are parented to the skeleton:
Tree skeleton
Contains just vertices and an edge for each branch segment. It also contains two custom integer vertex layers: Radius and Parent, and a custom float vertex layer: Distance. They hold the total number of connected branch segments, the index of the parent vertex and the shortest distance to a root respectively. The information in these layers is used to produce the other objects and their uv-maps and can only be accessed programmatically.
Tree skin
Is generated from and parented to the tree skeleton. It is either a Curve object or a Mesh object.
Curve object
This object is a curve object with a separate bezier spline for each branch. An uv-map is implicitly generated (as with any curve object). The u (horizontal) coordinate will run along the length of the branch with the 1.0 value at the tip. The v (vertical) coordinate will run around each branch.
Mesh object
It is an all quad mesh that represents the bark of the tree. It is created with two uv-maps, UVBark and UVBark2 and a vertex color layer VColBark that you may use in materials.
UVBark contains the uv coordinates for each branch segment. All branch segments are cylinders that map to these same uv coordinates. This is useful when applying tiled bark materials.
UVBark2 also contains uv coordinates and the u coordinate is the same as in UVbark but the v coordinate is the distance to the root segment. This way you may for example overlay tiled textures with another texture that changes from root to branch tip or you can use this map directly with a tiling bark material.
The VColBark vertex color layer contains information about the mesh in different channels:
Red - holds the radius or thickness of a branch
Green - holds a unique value for regular branches, tips and pruned caps. This makes it possible to let a material switch between textures for example. Regular branch sections have a value 0.0, tips a value of 0.5 and the end of pruned branches a value of 1.0
Blue - reserved for future use.
Leaves emitter
This mesh is the basis for a leaf particle system. It has two vertex groups, tips and notips. These allow you for example to add two particle systems, each with different leaf sizes restricted to the appropriate group maybe or anything you can come up with.
Twigs mesh
If the generate twigs option is checked this mesh will hold the geometry of the meshes. This mesh is not present if the curve model is chosen (then the twigs will be part of the curve object that represents the trunk).
Add-on preferences
Leaf material / Bark material
The texture sets used to display leaves and bark during interactive drawing.
Help color
The color and transparency of the on-screen help text that is available when drawing.
Dead marker / Live marker / Marker size
Allow control of the markers if they are shown (Alt-M)
Show development info
When checked a panel with timings will be shown in the 3d-view
Persistent trunk material
When enabled (the default) click Update tree will try to copy a material that is already present on the trunk mesh. This is convenient because adding a material to a mesh object will associate that material to the mesh data by default and not to the object so it will be removed when the mesh data is replaced by another mesh.
Memory limits
If your computer is limited in RAM or GPU memory and NewGrowth crashes Blender, you might lower these values. The default values are pretty generous so even when you halve these values you should be able to draw a fair sized tree.
Credits
Some of the assets included in the add-on are based on textures from CC0Textures.
| Sales | 20+ |
| Dev Fund Contributor | |
| Published | over 5 years ago |
| Blender Version | 2.79, 2.8, 2.83, 2.93, 3.0, 3.1, 3.2 |
| License | GPL |
Have questions before purchasing?
Contact the Creator with your questions right now.
Login to Message